

TL;DR:
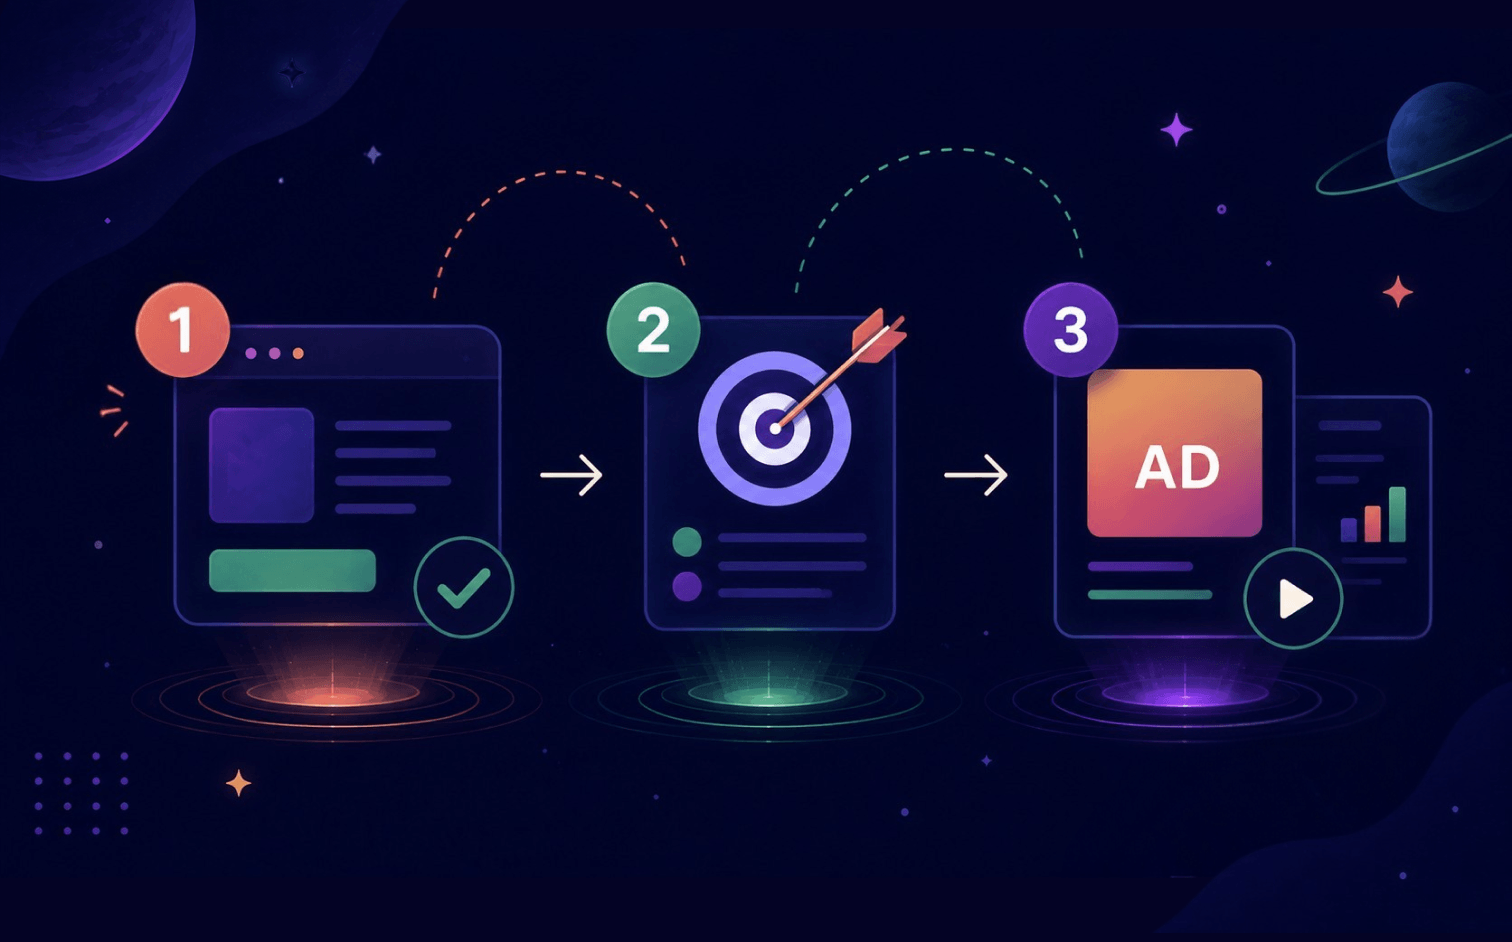
A programmatic campaign runs in three stages.
Preparation: pick one goal, choose a format (display, video, native, CTV), sign up for a self-serve DSP, build your creative.
Launch: set your CPM bid, build an audience, select SSP traffic sources, create a budget, upload creative. (Takes under 30 minutes on a $100 deposit in Epom DSP.)
Optimization: wait for enough data before optimizing, then use bidding rules to automate exclusions and bid modifiers to adjust spend on specific placements.
Epom DSP runs Pixalate fraud protection at pre-bid (blocks flagged inventory before spend) and post-bid (measures viewability after delivery). Add pixel or S2S postback tracking to optimize toward conversions.

Meta or Google Ads is the usual gateway to advertising. Then, as your business grows, you see that your inventory is locked inside the platform, and you have no control over CPMs or placement of your ads. Programmatic solves these pains; want to know how to set it up? Then read on.
When limits and overpriced advertising space become a pressing matter, expanding into programmatic ad buying looks like the way. And it is.
Here is a stopper for many, though. A common misconception says that programmatic is a technically complicated and budget-demanding game. Like someone handed you the controls of a helicopter when you've only ever driven a car.
That opinion mostly tells about huge enterprise platforms like DV360 or Amazon DSP. Rest assured: no one is going to use them today. Meanwhile, running ads on simpler ad platforms is more like upgrading from a sedan to an SUV — a bit more volume, yes, since programmatic reaches the open web ad exchanges, not just fenced territory of one corporation.
The fact: if you've launched a campaign in Google Ads or Meta account before, you already intuitively know how to handle programmatic too.
Today we'll walk you through creating your first programmatic campaign from scratch, using Epom self-serve DSP as the example tool. Half an hour from now, you will be able to win ad placements on the open web and stay in control of your campaign performance.
At Epom, we help 350+ global companies make the most of their programmatic ads - chat with our managers today to find out how it can work best for you.
⚠️Disclaimer: If you have already defined the goal of your digital advertising campaign and have a creative ready, feel free to skip the preparation stage and go to the launch section straight away.
Step #1: Preparation & Defining Your Programmatic Advertising Strategy
NASA says it takes 8.5 minutes for an average shuttle to reach orbit. For comparison, it takes 18 months to craft a satellite-carrying rocket such as Falcon 9, and over 5 years to build a functional shuttle. Launch stage = 8.5 minutes. Preparation stage = 788,401 minutes.
Even though you don't need to spend 18 months to launch ads in programmatic space, preparation will still take at least 10x more time than setup, which can take merely 30 minutes. Before you even start examining the platform's dashboard, let’s figure out your campaign strategy first.
Set Your Programmatic Advertising Goals
If you've run campaigns in a Meta account before, you've already done this. Meta asks you upfront: are you optimizing for traffic, purchases, or impressions? You pick one campaign goal and the algorithm does the rest, deciding who sees your ad and finding a way to hit your key performance indicators.
Programmatic works the same way. You define what you're trying to achieve before you touch any campaign parameters. First, you shape audience targeting, budgets, and what you measure as campaign success.
Most programmatic marketing campaign goals fall into one of these:
- Get your brand in front of new people. Pick reach if you want visibility among audiences who haven't heard of you yet, across the sites and apps they visit.
- Drive leads to your site. Let's say, you want more visits for lead generation. Pick clicks for someone seeing your ad and landing eventually at your target page.
- Get a specific action. It can be a purchase, a signup, an install. If you choose sales as your goal, you're paying or optimizing for tangible results.
- Re-engage people who already know you. They visited your site, used your app, or interacted with your brand. Programmatic lets you find them again through retargeting.
Setting clear goals and KPIs is essential for a successful programmatic advertising campaign. If you want to increase brand awareness, you set broader targeting and focus on ad impressions. And if you're favoring customer acquisition, you'd like to personalize ads and pick narrow audience segments more carefully.
Display Ads or Something Else? Choose Your Ad Format
Most programmatic platforms support the same core formats. Here's what each does and when it makes sense.
| Format | What it is | When to use |
|---|---|---|
| Display | Banners and responsive units across web and app advertising inventory. Simplest format, lowest production cost. | Brand awareness, any campaign where reach matters more than engagement. |
| Video | Pre-roll, mid-roll, and outstream placements. Higher production cost, higher engagement. | Product demos, brand storytelling — anything a static image can't carry. |
| Native | Native ads match the look and feel of the page. Less intrusive, tends to drive higher quality traffic. | Driving visitors who actually engage with what they land on. |
| CTV | Ads on connected TV and streaming platforms. Major channel on larger DSPs. | Extending reach beyond web pages and apps. |
| DOOH | Digital billboards, transit screens, retail displays bought programmatically. Not supported by every DSP. | Location-based awareness campaigns at scale. |
Epom also supports interstitial and push, which are useful for performance-focused campaigns targeted at niche audiences.
Choose your format, then build your creative. Depending on what you're running, this takes anywhere from a few hours to a couple of weeks.
Sign Up for The Right Demand-Side Platform
Demand-side platforms (DSPs) are programmatic software that advertisers use to buy traffic in various ad formats from a large pool of digital publishers. Choosing the right demand-side platform is a critical step in setting up a programmatic campaign.
There are dozens of DSPs on the market. The large enterprise platforms like The Trade Desk, DV360 or Amazon DSP are built for teams with dedicated ad ops, managed contracts, and five-figure monthly programmatic spend.
If you're testing for the first time to find out what benefits of programmatic are out there for you, they're not the right starting point. Their interface is complex and the entry bar is high.
For a first campaign, you might want a self-serve platform where you can sign up, load a test deposit, and see how it works without a sales call or spend commitment.
Before you register anywhere, check that the platform has:
- No platform fee to get started
- Basic targeting available: location, OS, browser, language, device.
- At least 20-30 SSP integrations for meaningful inventory access
- Real-time, transparent reporting with source visibility
- Support for standard IAB formats
- Access to your own campaign data
- Live support when something isn't working
- Machine learning algorithms for automated bidding optimization
For this guide, we're using Epom DSP, as it fits all of the above and you can get started with a $100 deposit. You can create your account now and follow along the steps inside the platform we show in the next chapter.
Step #2: Setup & Launch of a Programmatic Campaign
You've picked your format, set your goal, and signed up for a platform. Now you build the campaign. In Epom DSP, setup follows a linear flow — six tabs, each one a separate decision. Work through them in order and don't skip the audience step.
We'll use a banner campaign for an online gadget store targeting shoppers in Western Europe as the running example.
1. Choose Your Display Ad Creative Type

The first screen asks what format you're running. Pick Banner for this campaign.
Desktop banner icon
Name your campaign, assign it to a folder, and set your default bid price.
For a programmatic ad buying campaign in eCommerce, $1.50–$2.50 CPM is a reasonable starting range for Western Europe. You'll adjust once you see which traffic sources perform.
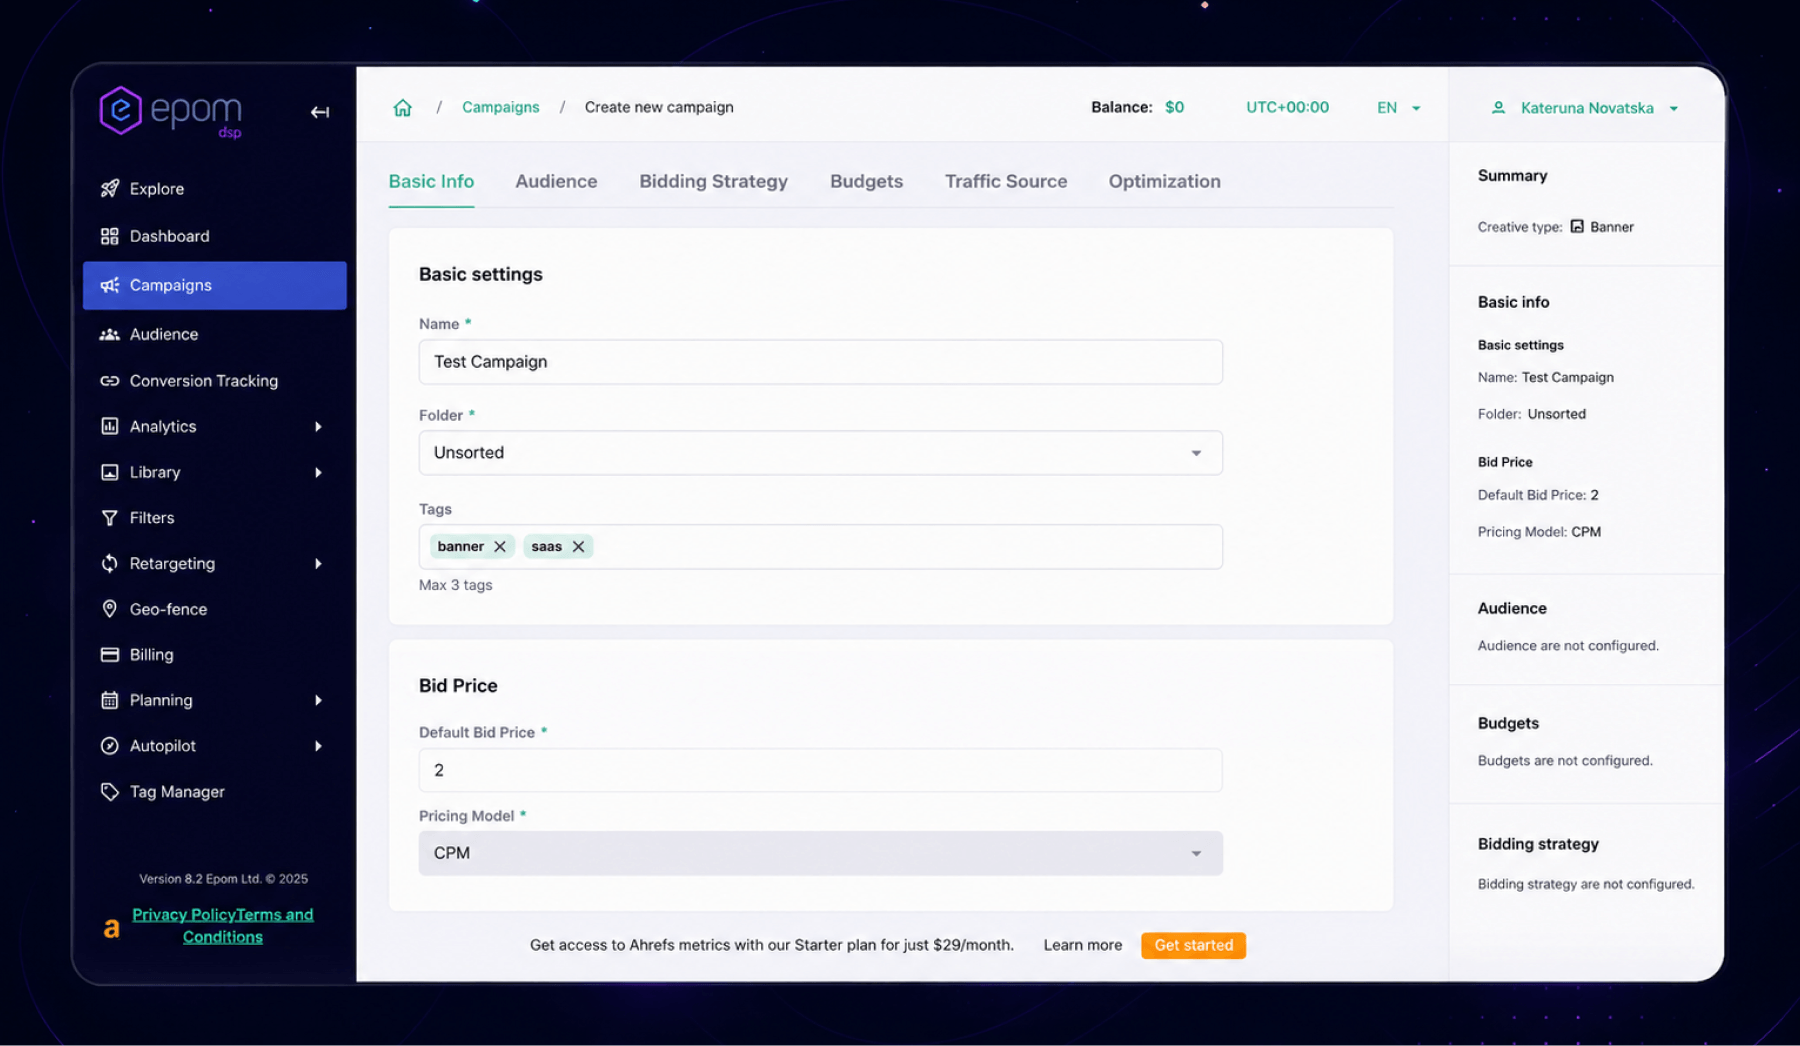
Your bid is the CPM you're willing to pay per 1,000 impressions from the open ad inventory. In most real-time bidding auctions today, you pay exactly what you bid — so set a price you're comfortable to spend.
However, some supply-side platforms still operate under the second-price auction rules, where you pay just above the second bidder's CPM. They are in the minority in 2026, though. You can clarify this by asking your DSP account manager about what type of real-time bidding each supply partner is using.
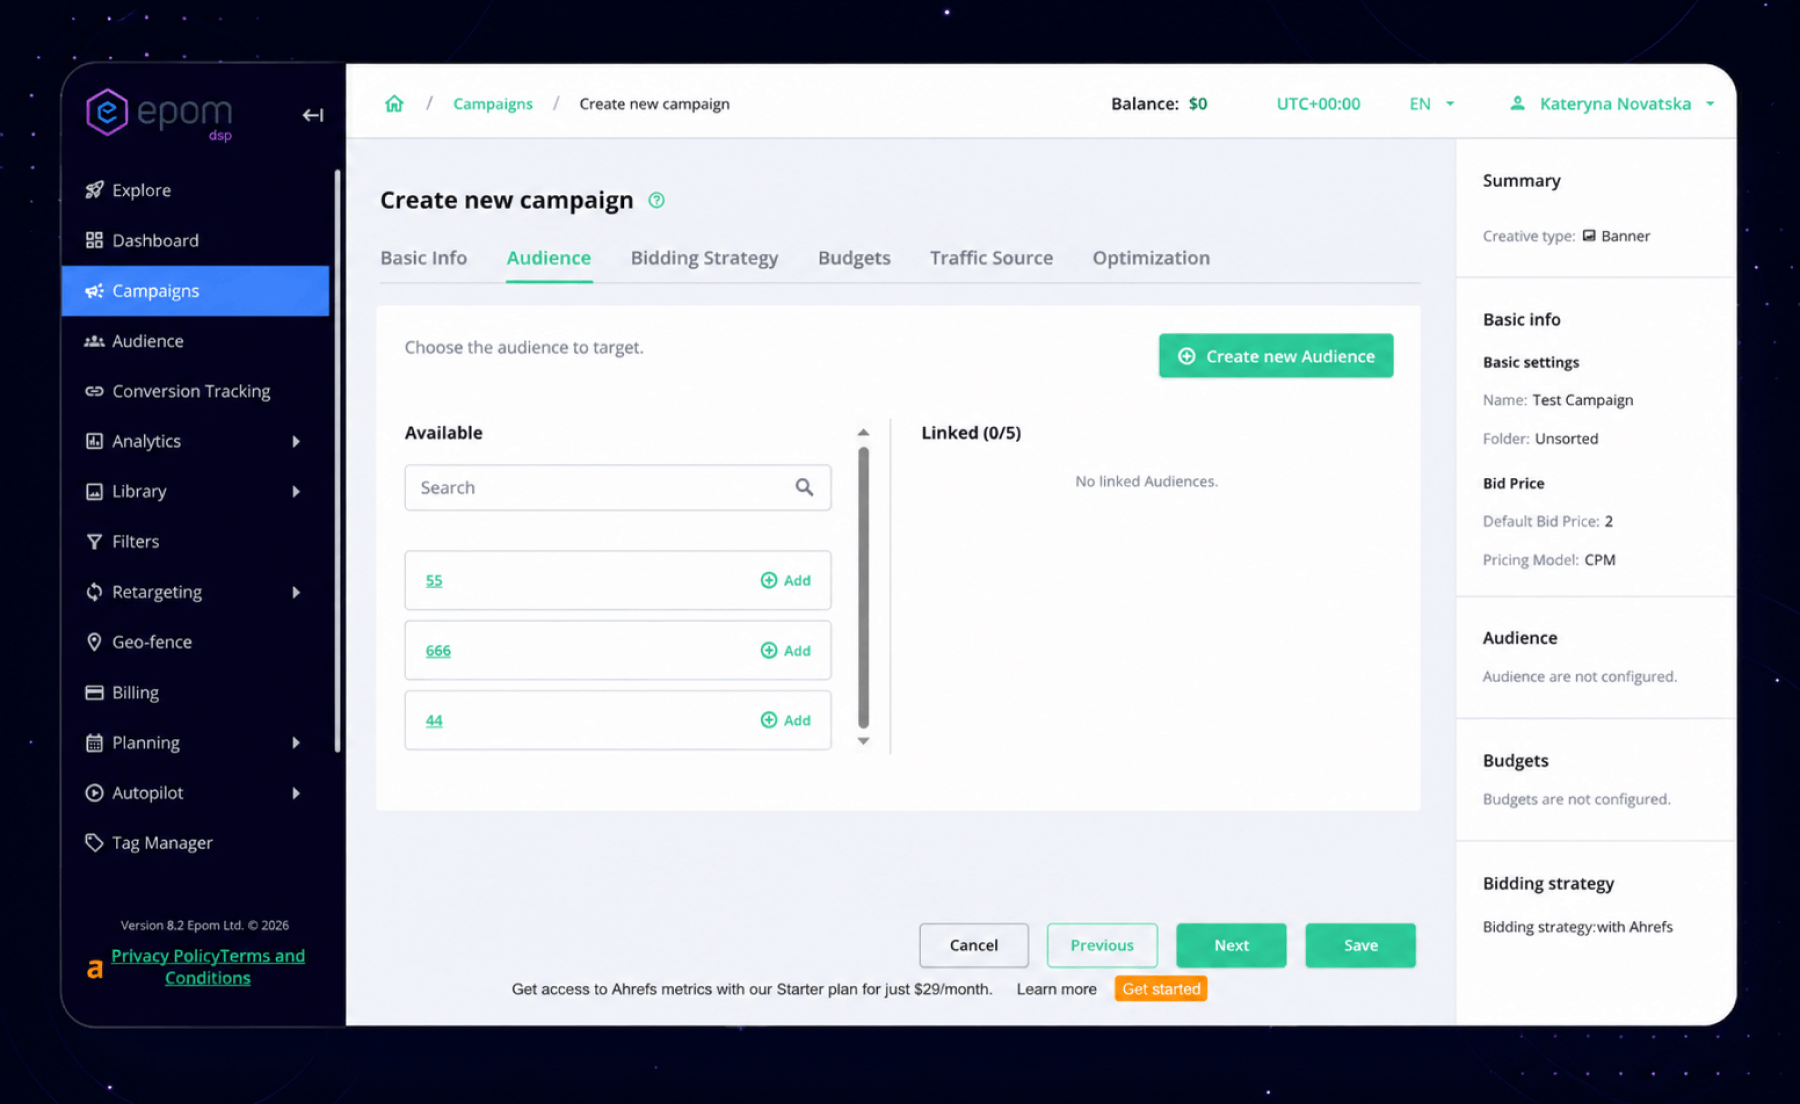
3. Build Your Target Audience
This is where you define who sees your digital ads. Instead of per-campaign targeting, the majority of demand-side platforms introduced Audiences as the broader tool of audience segmentation. In Epom DSP specifically, those are separate, reusable objects you build once and link to any campaign.
One campaign can have up to five audiences, which is useful when you want to test data-driven targeting variations without duplicating the whole setup. Using accurate audience data can significantly improve the targeting and effectiveness of programmatic campaigns.
For the gadget store, we can create one audience and set:
- Geo: Western Europe — UK, Germany, France, Netherlands
- Device type: Desktop and mobile
- OS: Any (unless the store has a separate mobile app — then you might segment Android vs iOS)
- Browser: Any
- Connection: Any
Contextual targeting by keywords can also be added in Advanced settings. Epom and other leading DSPs often support data management platforms like Lotame or Nielsen. Those will show up as an additional segment selector at the top of the audience screen, where you can connect 3rd-party audience segments based on buying intent and behavioral data.
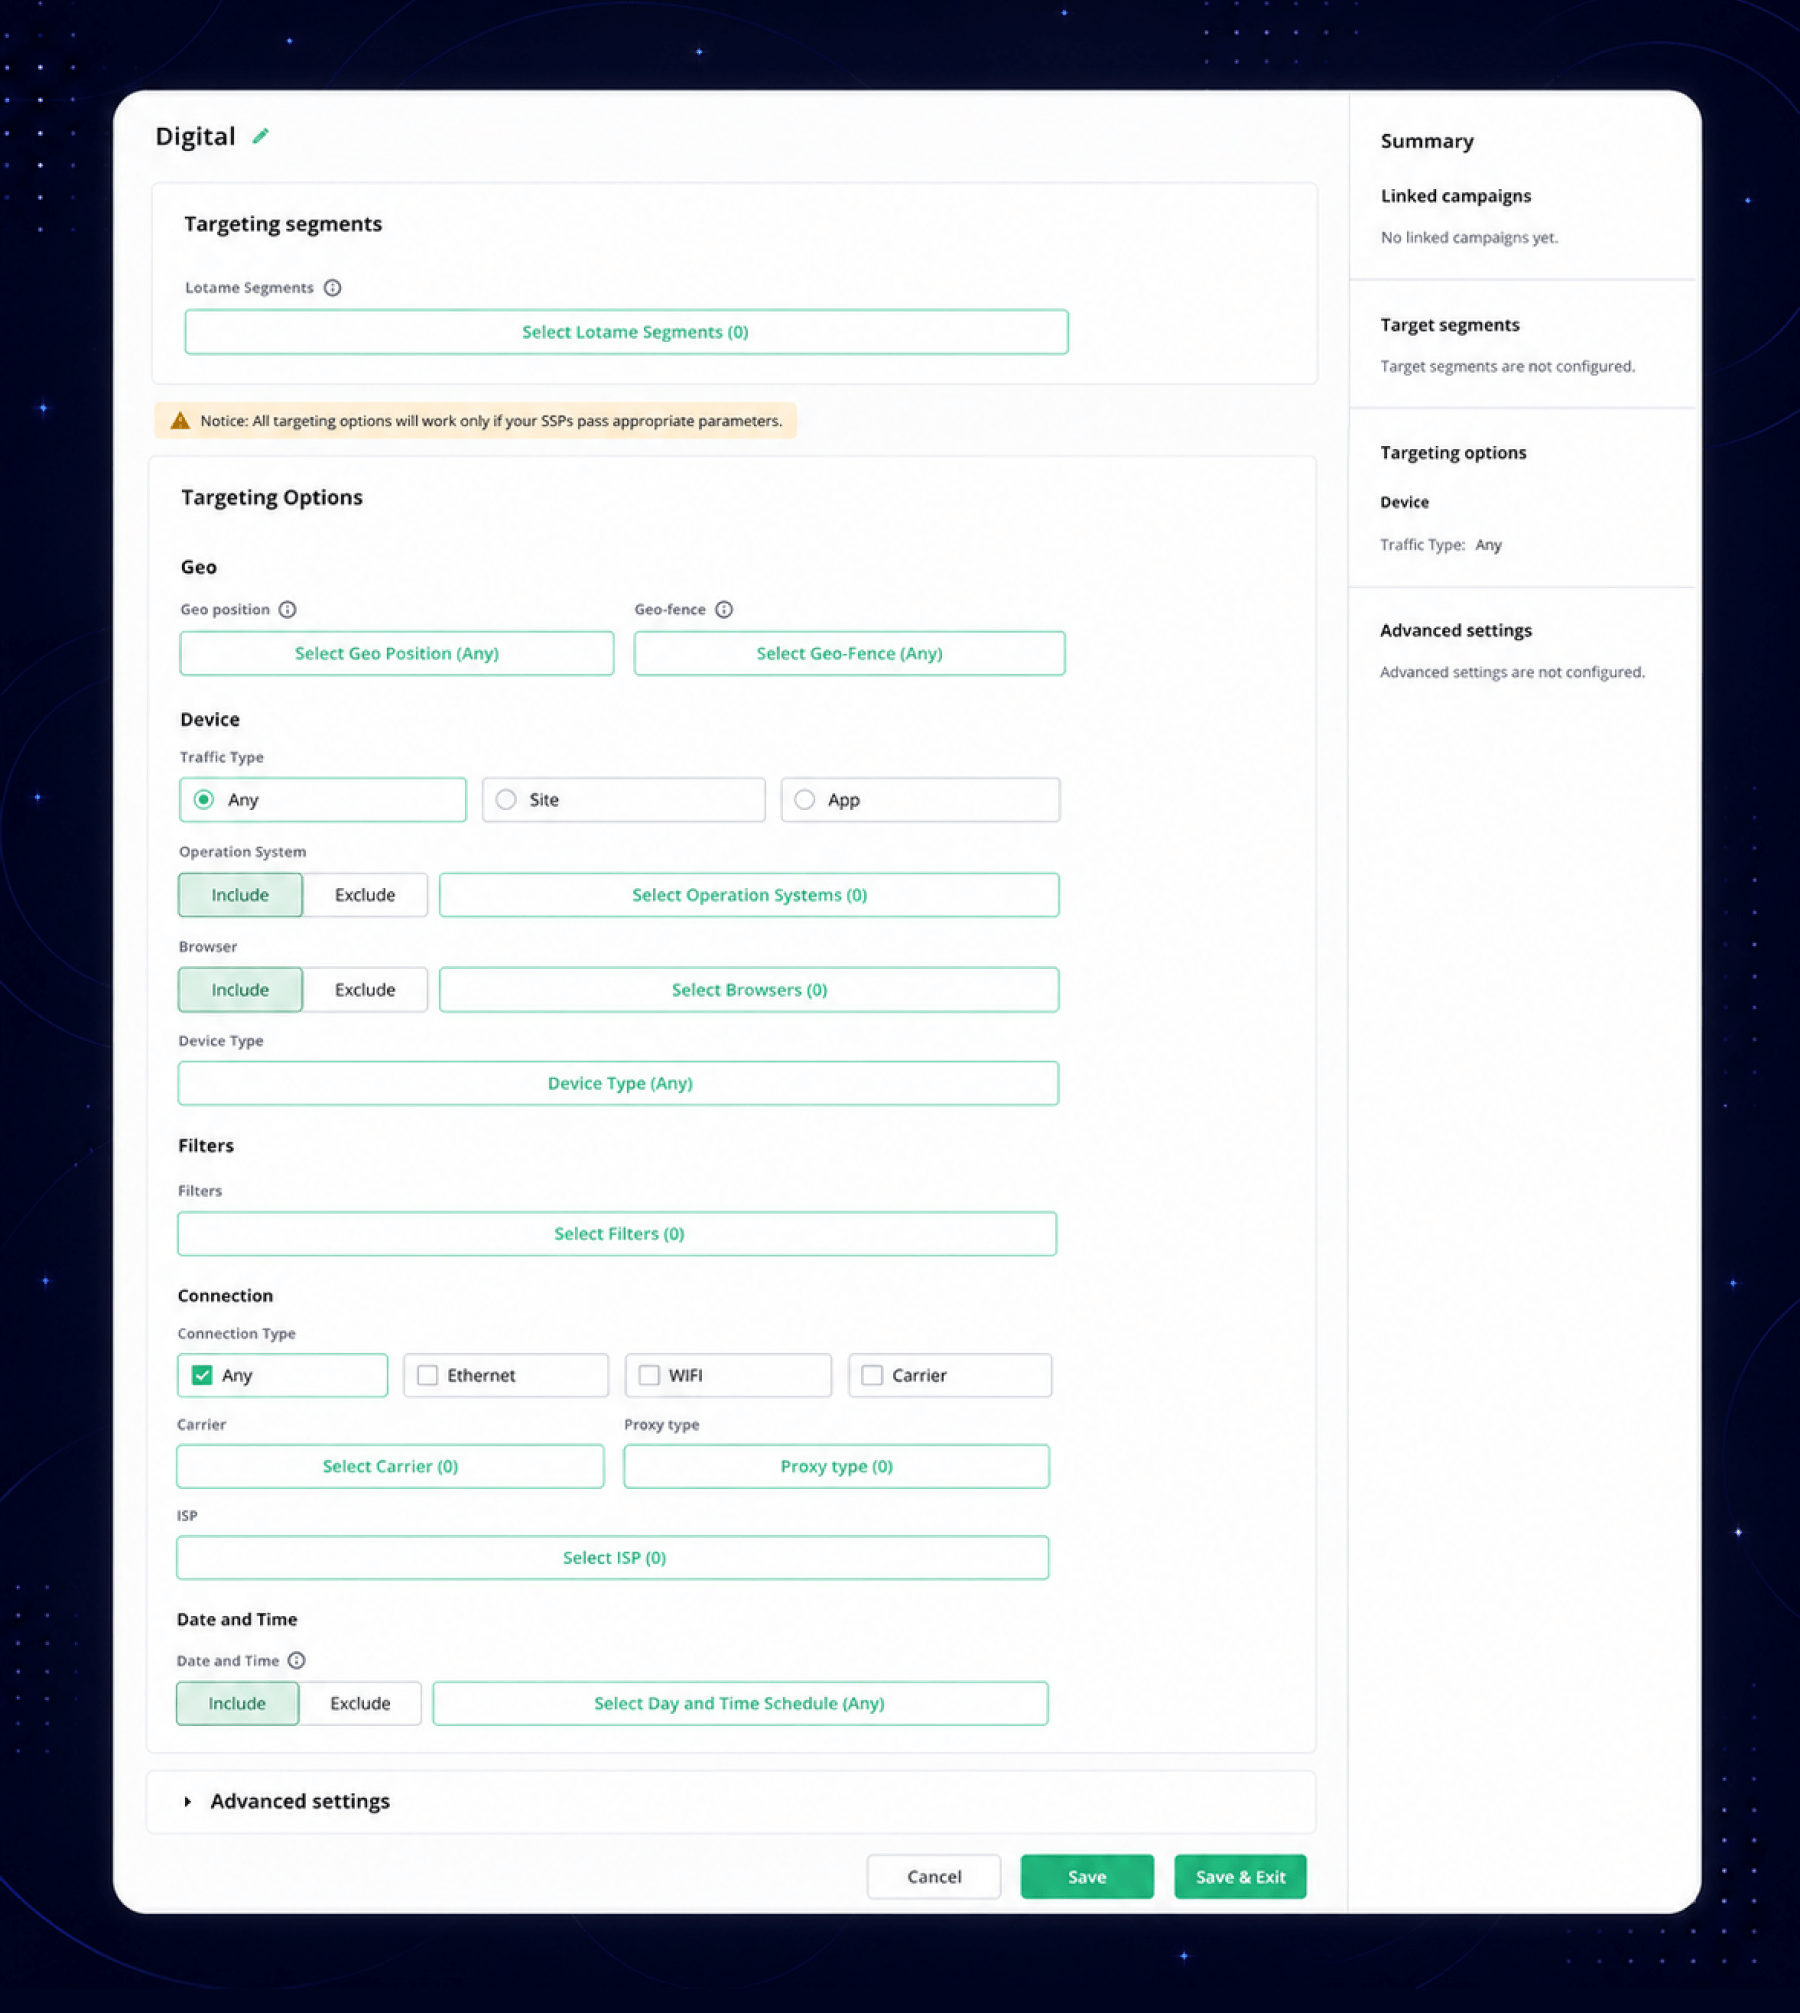
For your record: Data management platforms (DMPs) are data warehouses that connect to a DSP or an SSP to store data needed for strategic decisions.
Enterprise-level DSPs may also support custom audiences based on CRM data uploads. Creating targeted ads based on first-party data can improve engagement and conversion rates in programmatic advertising.
Let’s get back to your campaign: link the audience to your campaign before moving on. The campaign won't bid until at least one audience is attached.
4. Select Your Traffic Source
This tab shows the supply-side platform endpoints available for your campaign — the sources of ad inventory your programmatic media buying will draw impressions from. In simple words, those are app and website selection on the open web represented by one SSP.
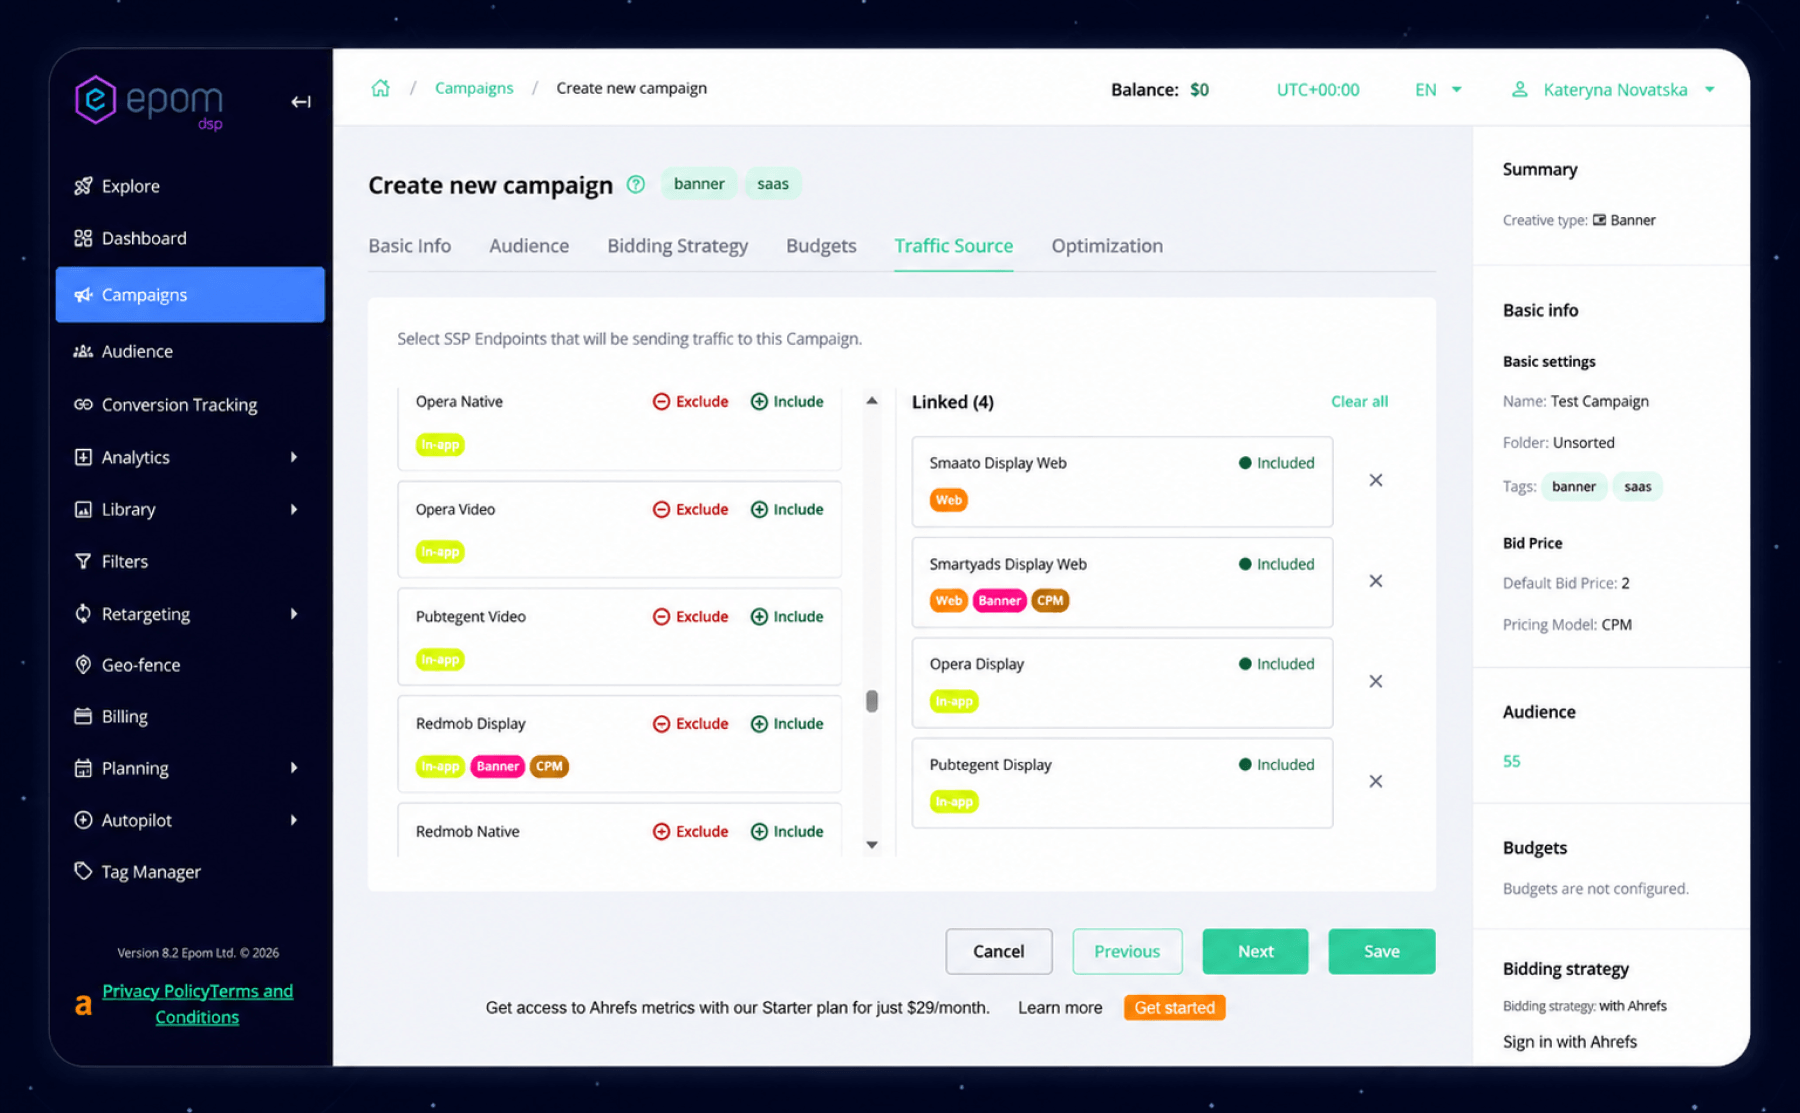
As of Epom DSP 8.2, endpoints are organized with labels showing traffic type: Web, In-app, Banner, CPM, and so on. Filter by label to find relevant sources faster.
For a banner eCommerce campaign targeting desktop and mobile web, look for sources tagged Web and Banner. Avoid In-app or CTV endpoints unless you're specifically buying inventory of this type.
Start with three to five sources. More isn't always better at the testing stage — you want enough volume to get data, but avoid noise that many sources may bring in.
5. Select Max Bid Price in Bidding Strategy
For a first programmatic advertising campaign, you only need one field here: Max Bid Price. Set it at 20–30% above your default CPM to give the algorithm room to compete for better placements.
Everything else in this tab — bid modifiers, bidding rules, exposure time multiplier — is for campaign management and optimization after you have real data. Skip it now. Set a frequency cap of 1–3 impressions per user per 24 hours to avoid showing the same ad to the same person repeatedly.

6. Set Your Programmatic Marketing Budget
Create a budget object and attach it to the campaign. Set a daily spend limit that matches what you want to test with.
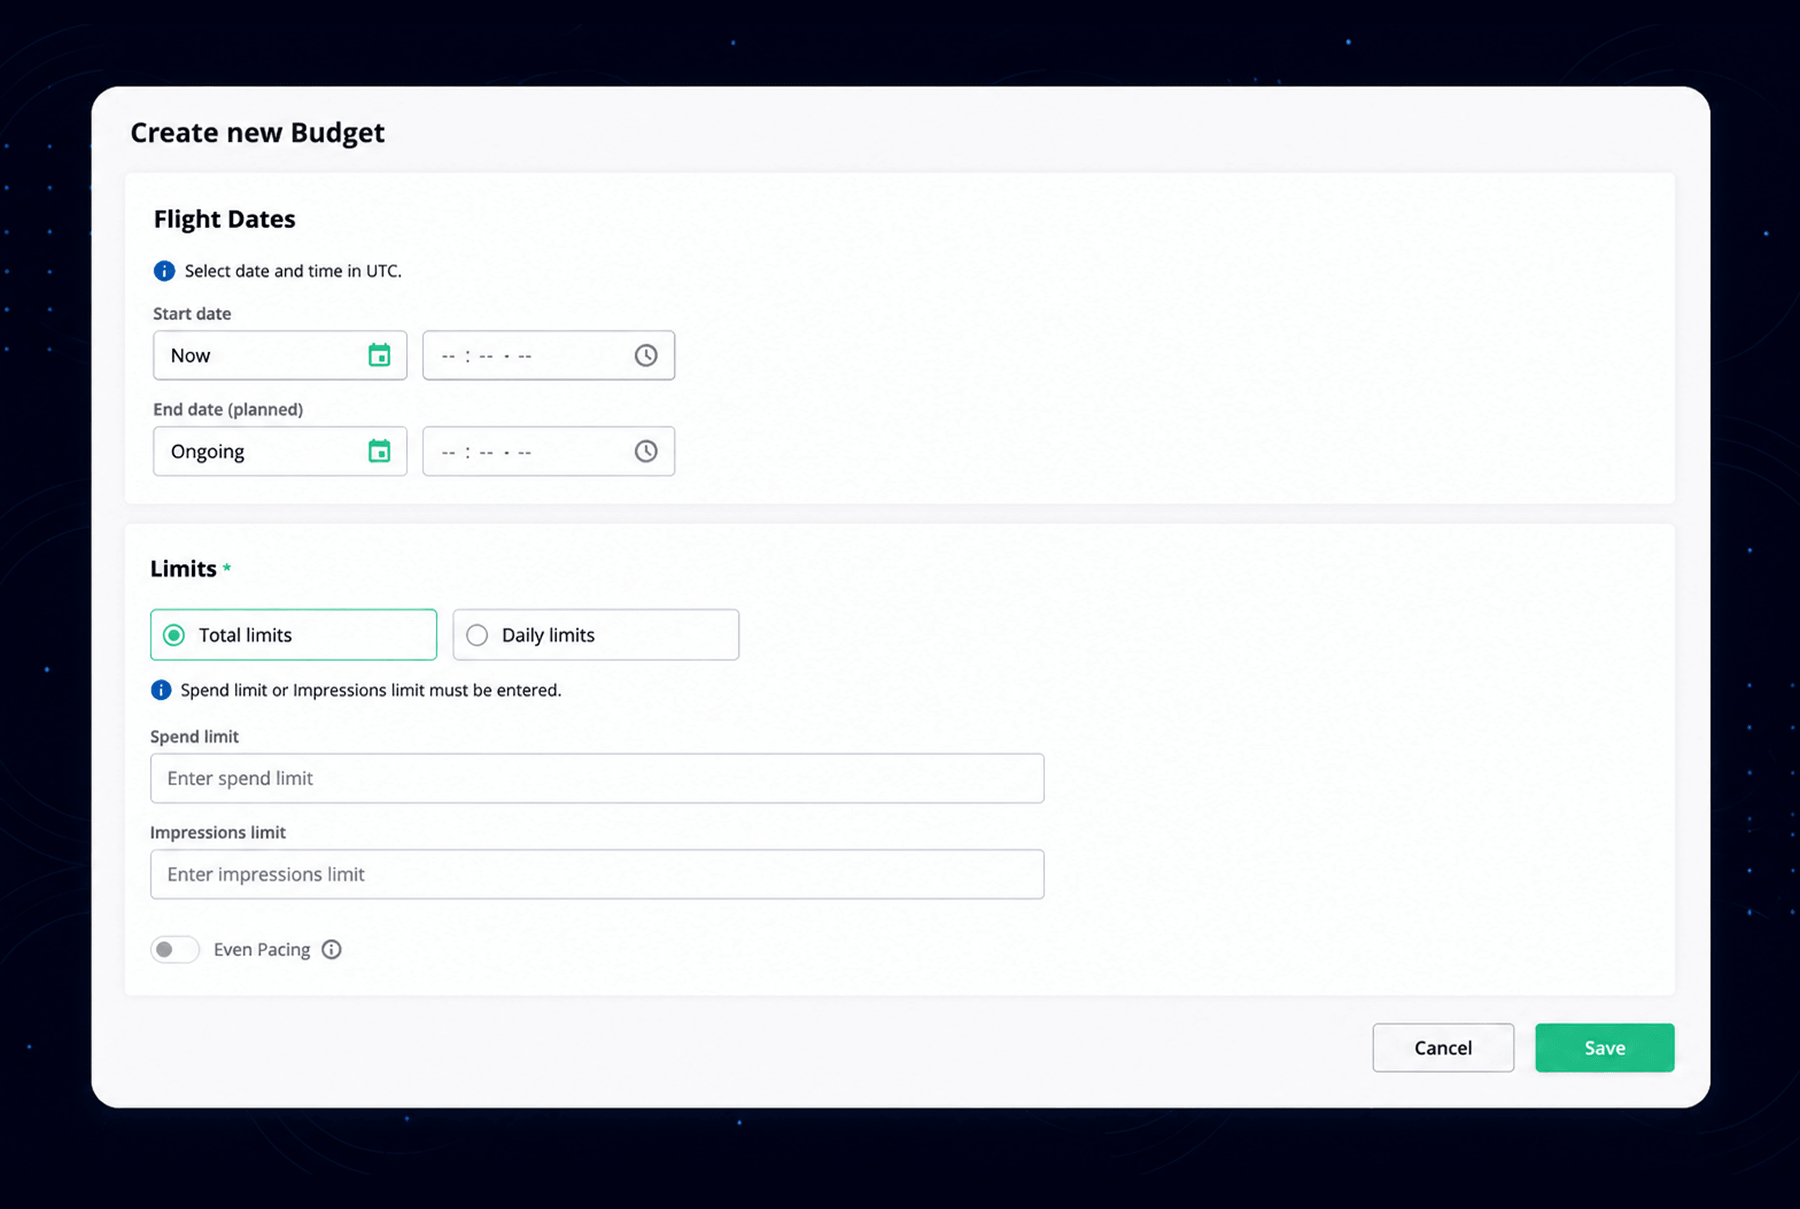
For a first campaign, $20–$50/day gives enough impressions to read the data without burning through your deposit.
Epom DSP 8.2 introduced Endless Budgets — campaigns with no end date and no spend cap that run until you manually stop them. For a test campaign, use a standard budget with a defined end date instead. Endless budgets make more sense for always-on retargeting once you know the campaign converts.
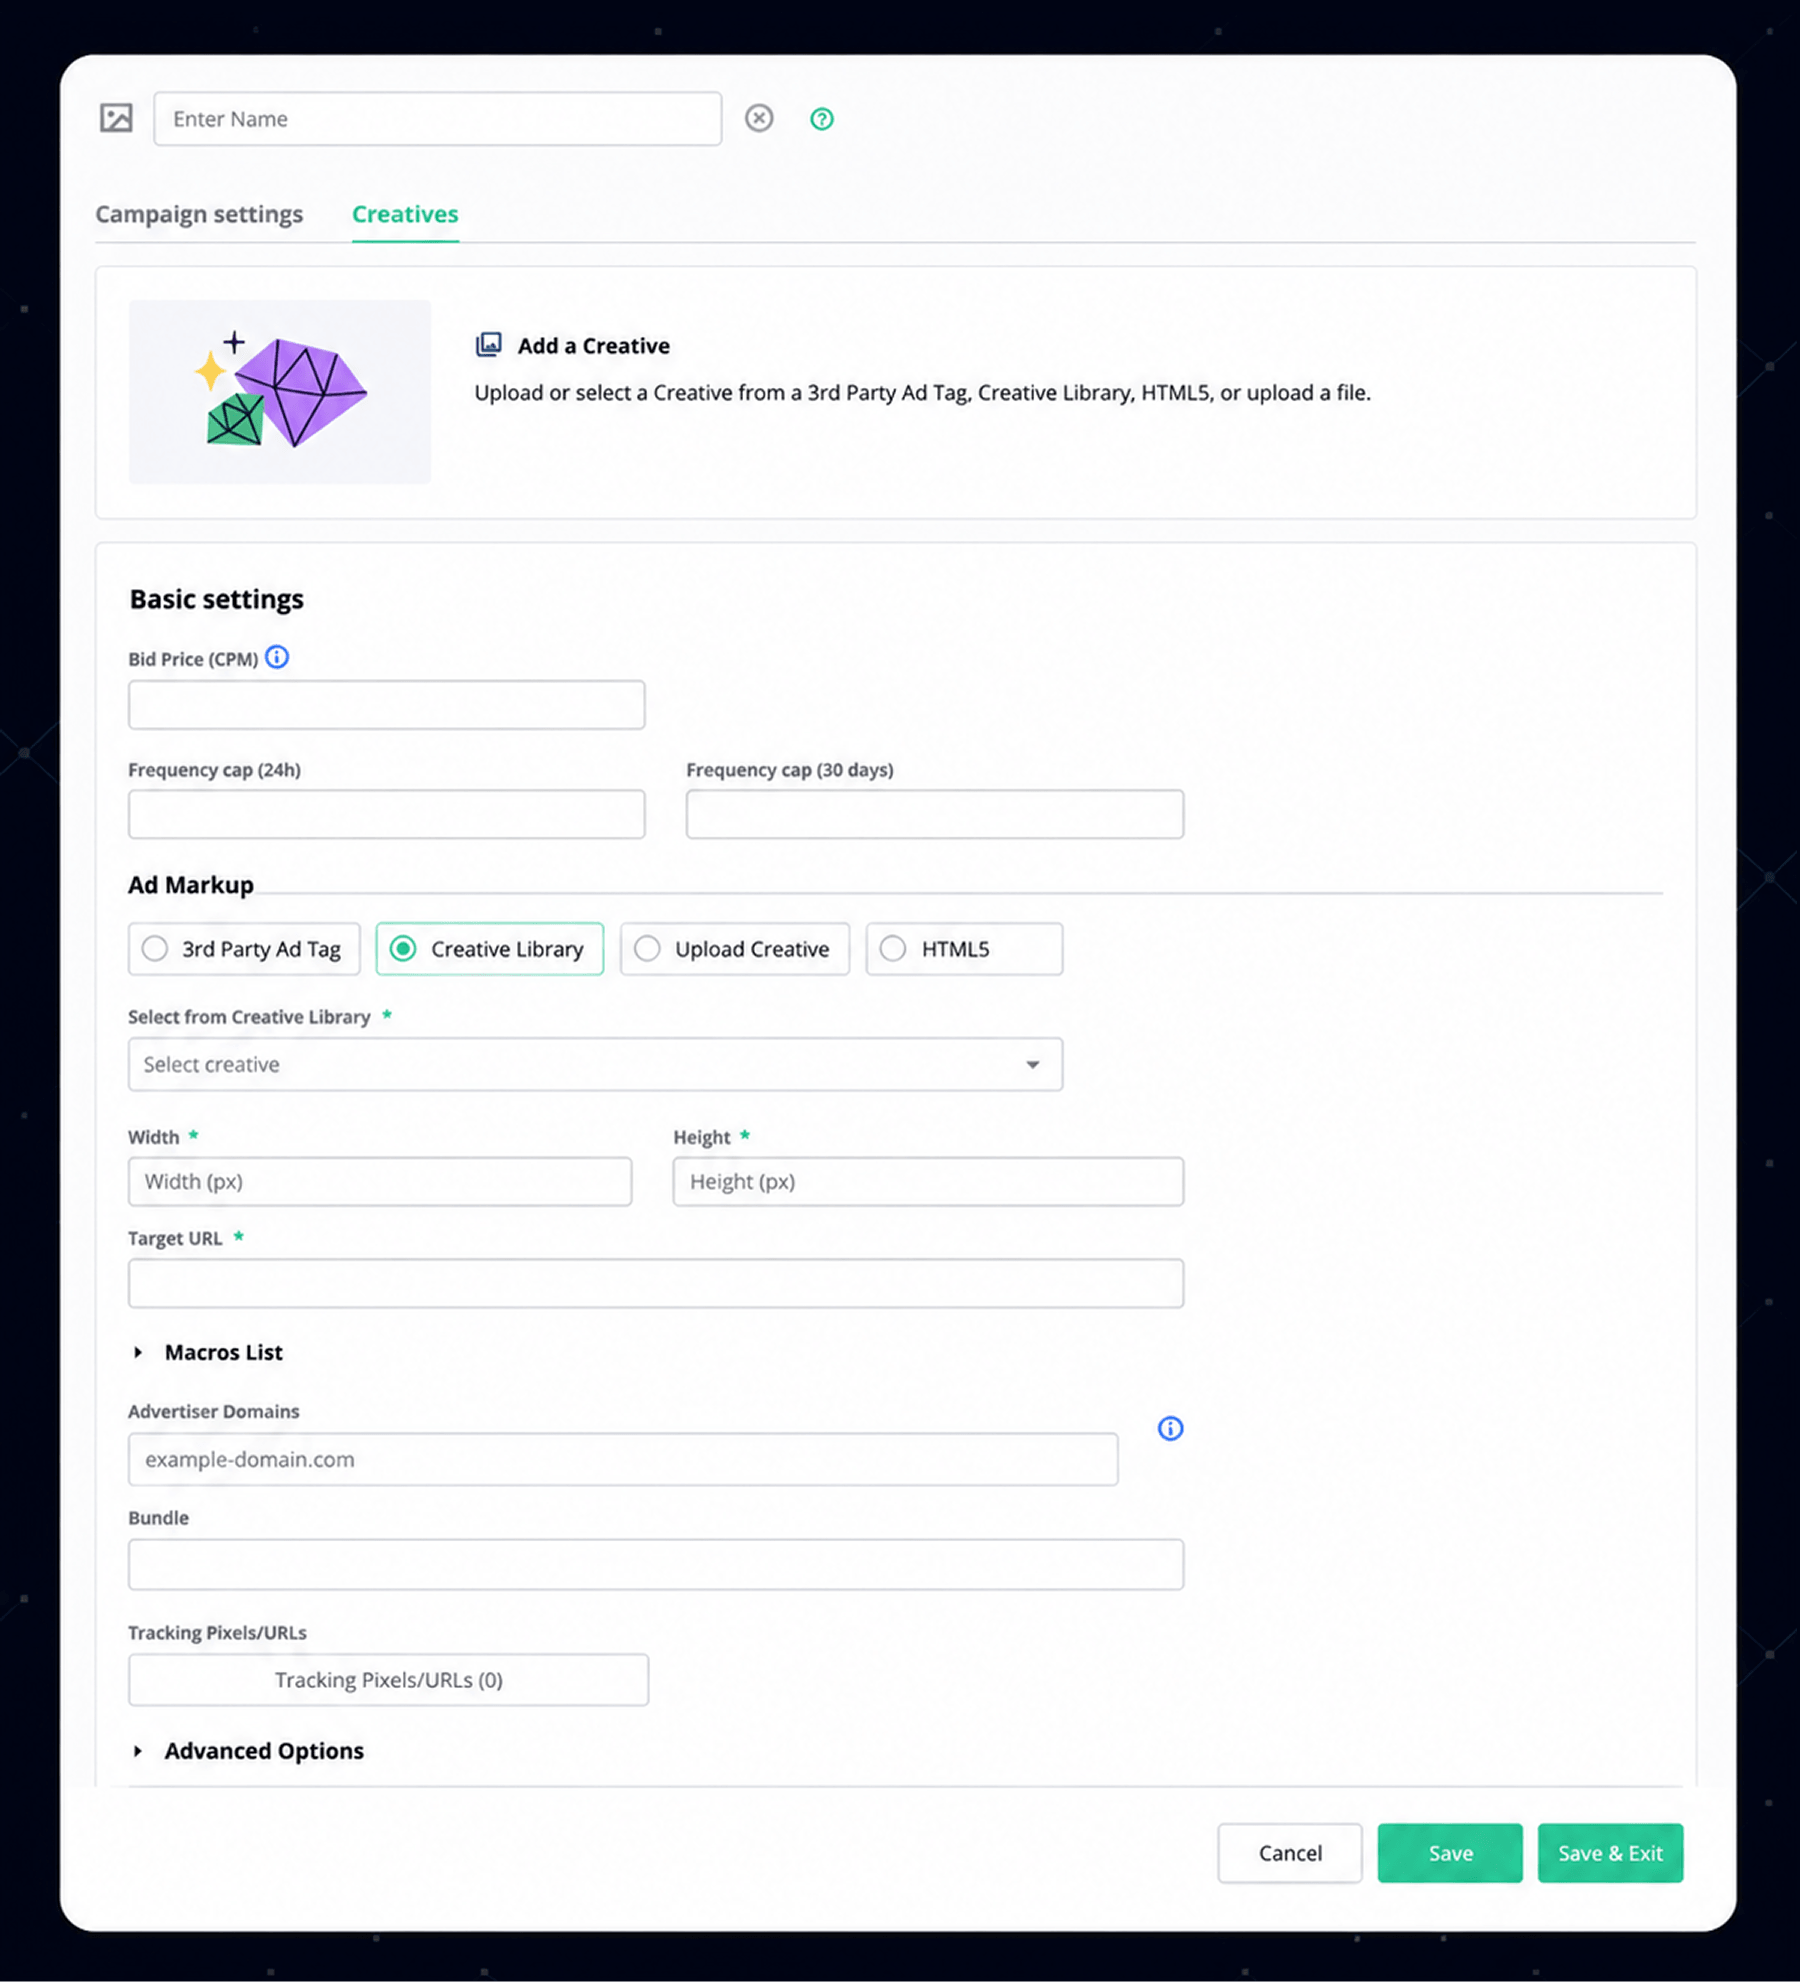
7. Add your creative
That's a final step where you upload your banner. You have four options for ad markup:
- Creative Library — if you've uploaded files to the library already, select from there
- Upload Creative — upload directly from your computer
- HTML5 — use a ZIP file with all scripts and files for interactive HTML5 banners
- 3rd Party Ad Tag — if you're using a separate ad server and already have a tag generated
For a straightforward banner, Upload Creative or Creative Library works fine. Set the Target URL — the landing page your ad will lead a user to. For the gadget store, this would be a product category page or a sale landing page.
At the creative level you can also set a separate bid price and frequency cap that override the campaign-level settings. For a first campaign, leave these blank and let the campaign-level settings apply.
Hit Save. Your campaign is configured and ready to go live once you deposit some money to the platform.
One thing worth knowing before you launch: programmatic marketing streamlines media buying through automation, but the first 48–72 hours of a new campaign are the learning window. The algorithm is testing placements and finding signals. Resist the urge to change settings mid-flight during that period.
Step #3: Collecting Data & Programmatic Media Optimization
Running a campaign without optimizing it is how your budget disappears quietly without giving you a decent ROI. Most advertisers who come to us saying "programmatic doesn't work" launched a campaign, walked away, and checked back two weeks later. It’s not because programmatic is broken, but because it does require adjustment.
The real work happens after the initial test. Not because the platform can't handle it — Epom DSP optimizes most things automatically. But unlike Meta, Google or ad networks, where the algorithm is a black box making decisions you can't see, here you are in charge of what exactly is happening and step in when it matters.
Efficiency in programmatic advertising is achieved through automated bidding, reducing manual tasks and streamlining workflows. That's the difference between spending money and spending it with intention.
Read Your Reports First
Before you change anything, look at placement-level data like CTR, CPC, overall ad spend, and conversion value per source. Identify which traffic sources are performing and which are burning budget without results. A week of data is usually enough to make the first decisions.
Rule-based Optimization: Bidding Rules and Bid Modifiers
Some DSPs handle optimization through artificial intelligence or algorithmic models that auto-adjust bids based on a selected campaign goal. It's convenient, but it's also opaque. You don't always know why the platform made a decision.
Epom DSP currently works on rule-based optimization. It's more granular, more transparent, but requires more marketing efforts — at the benefit of always knowing where your money goes.
We have two tools that can lead you to programmatic campaign success: bidding rules and bid modifiers. Both live under the Bidding Strategy tab during the campaign setup and under Autopilot in the left menu.
Bidding Rules are automated conditions that trigger an action when a performance threshold is met. You define the logic — the platform executes it, even when you're offline.
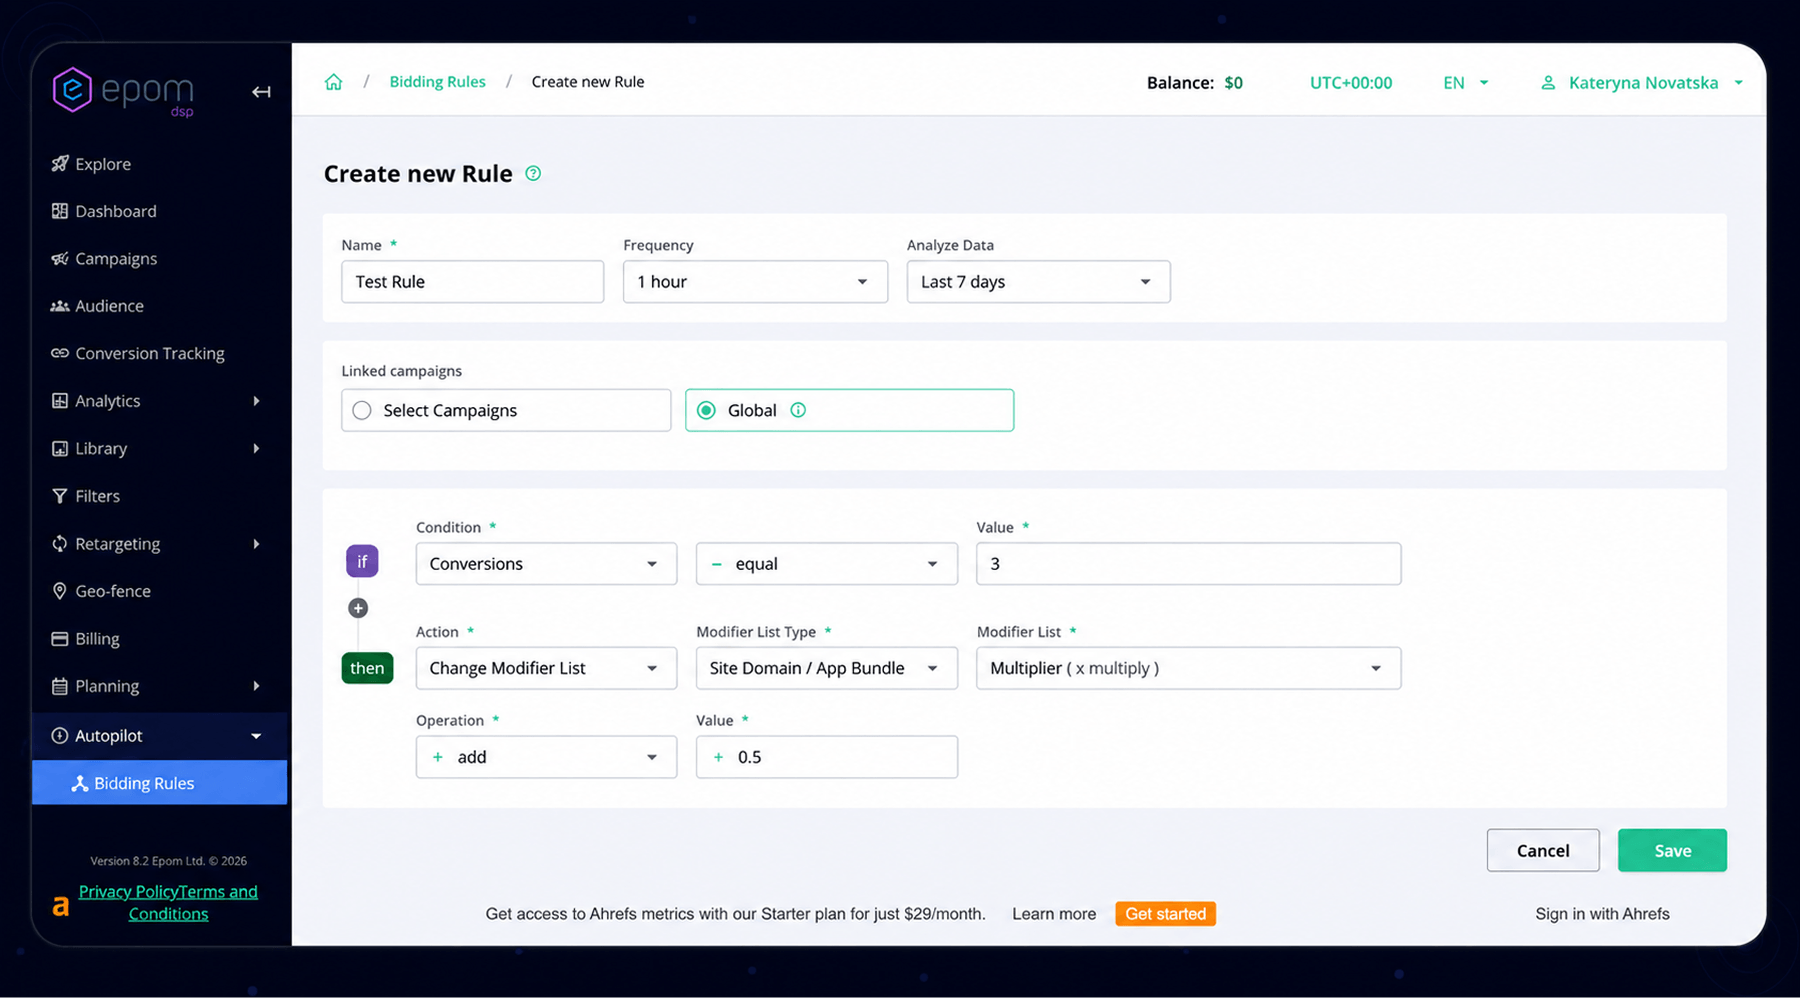
Example from the screenshot: If conversions = 3, then add site domain to the Multiplier list at 0.5x. This means: when a placement delivers three conversions, automatically apply a bid multiplier to that domain.
For the gadget store campaign, you might set: If CTR drops below 0.1% on a source after 500 impressions, exclude it. Or: If CPA exceeds $15 on a placement, reduce bid by 30%.
Bid Modifiers let you manually adjust how much you bid on specific domains, app bundles, or publisher IDs without changing your base CPM.
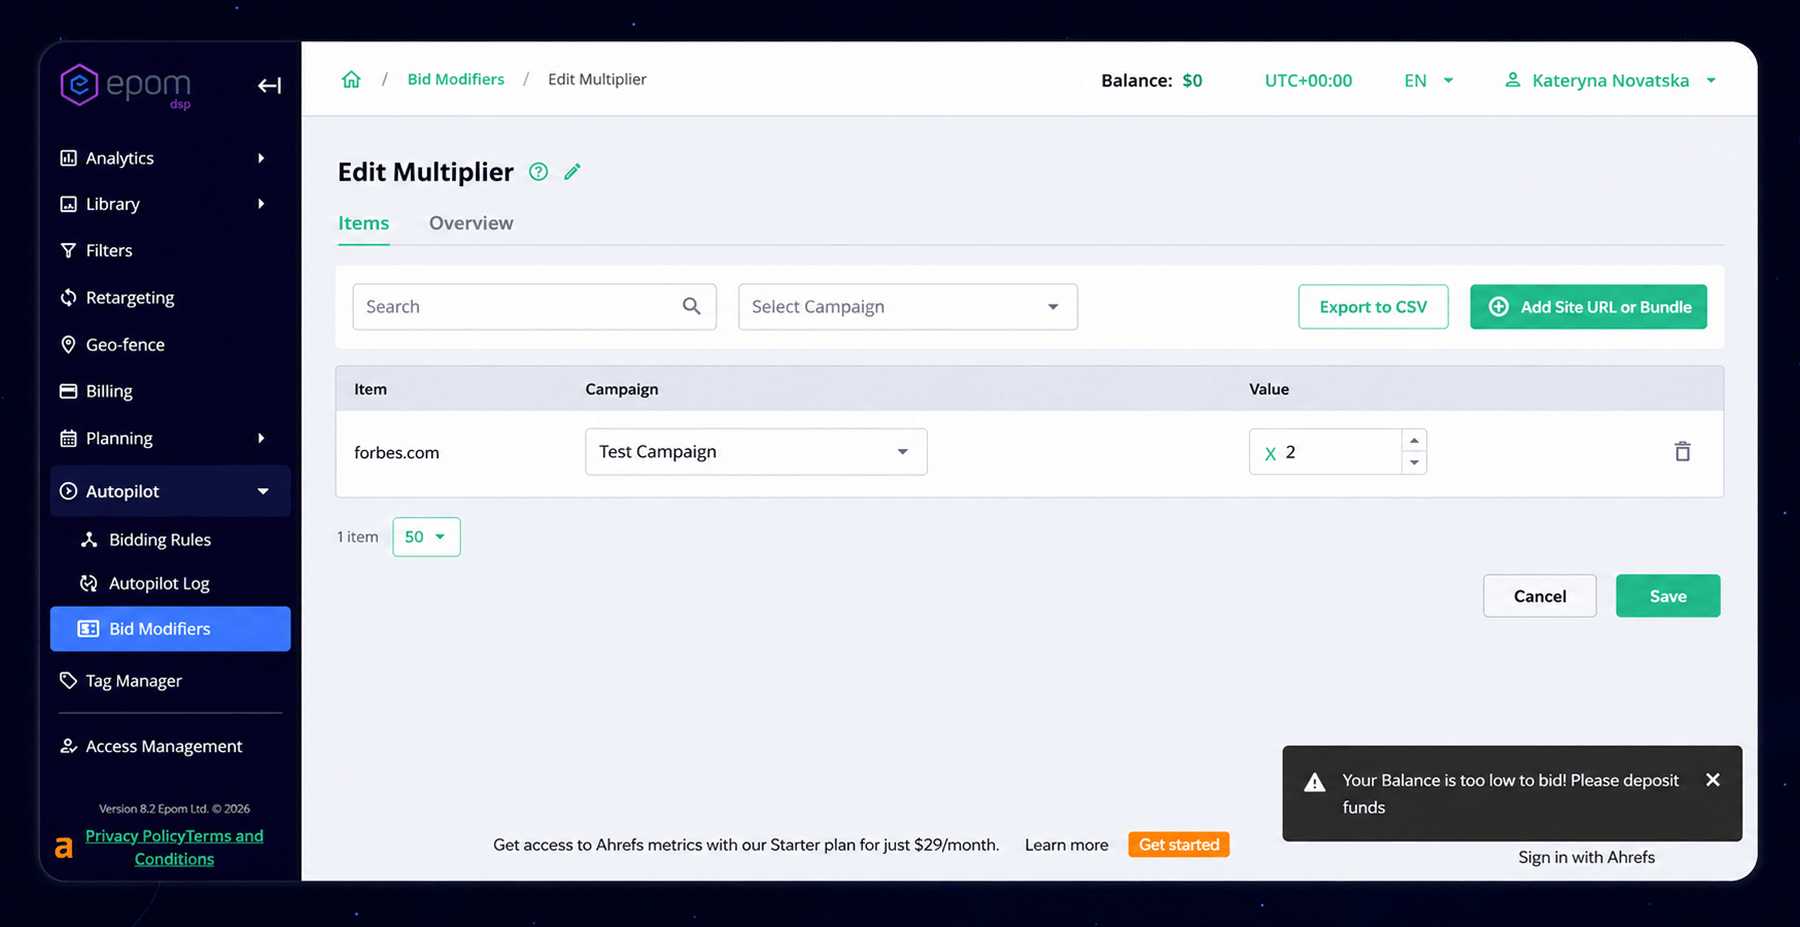
Example from the screenshot: forbes.com has a 2x multiplier applied. If your default bid is $2 CPM, the platform bids $4 on that domain specifically. You're not changing the campaign bid but telling the programmatic technology algorithm which inventory is worth more to you.
Use multipliers when you've identified high-performing placements you want to win more consistently, or premium domains where the default bid isn't competitive.
Ad Fraud Protection: Pre-bid and Post-bid
When you buy programmatic inventory, not every impression is a real person. Some placements serve ads to bots, load them incorrectly, or route your budget through too many middlemen making your bid overpriced.
Epom DSP filters ad fraud at two points in the process.
Before you bid, Pixalate checks the placement against a continuously updated list of flagged domains. If something looks suspicious, the DSP skips it. You never pay for that impression.
After delivery, Pixalate measures whether your ad was actually visible and how many intermediaries handled the transaction. Placements that underperform on these metrics get deprioritized automatically next time.
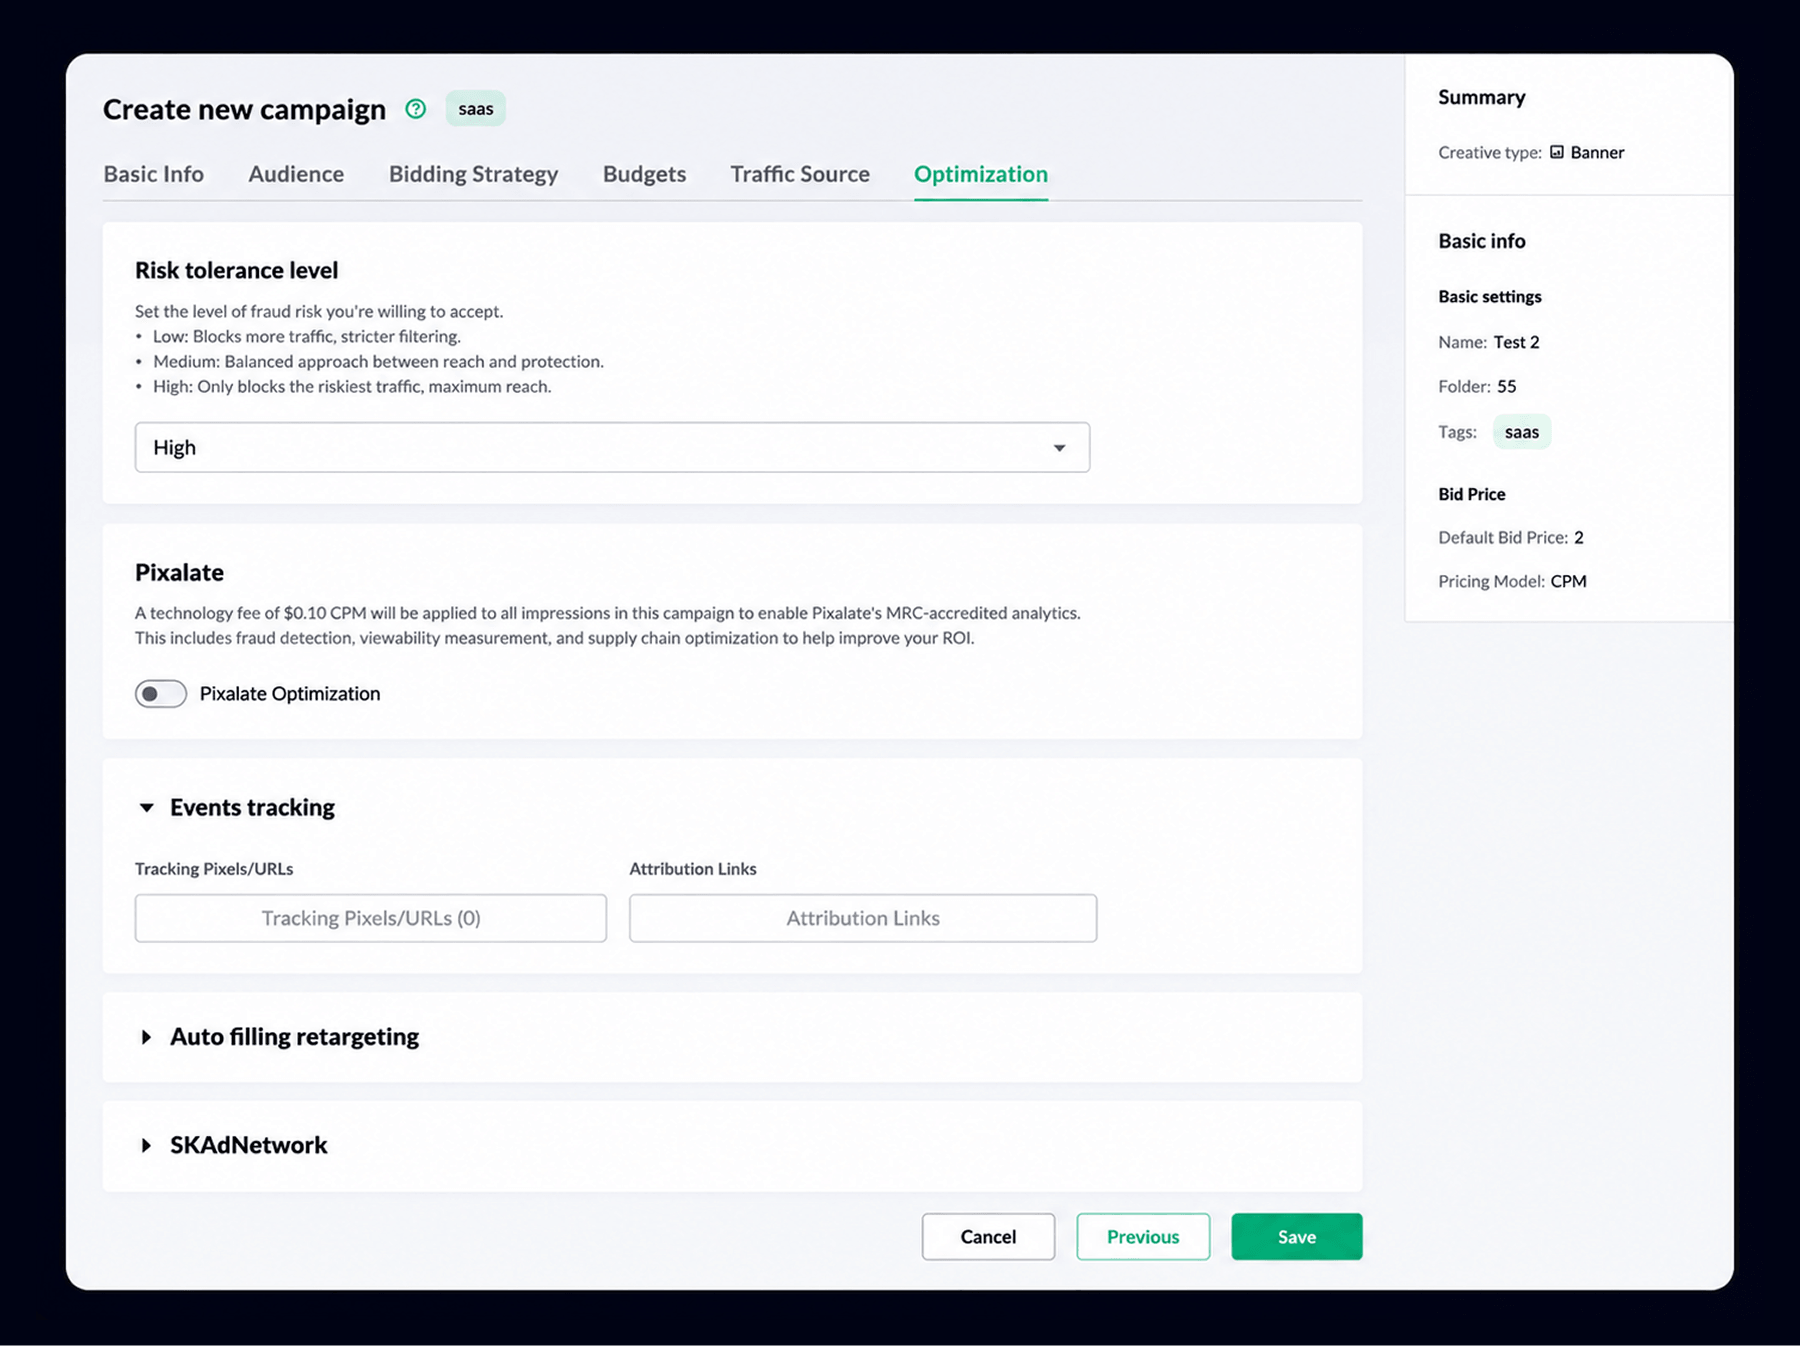
You control how strict the filter is — Low, Medium, or High risk tolerance. Medium works for most campaigns starting out. If you're running in finance or iGaming where fraud concentrates, go Low from the start.
The result: over time, your campaign spends less on inventory that doesn't deliver and more on placements that do.
Activate Conversion Tracking
If your goal is sales or specific on-site actions — add to cart, checkout, account signup — you might want to track conversions to optimize toward them.
Epom DSP supports both pixel tracking and server-to-server (S2S) postback tracking. S2S is generally more accurate, especially as browser restrictions and ad blockers make pixel tracking increasingly unreliable. Pixel tracking can miss up to 20% of conversions in privacy-restricted browsers.
Setting up conversion tracking is a separate topic with its own technical steps. Full guide here.
You've covered the full process from picking a goal to reading placement data three weeks in.


![5 Reasons Why White-Label DSP Beats Self-Serve DSP Hands Down [Quiz]](/resources/blogArticles/5-key-differences-between-white-label-DSP-vs-self-serve-DSP/Preview.webp)


