
Save, reuse and schedule reports
Save the Filter form under a name, apply it again later, and schedule it to render and email itself on a weekly or monthly slot.
A saved report is the whole Filter form kept under a name — report type, date range, time granularity, group-by, filters, both entity-tree selections and the metric-column choice. Apply it to rebuild that form in one click, or attach a schedule so the server renders it and emails the file on its own.
What is stored is the form’s parameters, not its results and not its resolved dates. A template saved as Last 7 days still means the last seven days a year from now.
Who this is for
Anyone who can open Analytics, in any role. Saving, applying, scheduling and deleting a template take nothing beyond being signed in, so the Saved reports button is always in the page header and the list is simply empty until your first save. What a template can contain still follows the Filter form you were able to compose — see Run a report.
Saved reports are private to the account that created them. The list is loaded per user and there is no way to share one; to get a report to a colleague, add them as a schedule recipient or export the file and send it.
Prerequisites
- A composed Filter form worth keeping — see Run a report.
- For scheduled email: at least one recipient address on the template. Nothing is sent to the owner automatically (see the warning under Recipients), and outbound mail must be configured by Epom for your network.
Steps
Save the current form
-
Compose the report on the Filter tab.
-
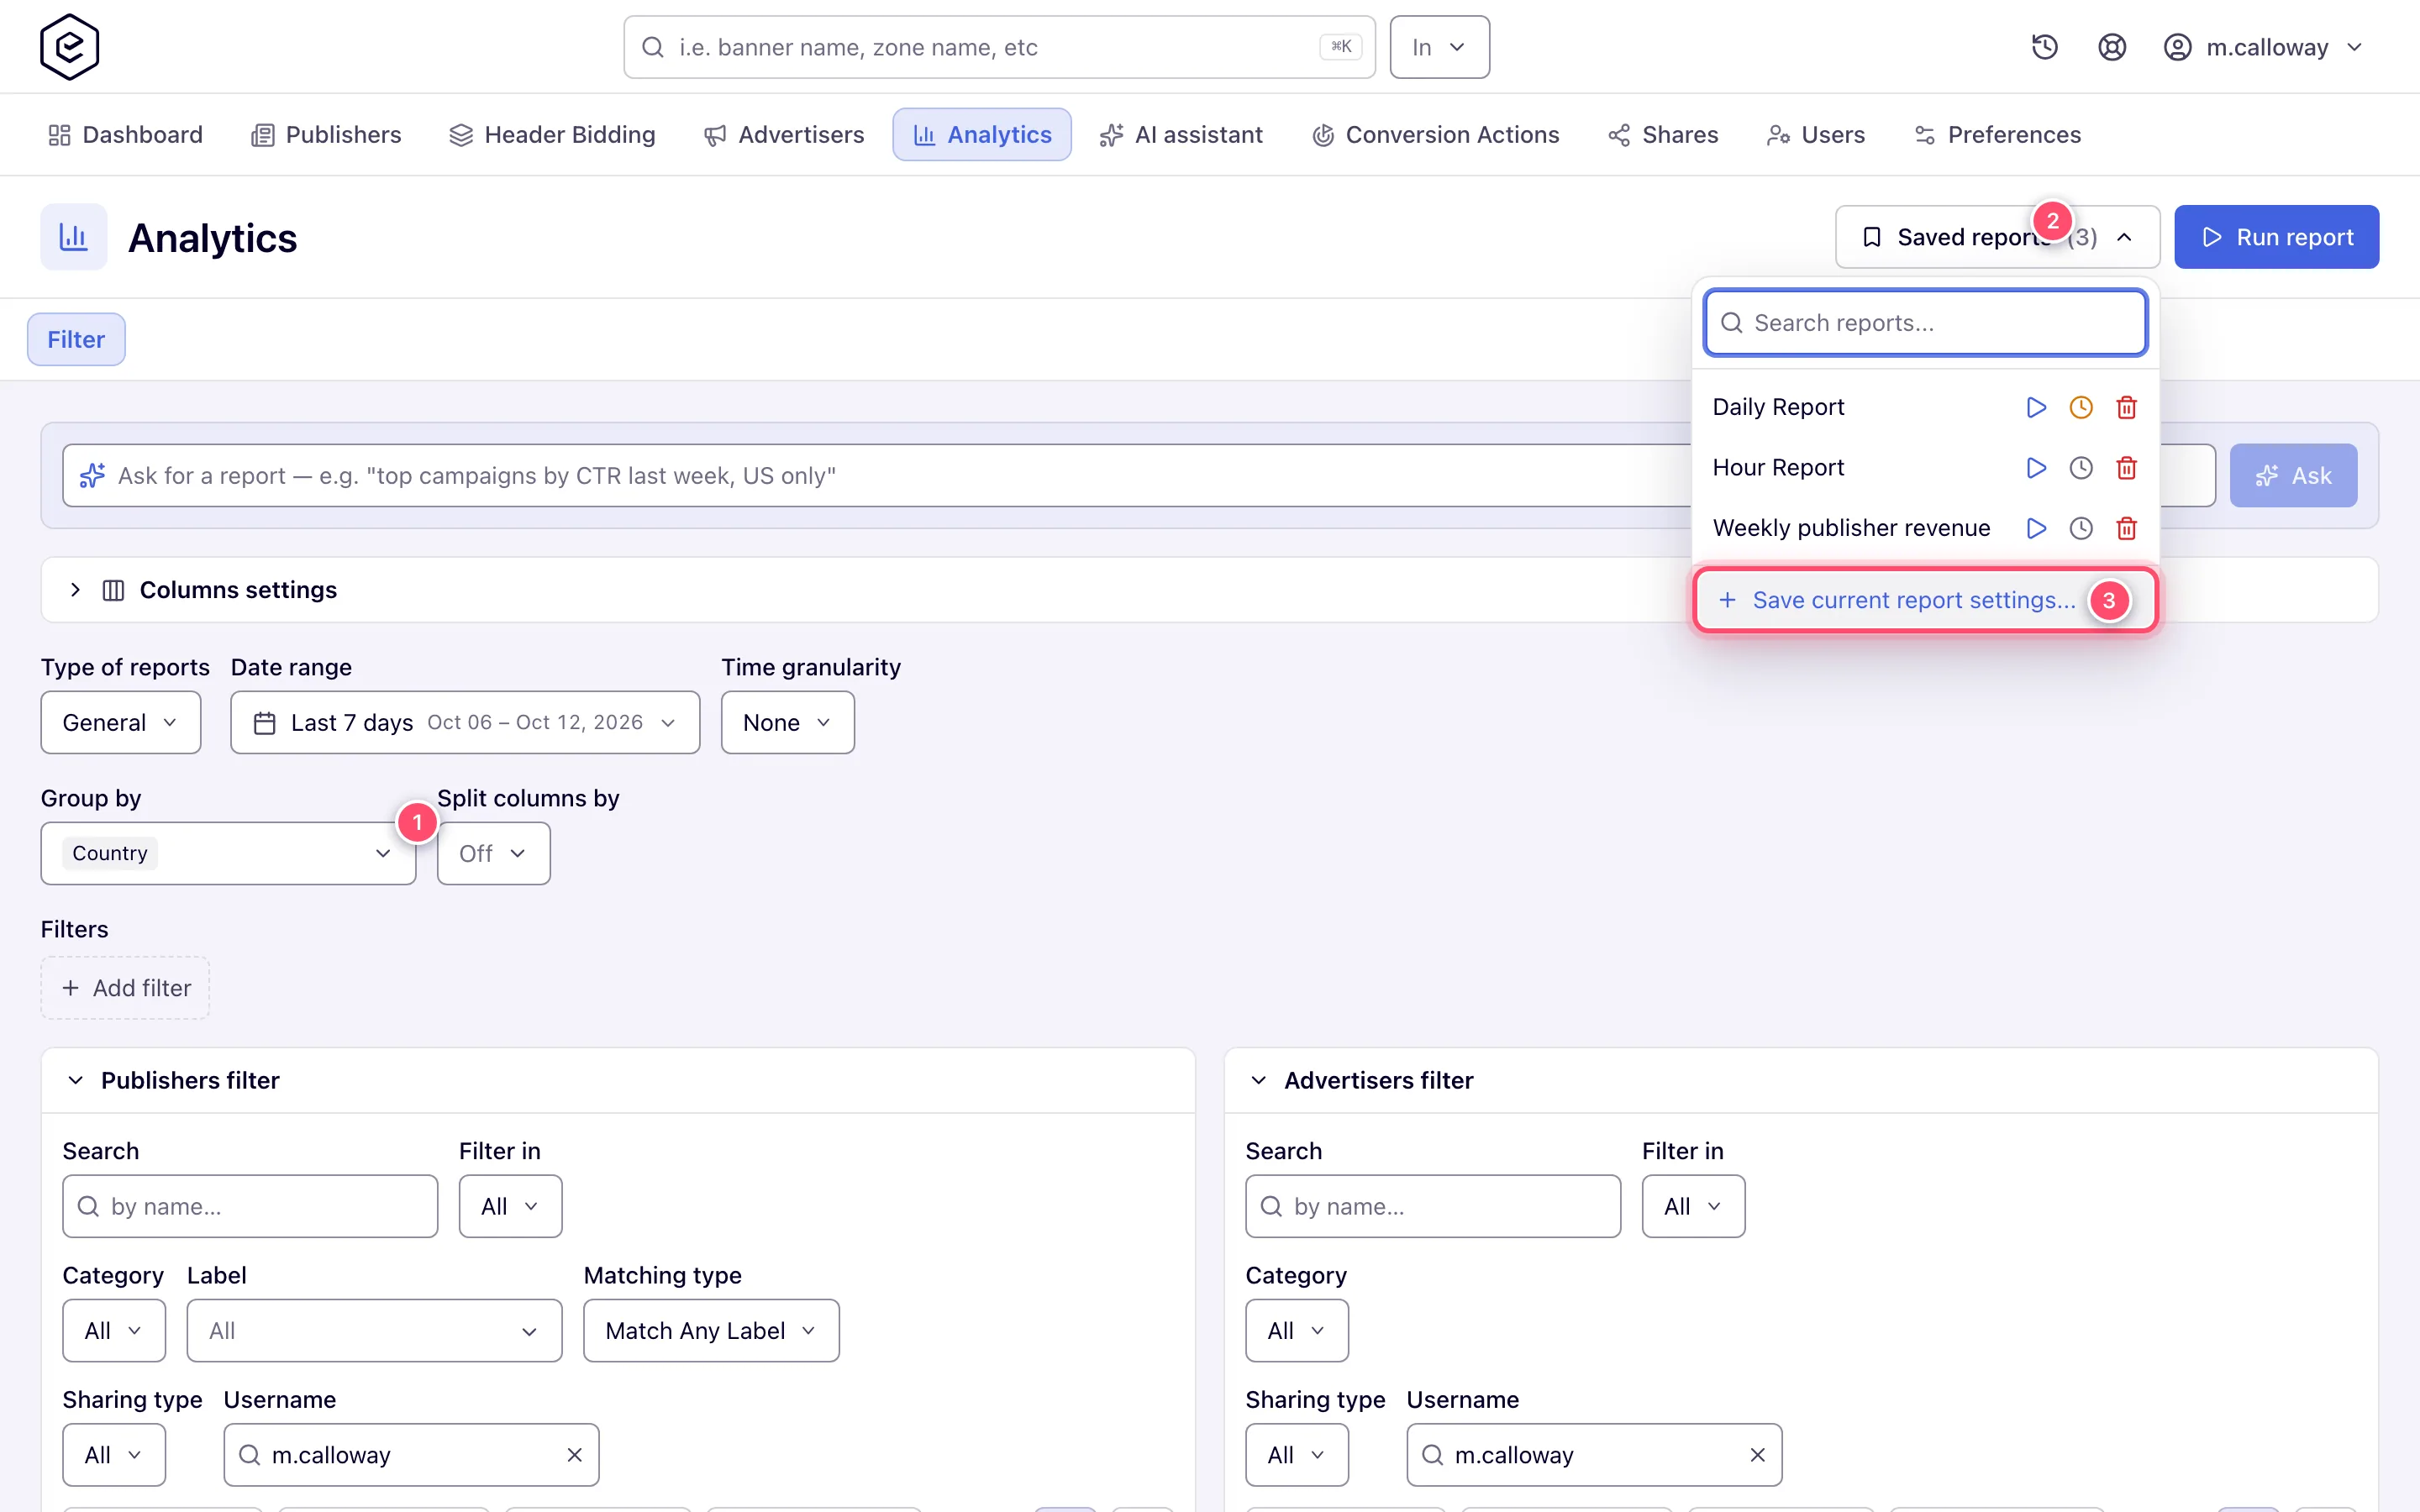
Click Saved reports in the page header, then Save current report settings… at the bottom of the popover.
-
Type a title (required, up to 256 characters) and confirm.
A green Record has been saved toast appears, the new template is selected, and the count on the Saved reports button goes up.
Apply a template again
-
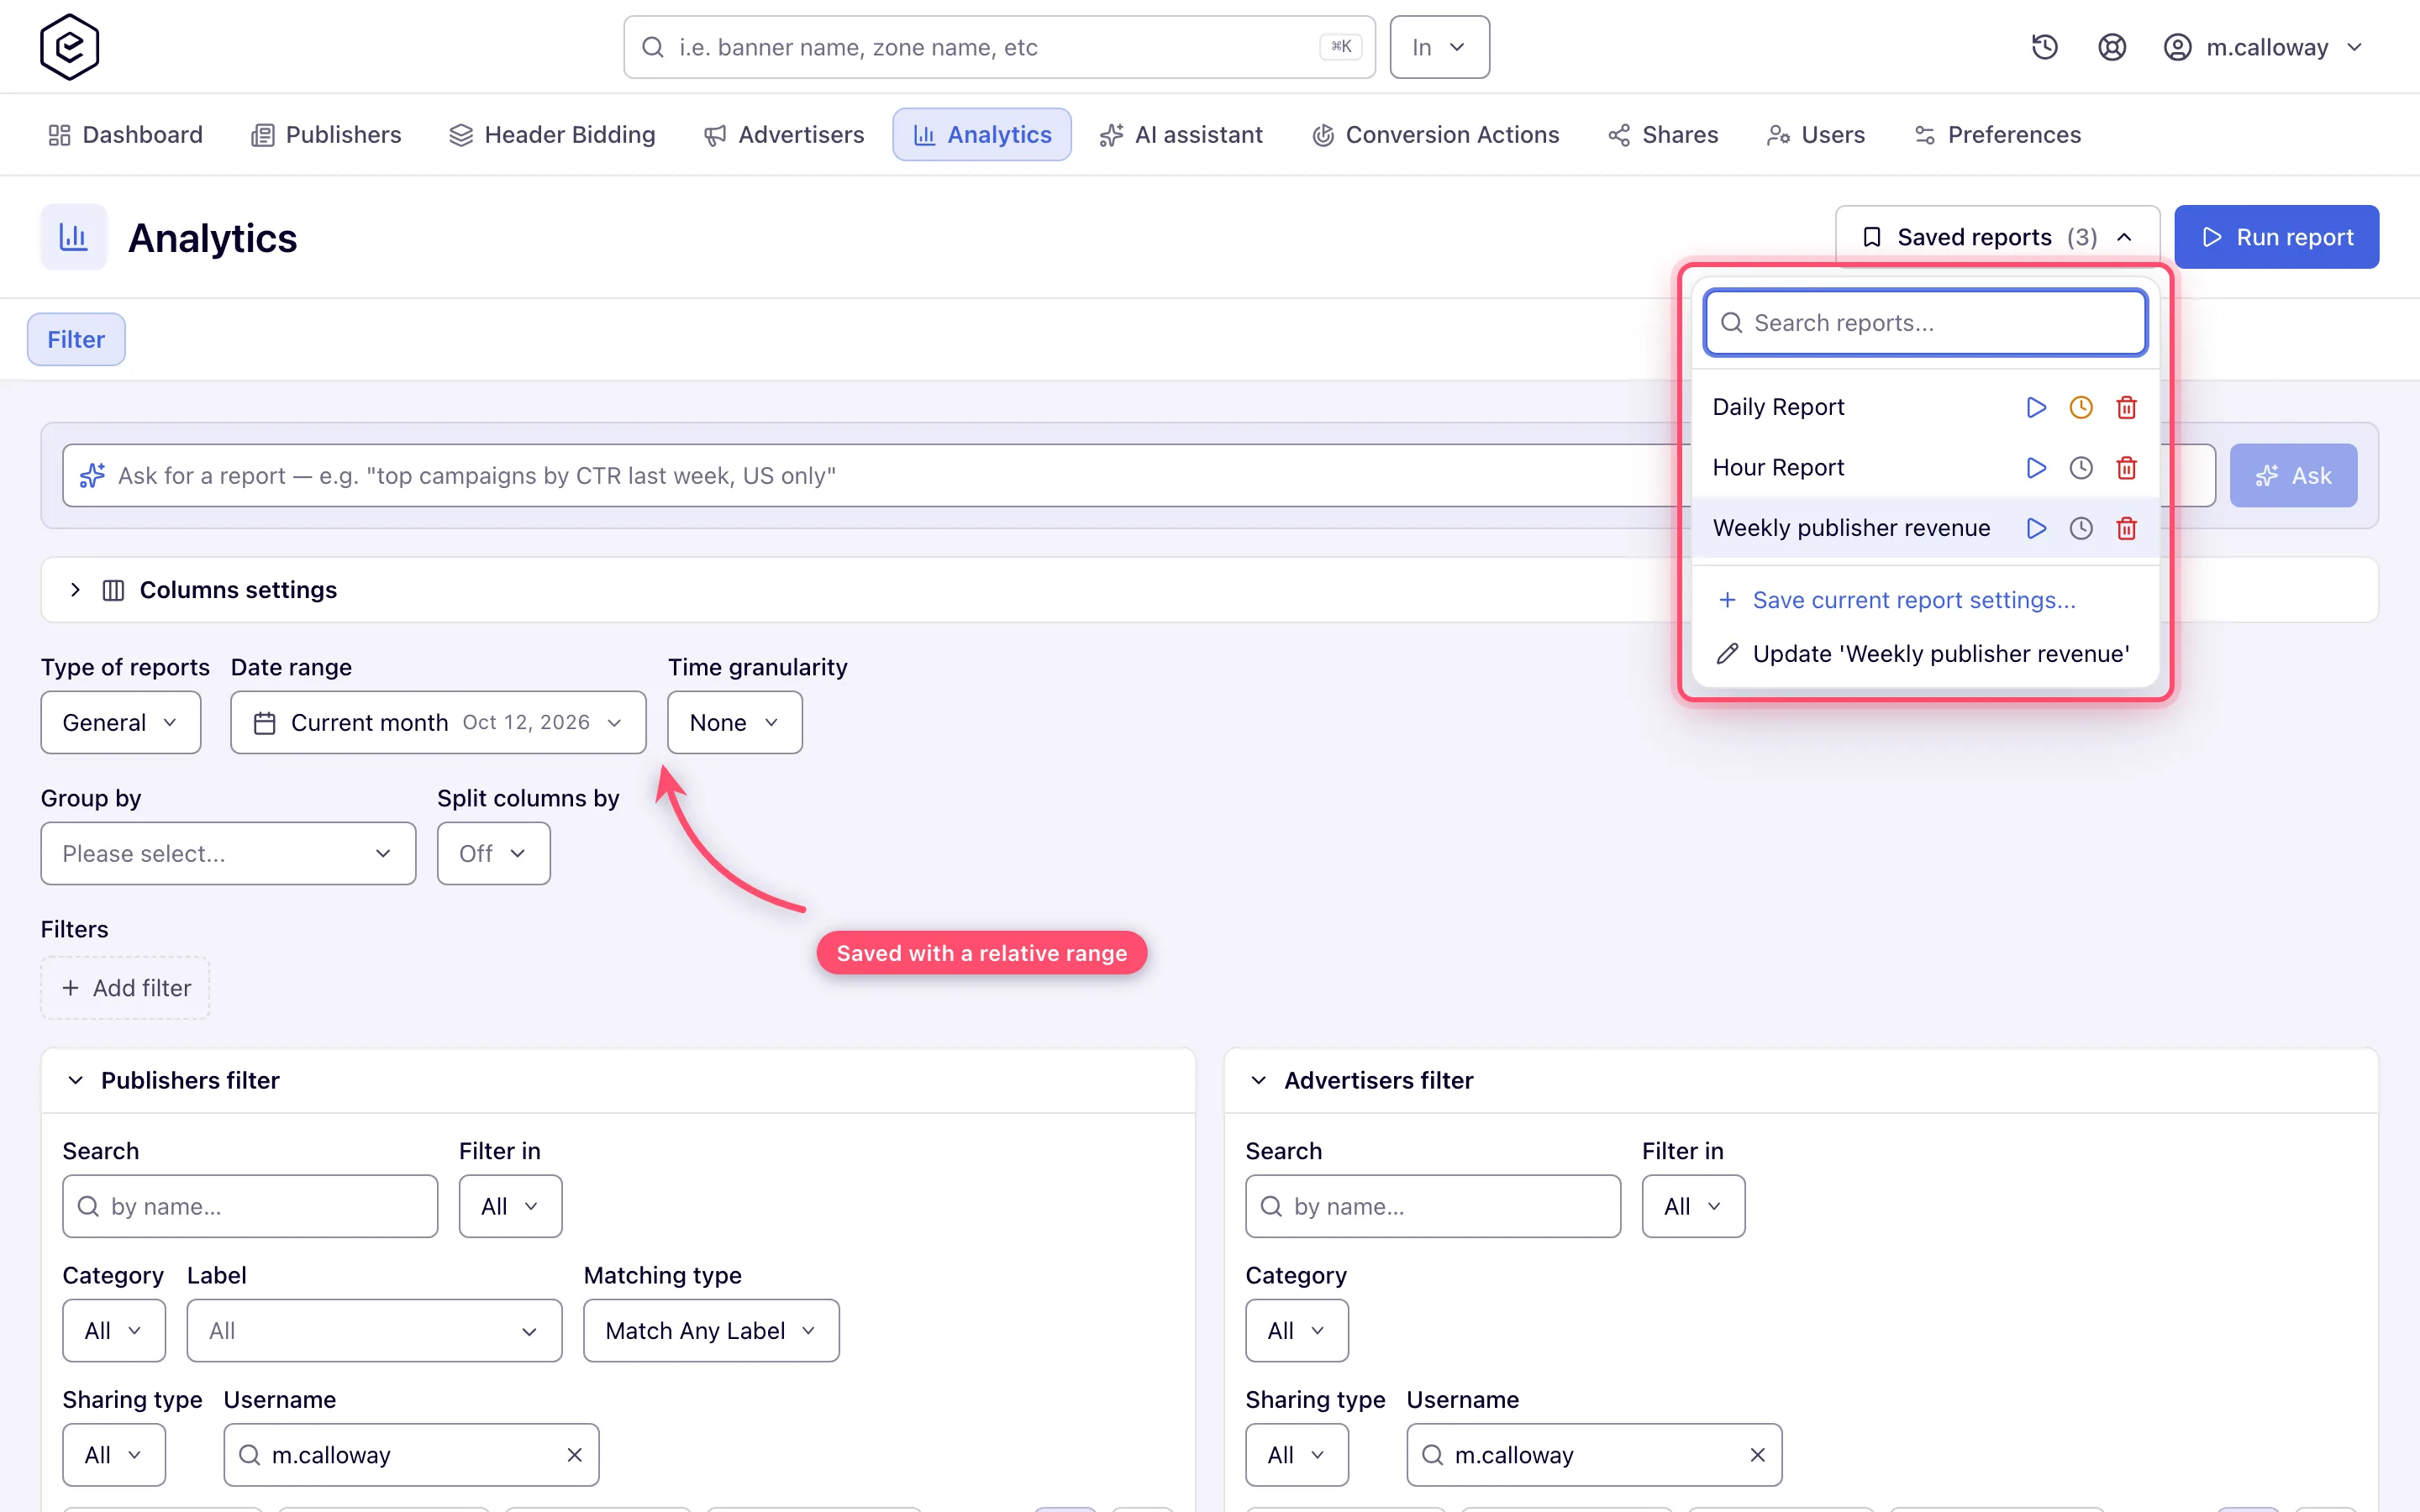
Open Saved reports and click a template’s title to load it into the form — a green Report template has been applied successfully toast confirms it. The blue ▷ icon on the row does the same and runs the report straight away.
-
The applied row is highlighted, and the footer gains Update ‘<title>’.
-
Applying replaces the entire form, including the publisher and advertiser tree selections and the columns — it is not a merge.
Note: the date range comes back as the preset, not as the dates the template was saved on. A Last 7 days template applied today runs over the last seven days from today. Only a Custom range… template carries two fixed dates — that is the one case where the saved parameters hold literal days, and it is deliberate, so a relative range never freezes.
Update or replace a template
Open Saved reports with a template applied and choose Update ‘<title>’. Confirm the Edit current prompt and the template is overwritten with the form as it now stands. Use Save current report settings… instead to keep both versions.
Overwriting keeps the template’s id, so any schedule and recipients attached to it survive — the next email simply renders the new shape.
Delete a template
Click the red bin icon on the row and confirm. Deleting also removes every schedule slot attached to the template; recipients go with it.
Schedule recurring emails
-
In Saved reports, click the clock icon on the row. An amber clock means the template already has a schedule; a grey one means it has none — in the list that icon is the only thing telling the two apart.
-
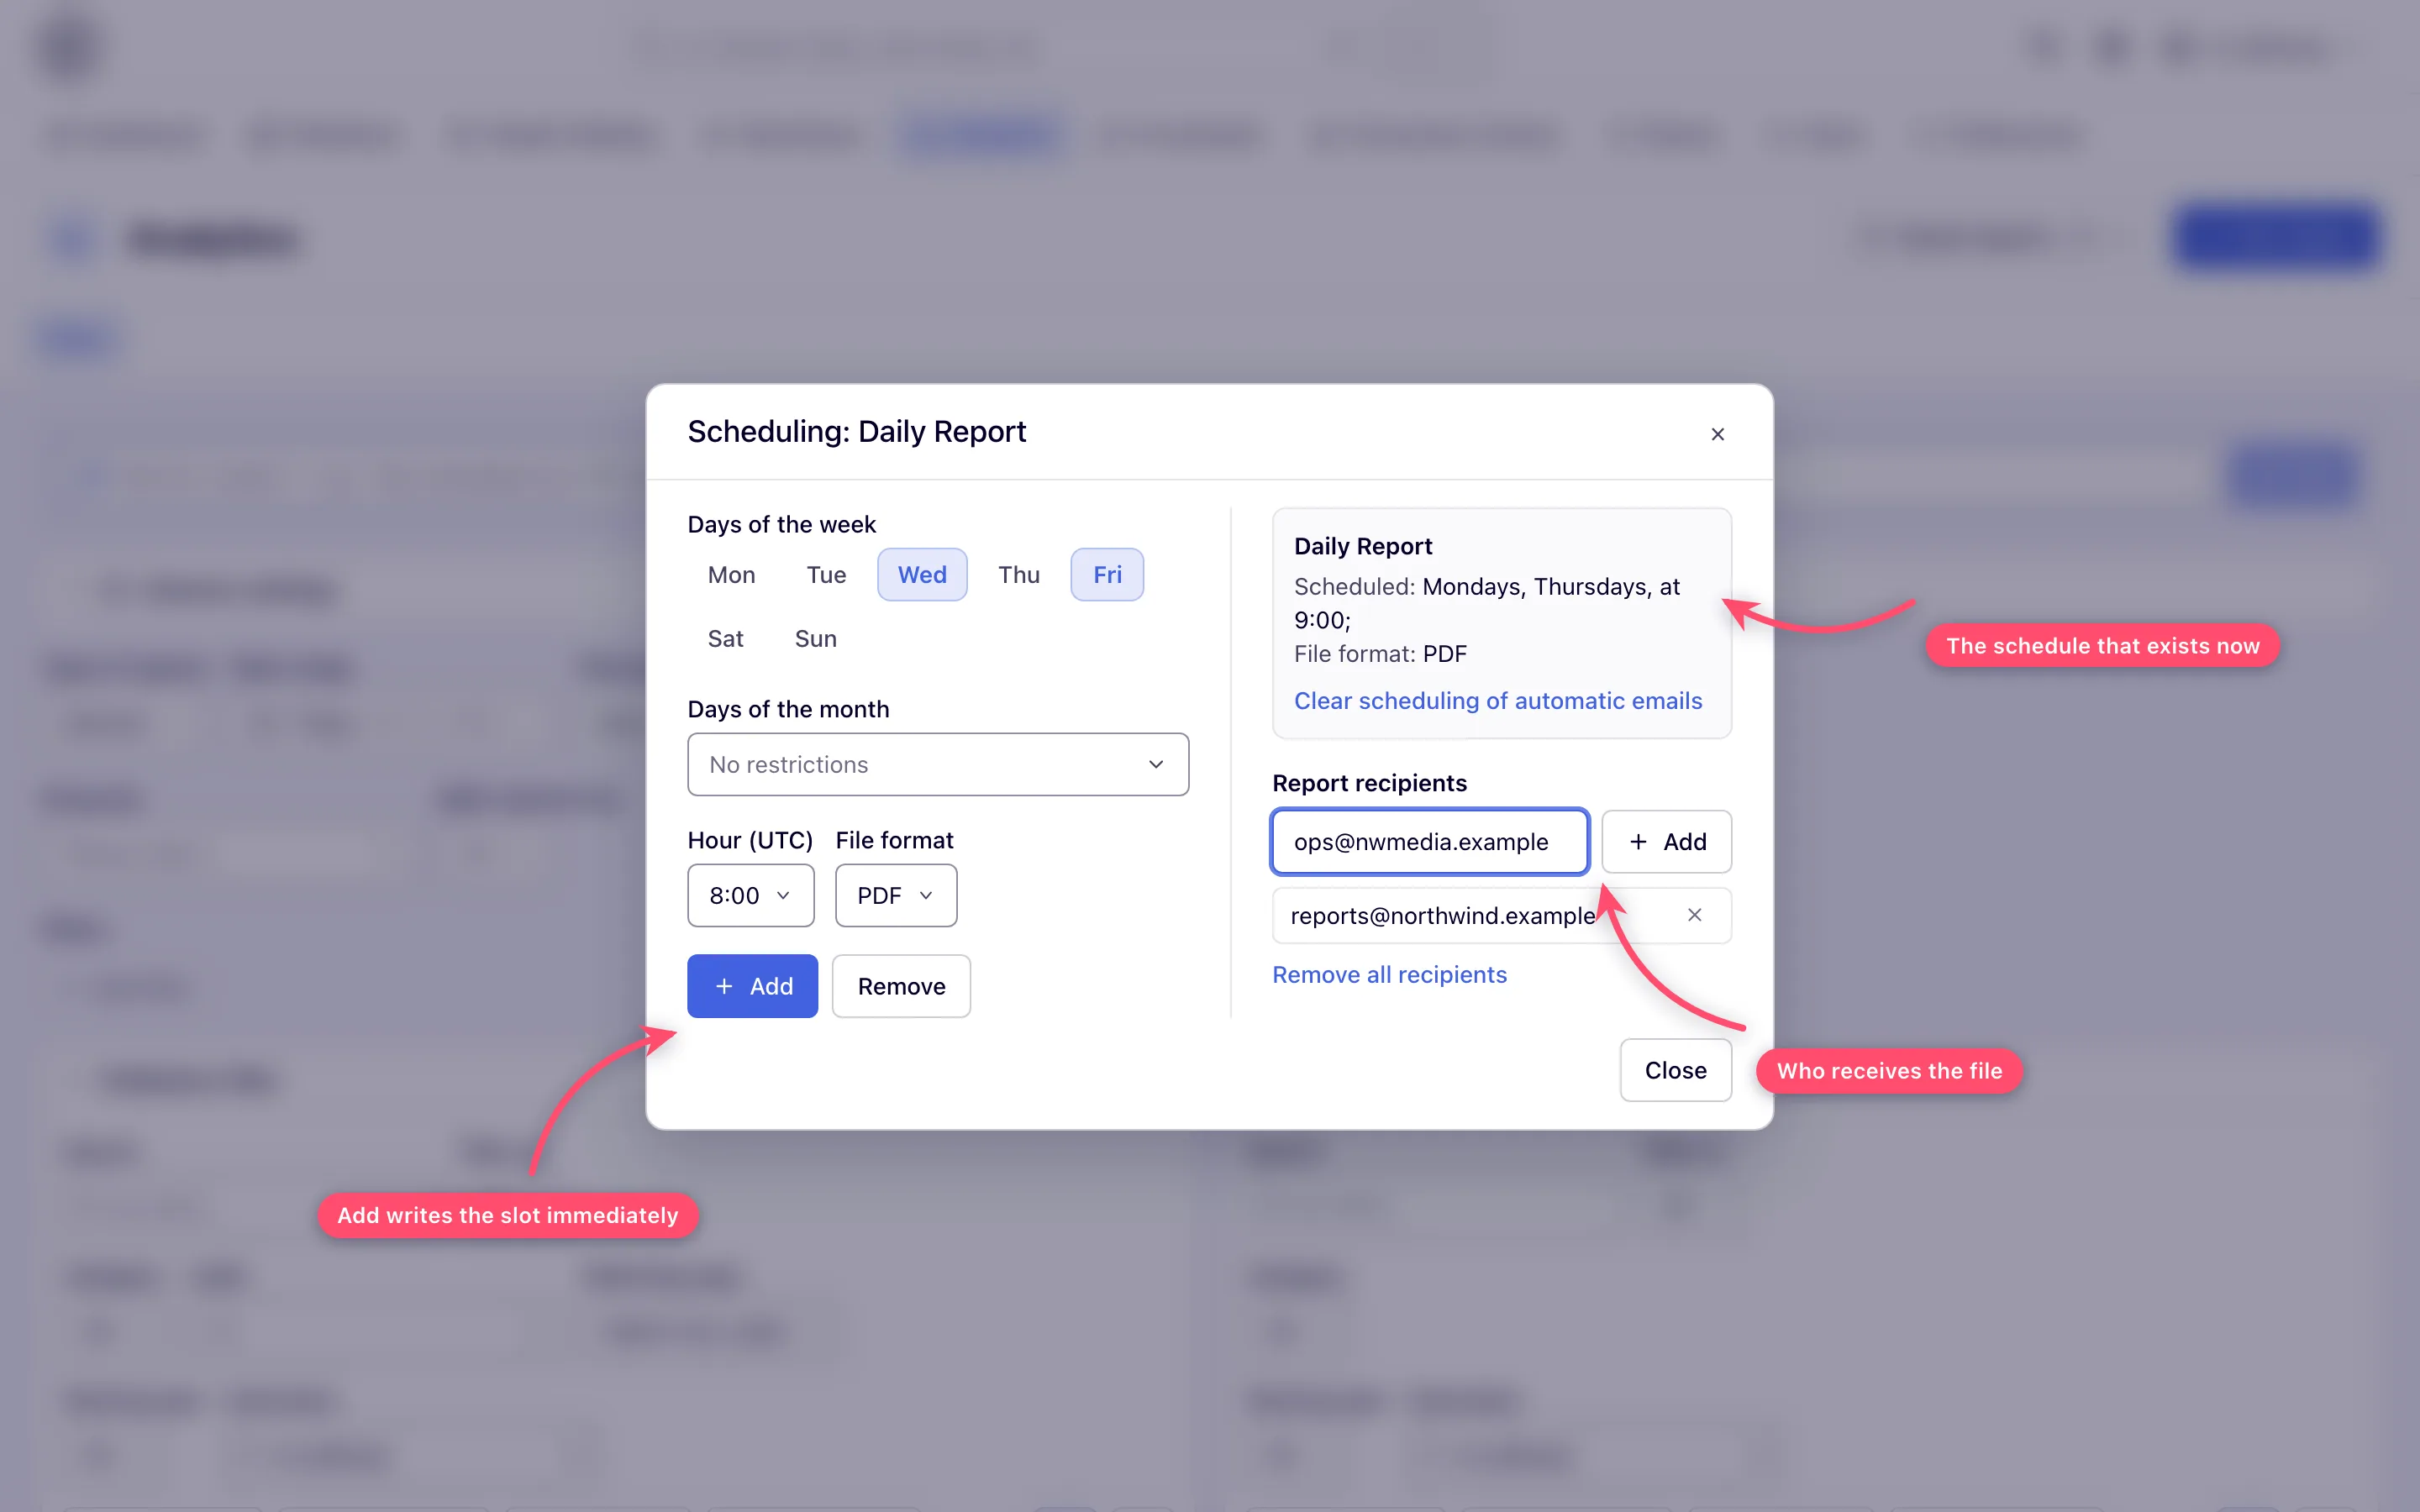
The Scheduling dialog opens. The left column always opens blank: it describes the slot you are about to add or remove, never the one that already exists. The right column is the current state.
-
Compose a slot: pick days of the week, and/or days of the month (left at No restrictions for a weekly-only schedule), an hour, and a file format. Add and Remove stay disabled until at least one day is picked.
-
Click Add. There is no Save button — the write happens at once, the day pickers reset, and the Scheduled: line on the right re-reads itself. That refreshed line is the confirmation.
-
To drop a slot, select the same days and hour and click Remove. Clear scheduling of automatic emails deletes every slot in one go; it is only shown while a schedule exists.
Repeat step 3 for as many slots as you need — a template can carry a weekly slot at one hour and a monthly slot at another.
Recipients
Under Report recipients, type an address and click Add (or press Enter). Addresses are compared whole and ignoring case: adding one that is already listed is refused with … is already a recipient. Added addresses appear as a list underneath, each with an ×; Remove all recipients clears the lot. Like the schedule, every change applies immediately.
Warning: the recipient list is the complete distribution list. The account that owns the template is not added to it, so a template that is scheduled but has no recipients renders on time and emails nobody, with nothing in the UI to say so. Add yourself explicitly if you want a copy.
Options and fields
Saved reports popover
| Control | What it does |
|---|---|
| Search reports… | Filters the list by title as you type; always present |
| Template title | Applies the template to the Filter form (does not run it) |
| ▷ Run report | Applies the template and runs it in a new report tab |
| Clock | Opens the Scheduling dialog. Amber = already scheduled, grey = not scheduled |
| Bin | Deletes the template, its schedule and its recipients, after a confirm |
| Save current report settings… | Saves the form as a new template under a title you type |
| Update ‘<title>‘ | Overwrites the currently applied template. Only shown once one is applied |
Scheduling dialog
| Field | What it does | Default | Notes |
|---|---|---|---|
| Days of the week | Weekly slots | none selected | Mon–Sun toggles; resets every time the dialog opens |
| Days of the month | Monthly slots | No restrictions | 1–31, multi-select. Combined with the weekly days as a union, not an intersection |
| Hour | The hour the slot fires (the sender runs 30 seconds past each hour) | 8:00 | Labelled Hour (UTC); see the corner case below |
| File format | Format of the attached file | CSV, XLSX, PDF, HTML, JSON — there is no XLS | |
| Add / Remove | Writes or deletes the composed slot | disabled | Enabled once at least one day is picked |
| Clear scheduling of automatic emails | Deletes every slot on the template | — | Only rendered while a schedule exists |
| Report recipients | Who gets the emailed file | empty | No default recipient; each add/remove applies immediately |
Corner cases and gotchas
Corner case: one slot per day-and-hour, whichever format you pick. Adding Monday 08:00 CSV to a template that already has Monday 08:00 XLSX is ignored — the day-and-hour pair is unique per template. To change a slot’s format, Remove it and add it again.
Corner case: Remove matches on days + hour only; the File format selector is ignored when removing. Set the same days and the same hour as the slot you want gone, and the format you happen to have selected makes no difference.
Corner case: the hour is in UTC. If scheduled mail keeps arriving an hour or two away from the hour you picked, tell Epom support or your account manager.
Corner case: picking days of the week and days of the month in the same Add creates both sets of slots. Mon plus day 1 means “every Monday and the 1st of every month”, not “the 1st only when it is a Monday”.
Corner case: applying a template overwrites work in progress. Save the current form as its own template first if you might want it back — there is no undo and no merge.
Corner case: the emailed file is cut at the row limit for its format, exactly as an interactive export is, and only the PDF and HTML attachments say so — they carry The report is too big and was trimmed, please log in to your account for full report. in the header. A CSV, XLSX or JSON attachment just arrives short, and the covering email never mentions it. If a scheduled file looks truncated, check the per-format export limits with Epom support or your account manager and pick a format with more headroom — see Exports.
Corner case: a recipient address is checked only for its shape. A typo that still looks like an address (
ops@nwmedia.exmaple) is accepted and that copy of the report simply never lands. Read the list back after the first send. A duplicate, in any letter case, is refused.
Corner case: scheduled e-mails support General and Advanced reports only. Schedule a template saved from one of those two types; for Header Bidding or Targeting Cookie figures, run the report and export it by hand.
Corner case: a save that fails reports only Cannot save the record, with no reason. Retry with a shorter title; if it keeps failing, ask Epom support or your account manager.
Corner case: the Analytics address bar mirrors your open report tabs (
?reports=…&tab=…), so back and refresh restore what you were looking at — but the tabs themselves belong to your login session. The link does not work for anyone else, and it does not work for you after the session ends: a tab from an expired session is dropped when the page reloads.
Over the API
Saved reports are under /rest-api/saved-reports:
GET /rest-api/saved-reports.dolists yours with their schedules and recipients;GET .../{id}.doaddsparams, the report’s definition under the parameter names of/rest-api/analytics/{format}.do, ready to run there.POST /rest-api/saved-reports.dosavestitleplus those report parameters;POST .../{id}.dorenames the report and/or changes its definition: each parameter sent replaces its stored value, the rest keep theirs. Filters change per field (eqLong[CAMPAIGN]=7touches only the campaign filter;eqLong[CAMPAIGN]=removes it), and a parameter sent with a leading underscore and no value resets it to its default (_groupBy=,_eqLong=).DELETE .../{id}.dodeletes the report with its schedule.reportsLayoutSettingstakes the column ids ofGET /rest-api/analytics/columns.do; an id that is no column of the report type answers 400 naming it. Always send it when you save: the scheduled e-mail builds its columns only from the stored set, so a template saved without one can produce a file without metric columns.- A definition the scheduled run could not use is refused when it is saved, with a 400 naming the field: a
CUSTOMrange whosecustomTois beforecustomFrom, anhourFrom/hourTooutside 0-23, or ausersTimeZoneIdthat is not one of the report’s time zones (UTC_PLUS_2, …). POST .../{id}/schedule.doadds e-mail slots:hour(0-23, UTC),format(CSV,XLSX,PDF,HTML,JSON) anddaysOfTheWeekand/ordaysOfTheMonth(1-31).DELETE .../{id}/schedule.doremoves the given slots, or all of them when no day is sent.POST/DELETE .../{id}/recipients.doadds or removes anemail(400 when it is not an address; an address already listed is not added twice; removing one that is not listed answers 404);DELETEwithout one clears the list. The owner is not added to the list by either call, and mail goes only to the listed addresses.
Another user’s report id answers 404.
Per-role notes
- Every account role — identical here. Templates are private to the login that saved them, so anyone sharing a login sees its templates and recipients.
- Network administrator — scheduled reports are sent hourly. For a missed report check, in order: the template has recipients; the owning user and parent account are active; the Scheduled Analytics Report email template is active; outbound mail works. If all of that holds, ask Epom support or your account manager to re-send the report for the missed slot.