
Sell a flat-rate sponsorship or homepage takeover
Recipe for a direct-sold, fixed-price flight — guaranteed slot via exclusive linking and Premium priority, date-bounded delivery, page takeover mode, and proof-of-delivery reporting.
You sell a fixed-price deal to a direct client: their creative owns your homepage hero slot (or the whole page) for one week, at a flat fee agreed offline. This recipe builds that in Epom end-to-end — a first-pick, date-bounded, exclusive flight with a delivery report you can send to the client.
Who this is for
Network managers closing direct deals. The Priority select is in the stock Network Manager role and not in the Advertiser role — if it is missing from yours, ask your network administrator — and the placement-side work that makes the slot exclusive needs access to the inventory. The client can get their own advertiser-role login to watch delivery, but the setup below is done by the network side.
Prerequisites
- The sold slot exists as a placement with the correct size, and its ad tag is live on the page.
- The client exists as an advertiser (create one if not).
- The creative files, sized exactly to the slot.
- Agreed flight dates and the flat fee.
Steps
1. Create the campaign and make it Premium
- Go to Account → Advertisers → advertiser and click Add new campaign.
- On the Basic information card, set the name (e.g. “Acme — Homepage takeover W27”) and set
Priority to Premium. Priority tiers are tried in order during
ad selection — Premium, Standard High, Standard
Medium, Standard Low, Non-guaranteed, House ads — so a Premium campaign outserves every
campaign in the lower tiers competing for the same slot, regardless of their prices.
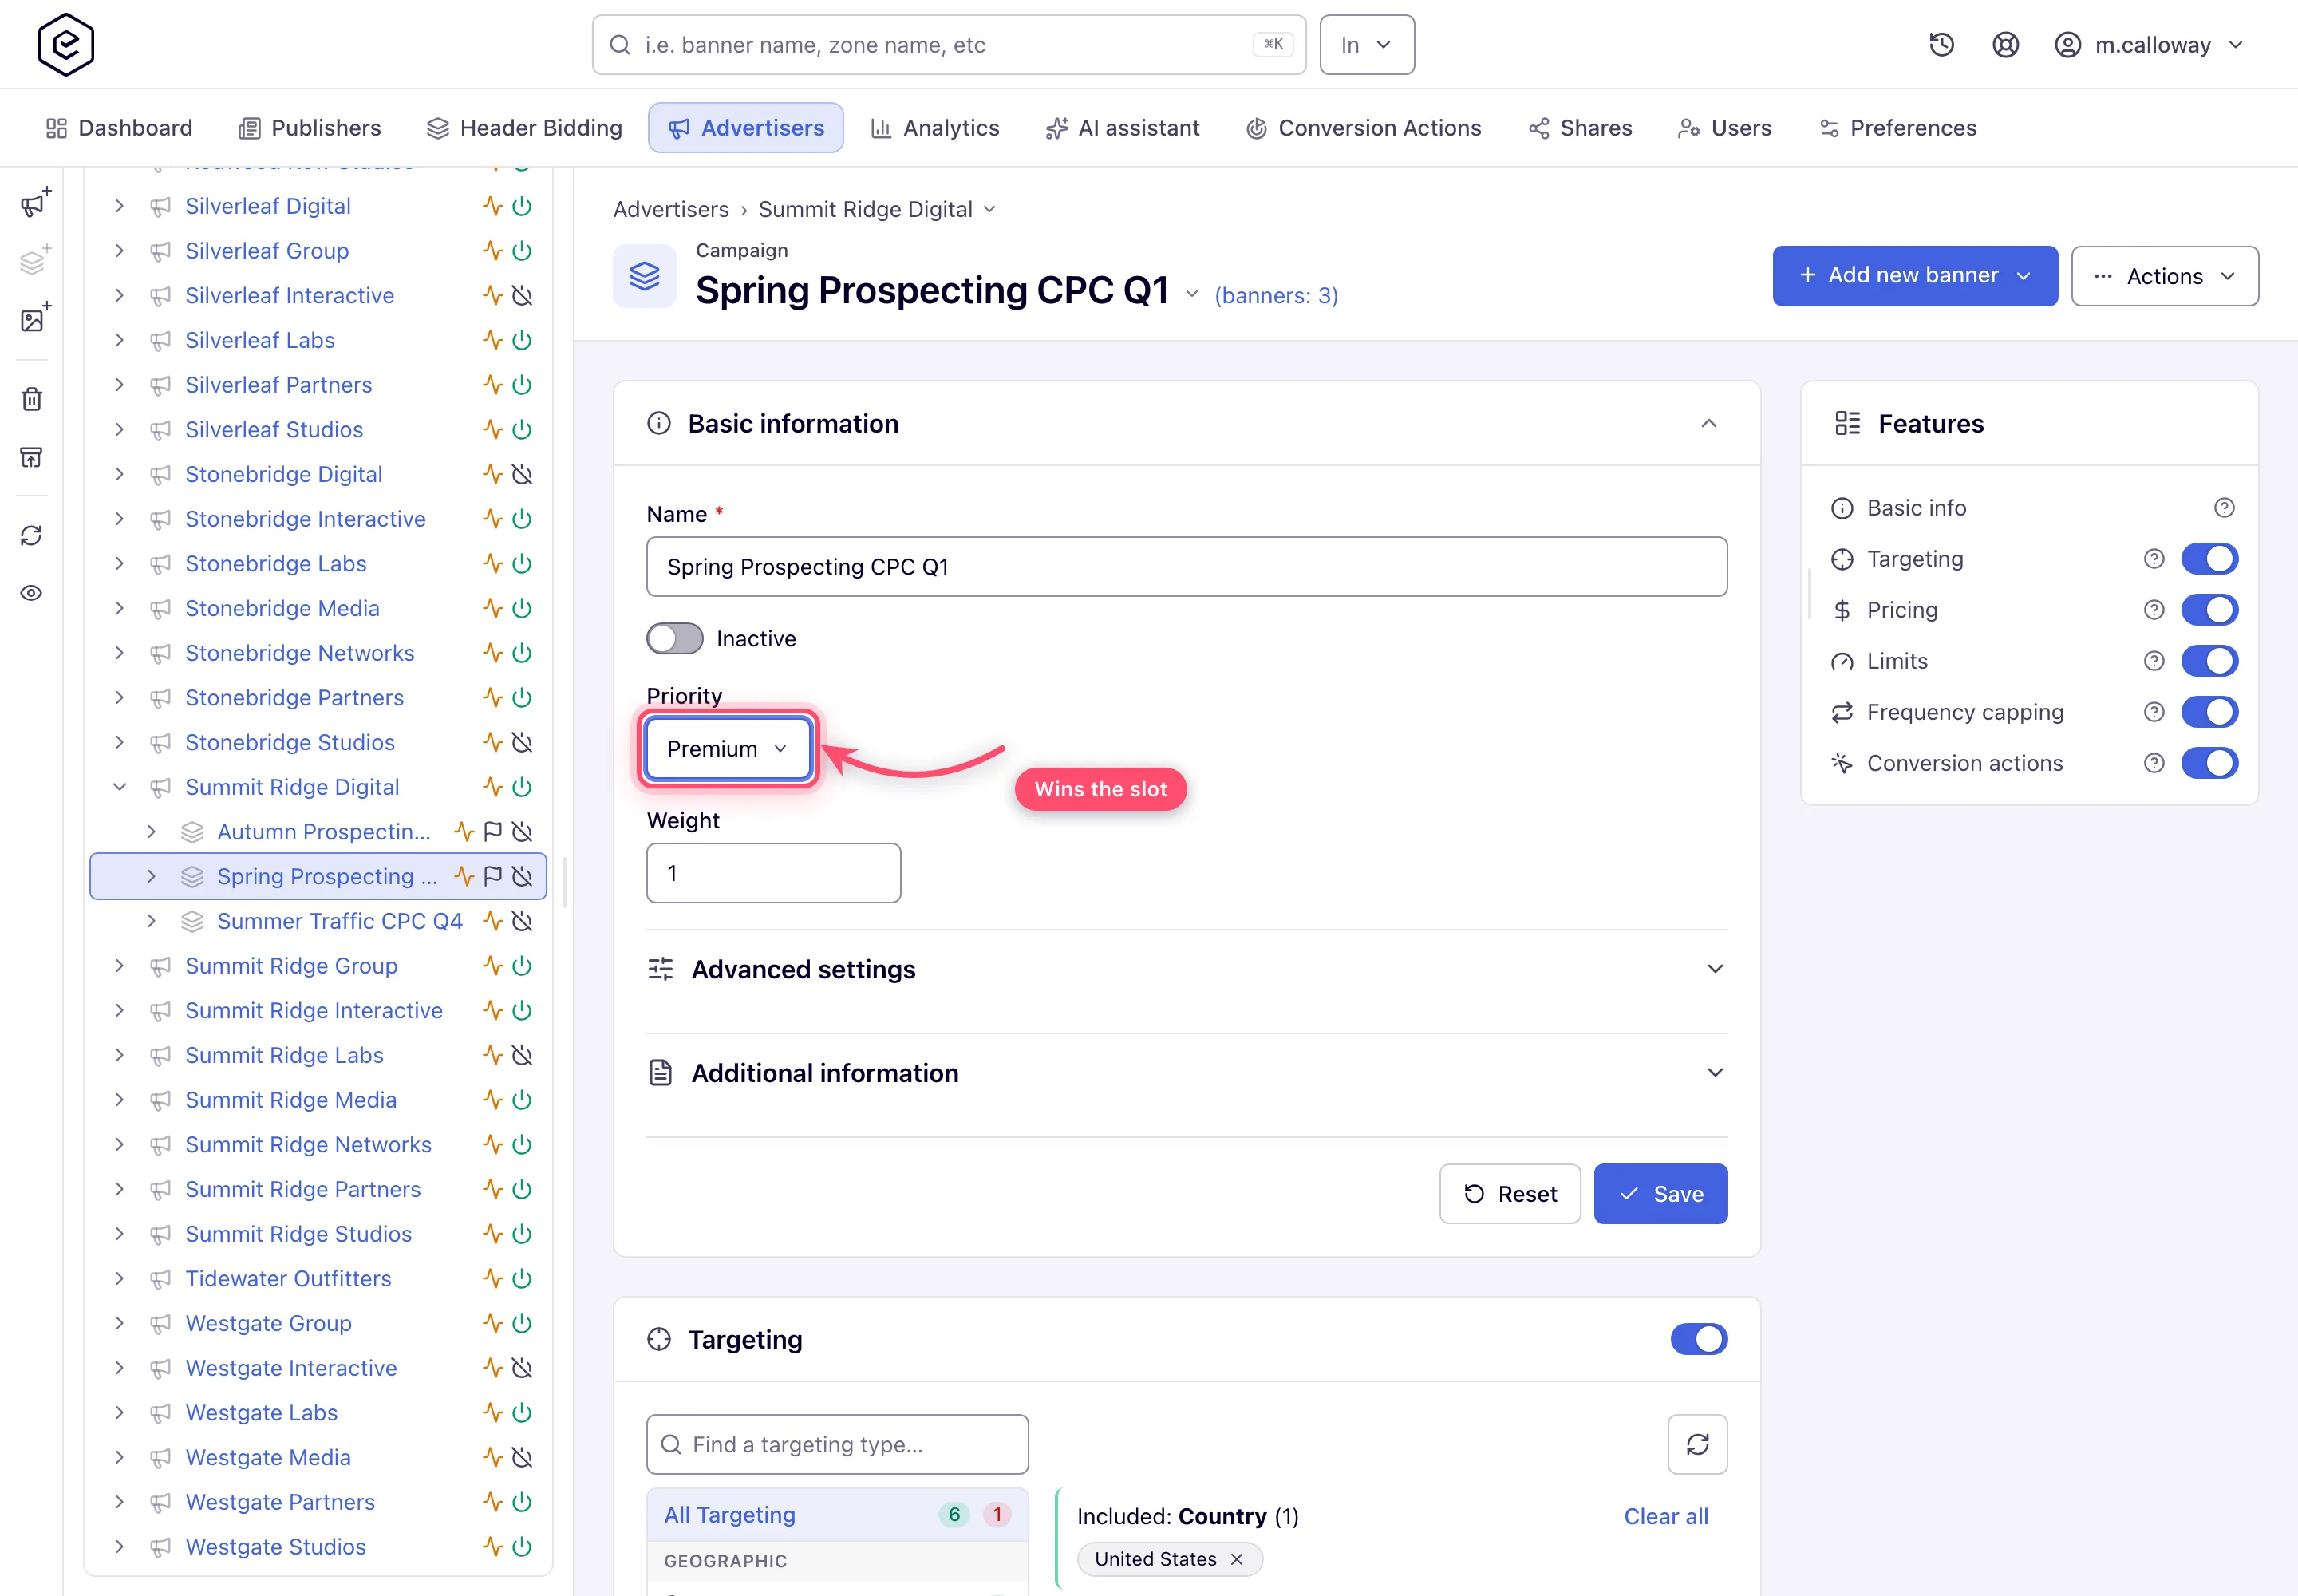
- Weight does not matter while the sponsor is alone in the Premium tier; leave it at 1.
2. Bound the flight with dates
- Scroll to the Limits card, switch it on, and pick Start date and End date for
the sold flight. Picking a start date from the calendar gives it 00:00 and picking an end
date gives it 23:59, so the flight covers whole days; type a different time afterwards if
you need one. Tick Local time (UTC ±X) if the deal was agreed in your browser’s
timezone rather than the server’s — it moves only those two dates, not the daily counter
reset. See Set volume limits and budgets.
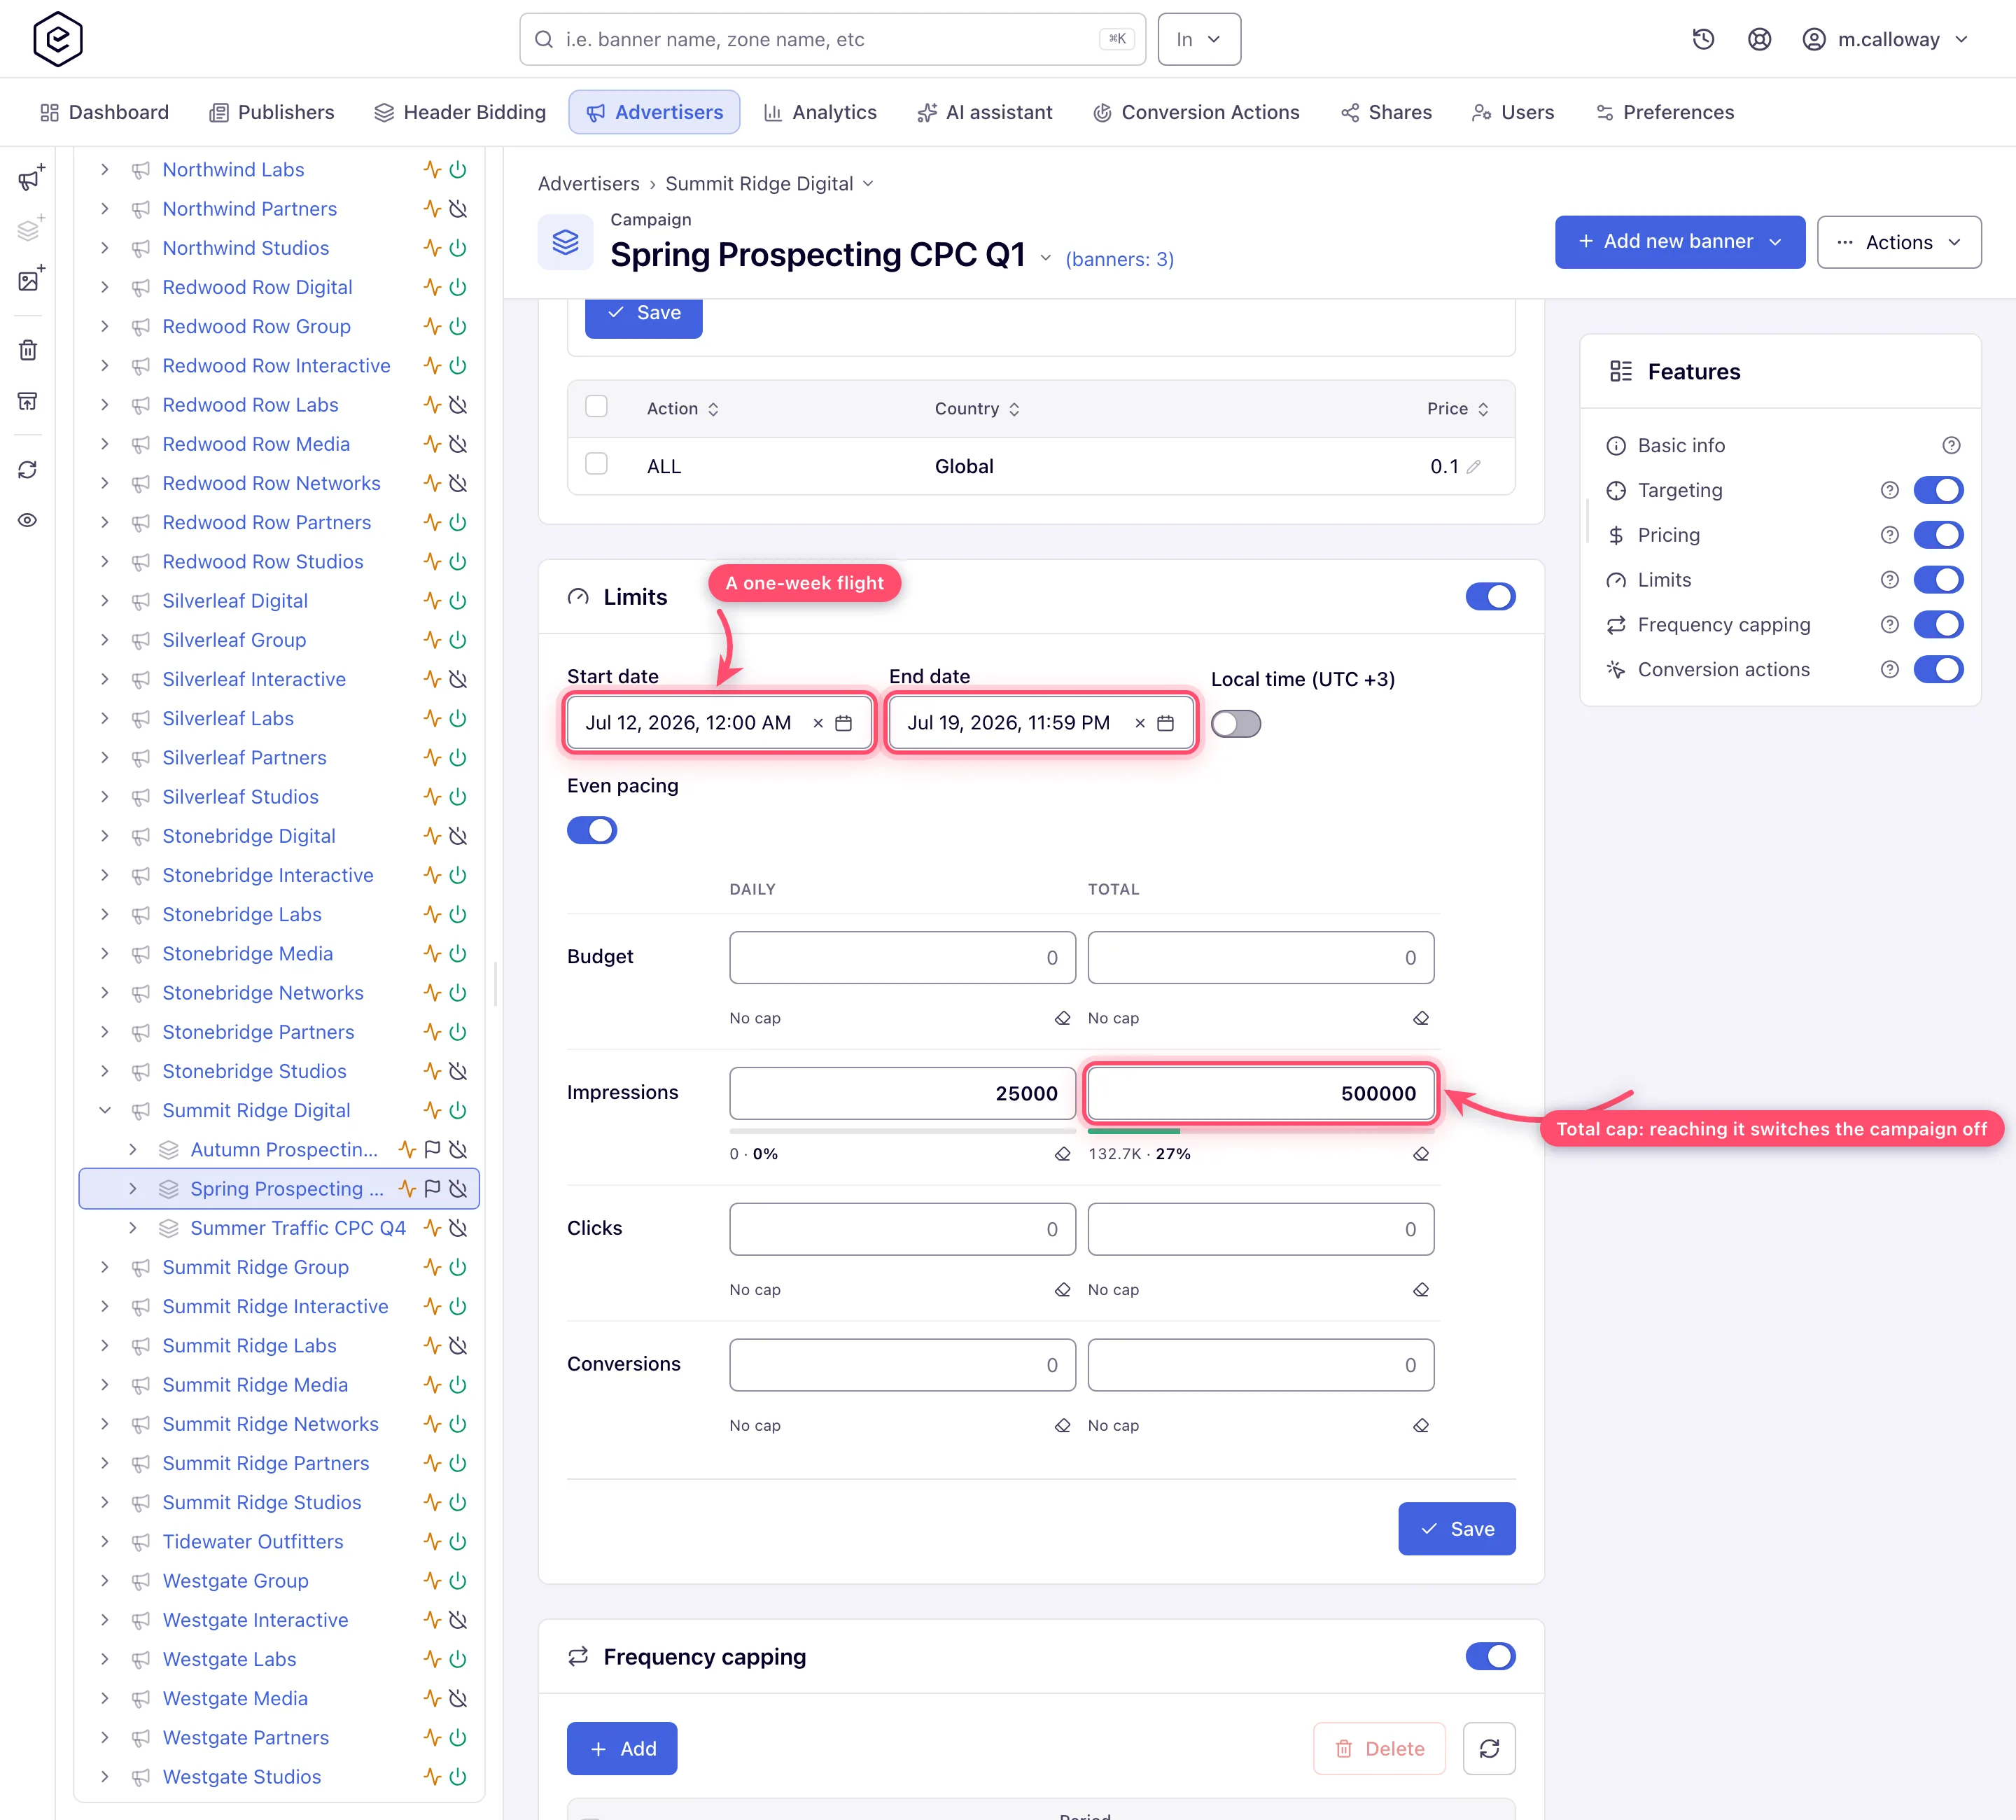
- If the deal includes a delivery number (“at least/at most N impressions”), set the Impressions row’s Total cap too, and consider Even pacing to spread it across the flight instead of front-loading. Pacing needs the End date you set above: a total cap on an entity with no end date is not paced. A filled Total cap and a passed End date both switch the campaign off for good — see the corner case below.
3. Price the deal
Campaign (advertiser-side) pricing offers CPM, CPC and CPA only — there is no flat pricing model on campaigns. Two workable patterns:
- Bill the flat fee off-platform, keep reporting truthful in-platform: set the campaign
to CPM with a Global price of
fee ÷ expected impressions × 1000. Reports then show a revenue figure that adds up to (roughly) the flat fee, which keeps dashboards and profit numbers meaningful. - If the flat side of the deal is what you pay the publisher (you own the demand, the slot is rented at a fixed rate), use the placement or site Pricing card — the supply side offers Cost per day and Cost per month. Both are off for every role out of the box; ask your network administrator to switch them on. See Configure pricing.
4. Link the creative — and make the slot exclusive
- Create the banner under the campaign (Add new banner → Add banner for Site Placement for a site slot), sized exactly to the placement’s ad unit, and link it to the takeover placement with the banner’s Link placements button or its Linked placements card (see Hierarchy and linking).
- For a hard guarantee that nothing else can appear in the slot during the flight, make the sponsor the placement’s only demand: on the placement, keep only the sponsorship banner(s) linked for the flight and switch the placement’s Matching rules card off in the Features rail so category/label matching can’t pull in other banners. With no other eligible demand, the slot is the sponsor’s alone.
- If you’d rather keep backup demand in place, rely on Premium priority instead: other campaigns stay linked but only serve when the sponsor campaign is ineligible. That is a “soft takeover” — see the corner cases.
- Decide what the slot does if the sponsor can’t serve (creative rejected, limit filled): the placement’s Default code (under Basic info → Advanced settings) is returned when nothing at all filled the request — put a house-ad or partner tag there, or leave it empty if you want no fallback. See Daisy chaining and passbacks.
5. Roadblock the whole page (optional)
If the takeover covers several slots on the same page, link one banner per placement (all under the sponsor campaign) and tick Only this campaign on page under Advanced settings on the campaign’s Basic information card. Once the sponsor has won a slot on a page view, the page’s remaining slots are filled from the same campaign instead of mixing advertisers — provided it is still eligible for each slot (targeting, size, caps). That control has an Alias field (campaigns sharing an alias form one group), but no role can edit it out of the box — ask your network administrator if you need it (campaign fields). Leave Only one banner from this campaign per page unticked: it makes the campaign skip every slot after its first on a page view, which is the opposite of a roadblock.
6. Prove delivery
- After the flight starts, go to Account → Analytics, set the Date range to the
flight (Custom range, or a preset that contains it), set Time granularity → Day,
choose Group by → Campaign and then Placement, tick the campaign in the
Advertisers filter, and click Run report — see
Run a report.
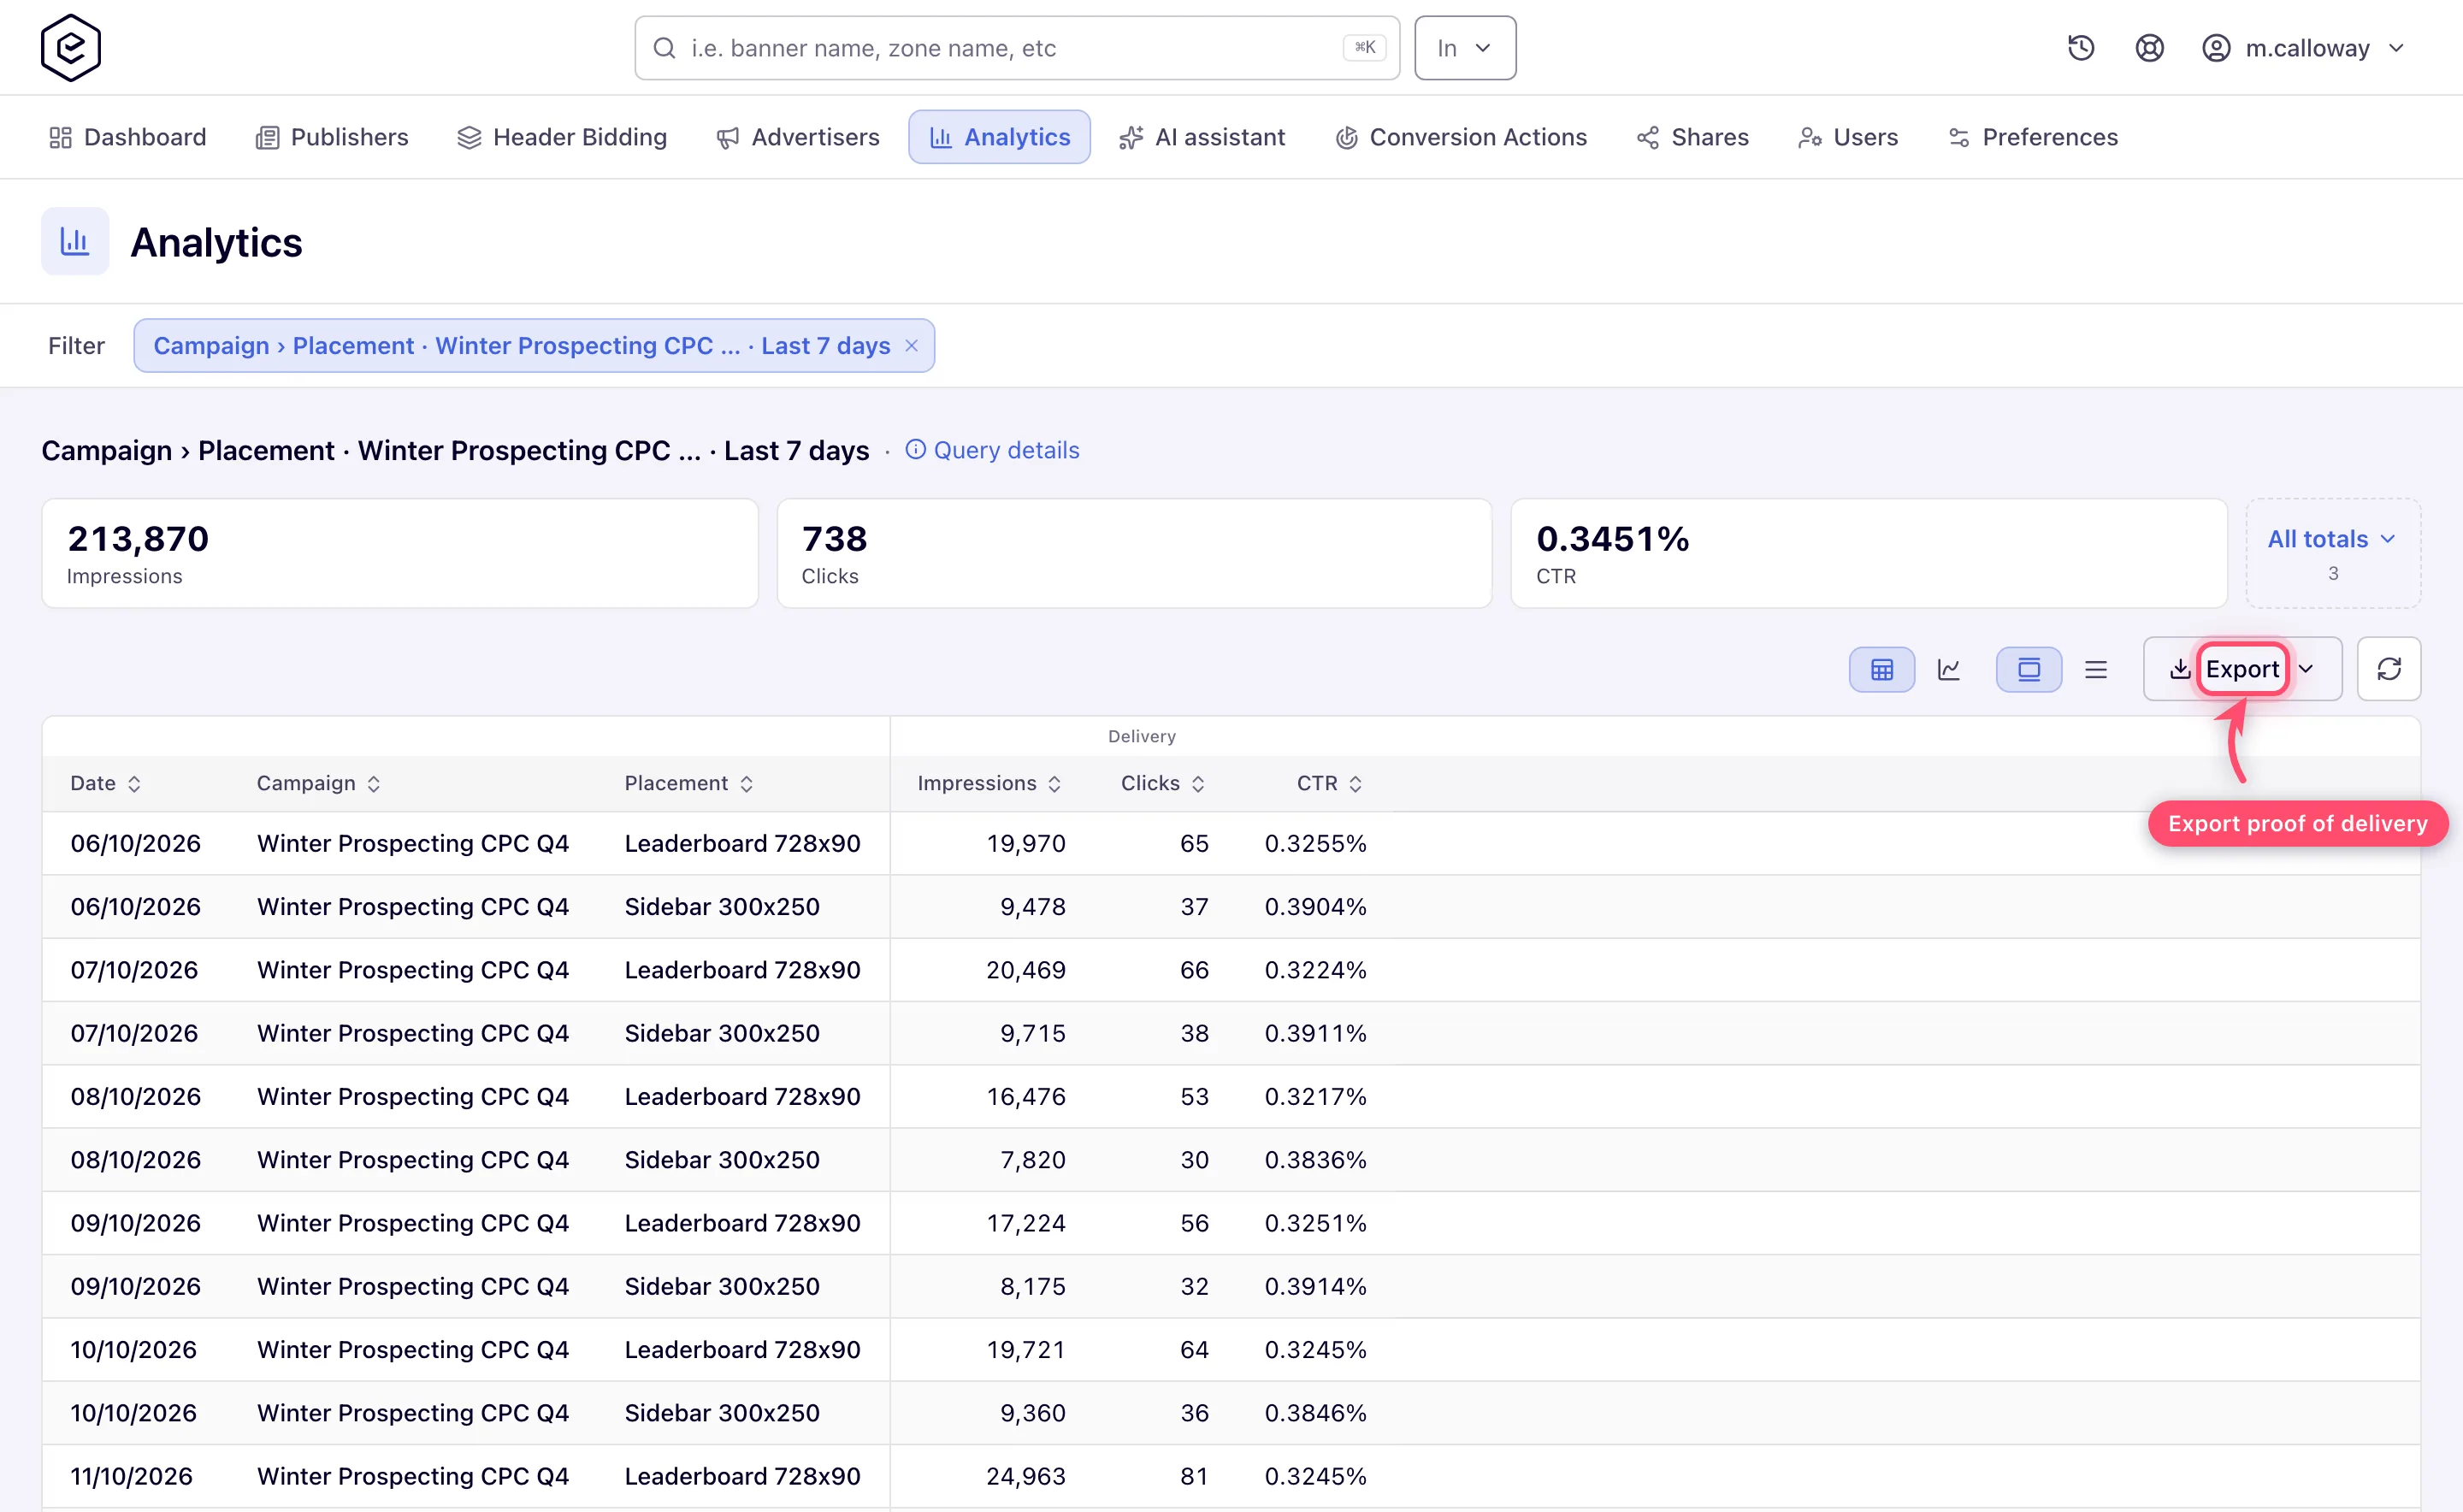
- Use Export for the client — CSV, XLSX, PDF, HTML or JSON — or better: save the report as a template (Saved reports) and schedule it as a recurring email with the client’s address in Report recipients. The recipient list is the whole distribution list: the template’s owner gets nothing unless added. A template saved with a Custom range keeps those fixed dates; a preset such as Last 7 days stays relative. See Save, reuse and schedule reports.
Corner cases and gotchas
Corner case — Premium priority is “first pick”, not “guaranteed delivery”. The priority tier only decides who wins among eligible candidates. If the sponsor campaign becomes ineligible — a filled limit, a targeting mismatch, a rejected creative — lower tiers fill the slot immediately. For a contractual “nothing else, ever” takeover, use the exclusive-linking setup from step 4, not priority alone. Priority is also skipped on a placement whose Daisy chaining card has Type Campaign and Apply priorities off — there the chain order decides, not the tier.
Corner case — exclusive linking can be undone from outside the placement. Another campaign with New placements auto-linking ticked links its banners again when a placement or site is created or edited, and a Matching rule switched back on can pair other banners with the slot. Check the placement’s Linked banners card after any change to it.
Corner case — there is no flat pricing model on campaigns. The campaign pricing dropdown offers only CPM/CPC/CPA. Cost per day / Cost per month exist only on placements and sites, and they set what you pay the publisher, not what the advertiser pays you. A scheduled job writes the fee into daily analytics, so a day with no impressions earns nothing and hourly reports show zero. Don’t set a placement flat price expecting it to bill the client.
Corner case — changes are not instant. Ad serving works from an in-memory copy of your setup. A saved change to the campaign, banner or site reaches it through an update message, usually within seconds; anything that message does not cover — frequency caps, price adjustment rules — waits for the full rebuild, which runs every 10 minutes (at 5, 15, 25, 35, 45 and 55 past the hour). Build slack into “starts at midnight” promises, or set the start date in advance and let the date gate do the timing (how current the numbers are).
Corner case — a filled Total cap or a passed End date switches the campaign off, and it stays off. When a Total impressions, clicks, conversions or budget cap fills, the statistics update (hourly by default) turns the campaign’s own Active switch off; once the End date has passed, the same update does it. Raising the cap or moving the date afterwards does not turn it back on — switch it on by hand. For an extension, change the End date and check the switch (Total caps switch the entity off — permanently).
Corner case — resizing the creative silently unlinks it. If you swap the banner file for a different size mid-flight, the platform re-checks links on save and silently drops placements that no longer match the size. Re-open the Linked placements card and check the link count after any creative change (details).
Note: campaign start/end dates live in the Limits card, not Basic information. Switching the Limits card off deletes the limit record — dates, caps and counters — so a campaign with Limits off has no flight window at all.
Per-role notes
- Network manager: the build is yours, because exclusivity is set on the placement and the Priority select is a network-side control.
- Advertiser (the client’s own login): they can read the flight dates, price and delivery counters and run the report. They can also change the two same-page checkboxes on their campaign, so share it at Can view if they should only watch.
- Can edit share: lets the client change the flight dates. The stock Advertiser role cannot delete the campaign at any share level.