Monetize a website with display ads
End-to-end recipe — structure a site into zones and display placements, generate the tags, set publisher pricing and a passback, and read the reports that show your fill and revenue.
You own a website and want to earn from banner slots on it — the classic publisher setup. This recipe takes you from nothing to a structured, priced, always-filled set of display slots with revenue you can verify in reports.
If you are a publisher: what you do. Steps 1–3 (site, zones, placements), step 6 (Default code), step 7 (the tag on your page) and step 9 (the reports) are yours. Steps marked (network manager) — payout, floors and connecting demand — are done for you by your network; the stock Publisher role does not see those cards. Before going live, also read Privacy signals and ads.txt.
Who this is for
Publishers monetizing their own property and network managers onboarding a publisher’s site.
Prerequisites
- Access to your website’s templates — you will paste one ad tag per slot.
- Demand that can fill the slots: your network’s campaigns, programmatic DSP partners, or at minimum house ads.
- Agreed payout terms — a fixed CPM (price per thousand impressions) or a percentage of revenue.
The recipe at a glance
| Business decision | Epom feature |
|---|---|
| ”These are my pages and slots” | Site → zones per page area → one display placement per slot |
| ”Each slot has a size” | Ad unit on the placement (fixed, custom, or flexible) |
| “This is how I get paid” | Placement/site Pricing card (CPM payout) or Revenue Share card (%) |
| “Cheap programmatic bids shouldn’t win here” | Bid floor (placement/site) and CPM threshold (site) — both need a permission the stock roles do not hold |
| ”Never show a blank” | Default code (passback) + house ads |
| ”Prove it works” | General report by placement/day; publisher dashboard |
Steps
- Create the site. Go to Account → Publishers and click New site in the tree’s action rail. Enter the Name, leave Inventory type on Website and enter the Site URL. Where the role shows a Category field (a network manager’s does; the stock Publisher’s does not), pick the site’s categories — they drive Rules-based matching and auto-linking later. If your network reviews sites, a new one carries a Pending badge until someone approves it — a review status only, which does not stop the site’s placements from serving (details).
- Add one zone per page area — for example Homepage, Article pages, Sidebar.
Zones exist for organization, zone-level reporting and pre-targeting that covers every
slot in the area (details).
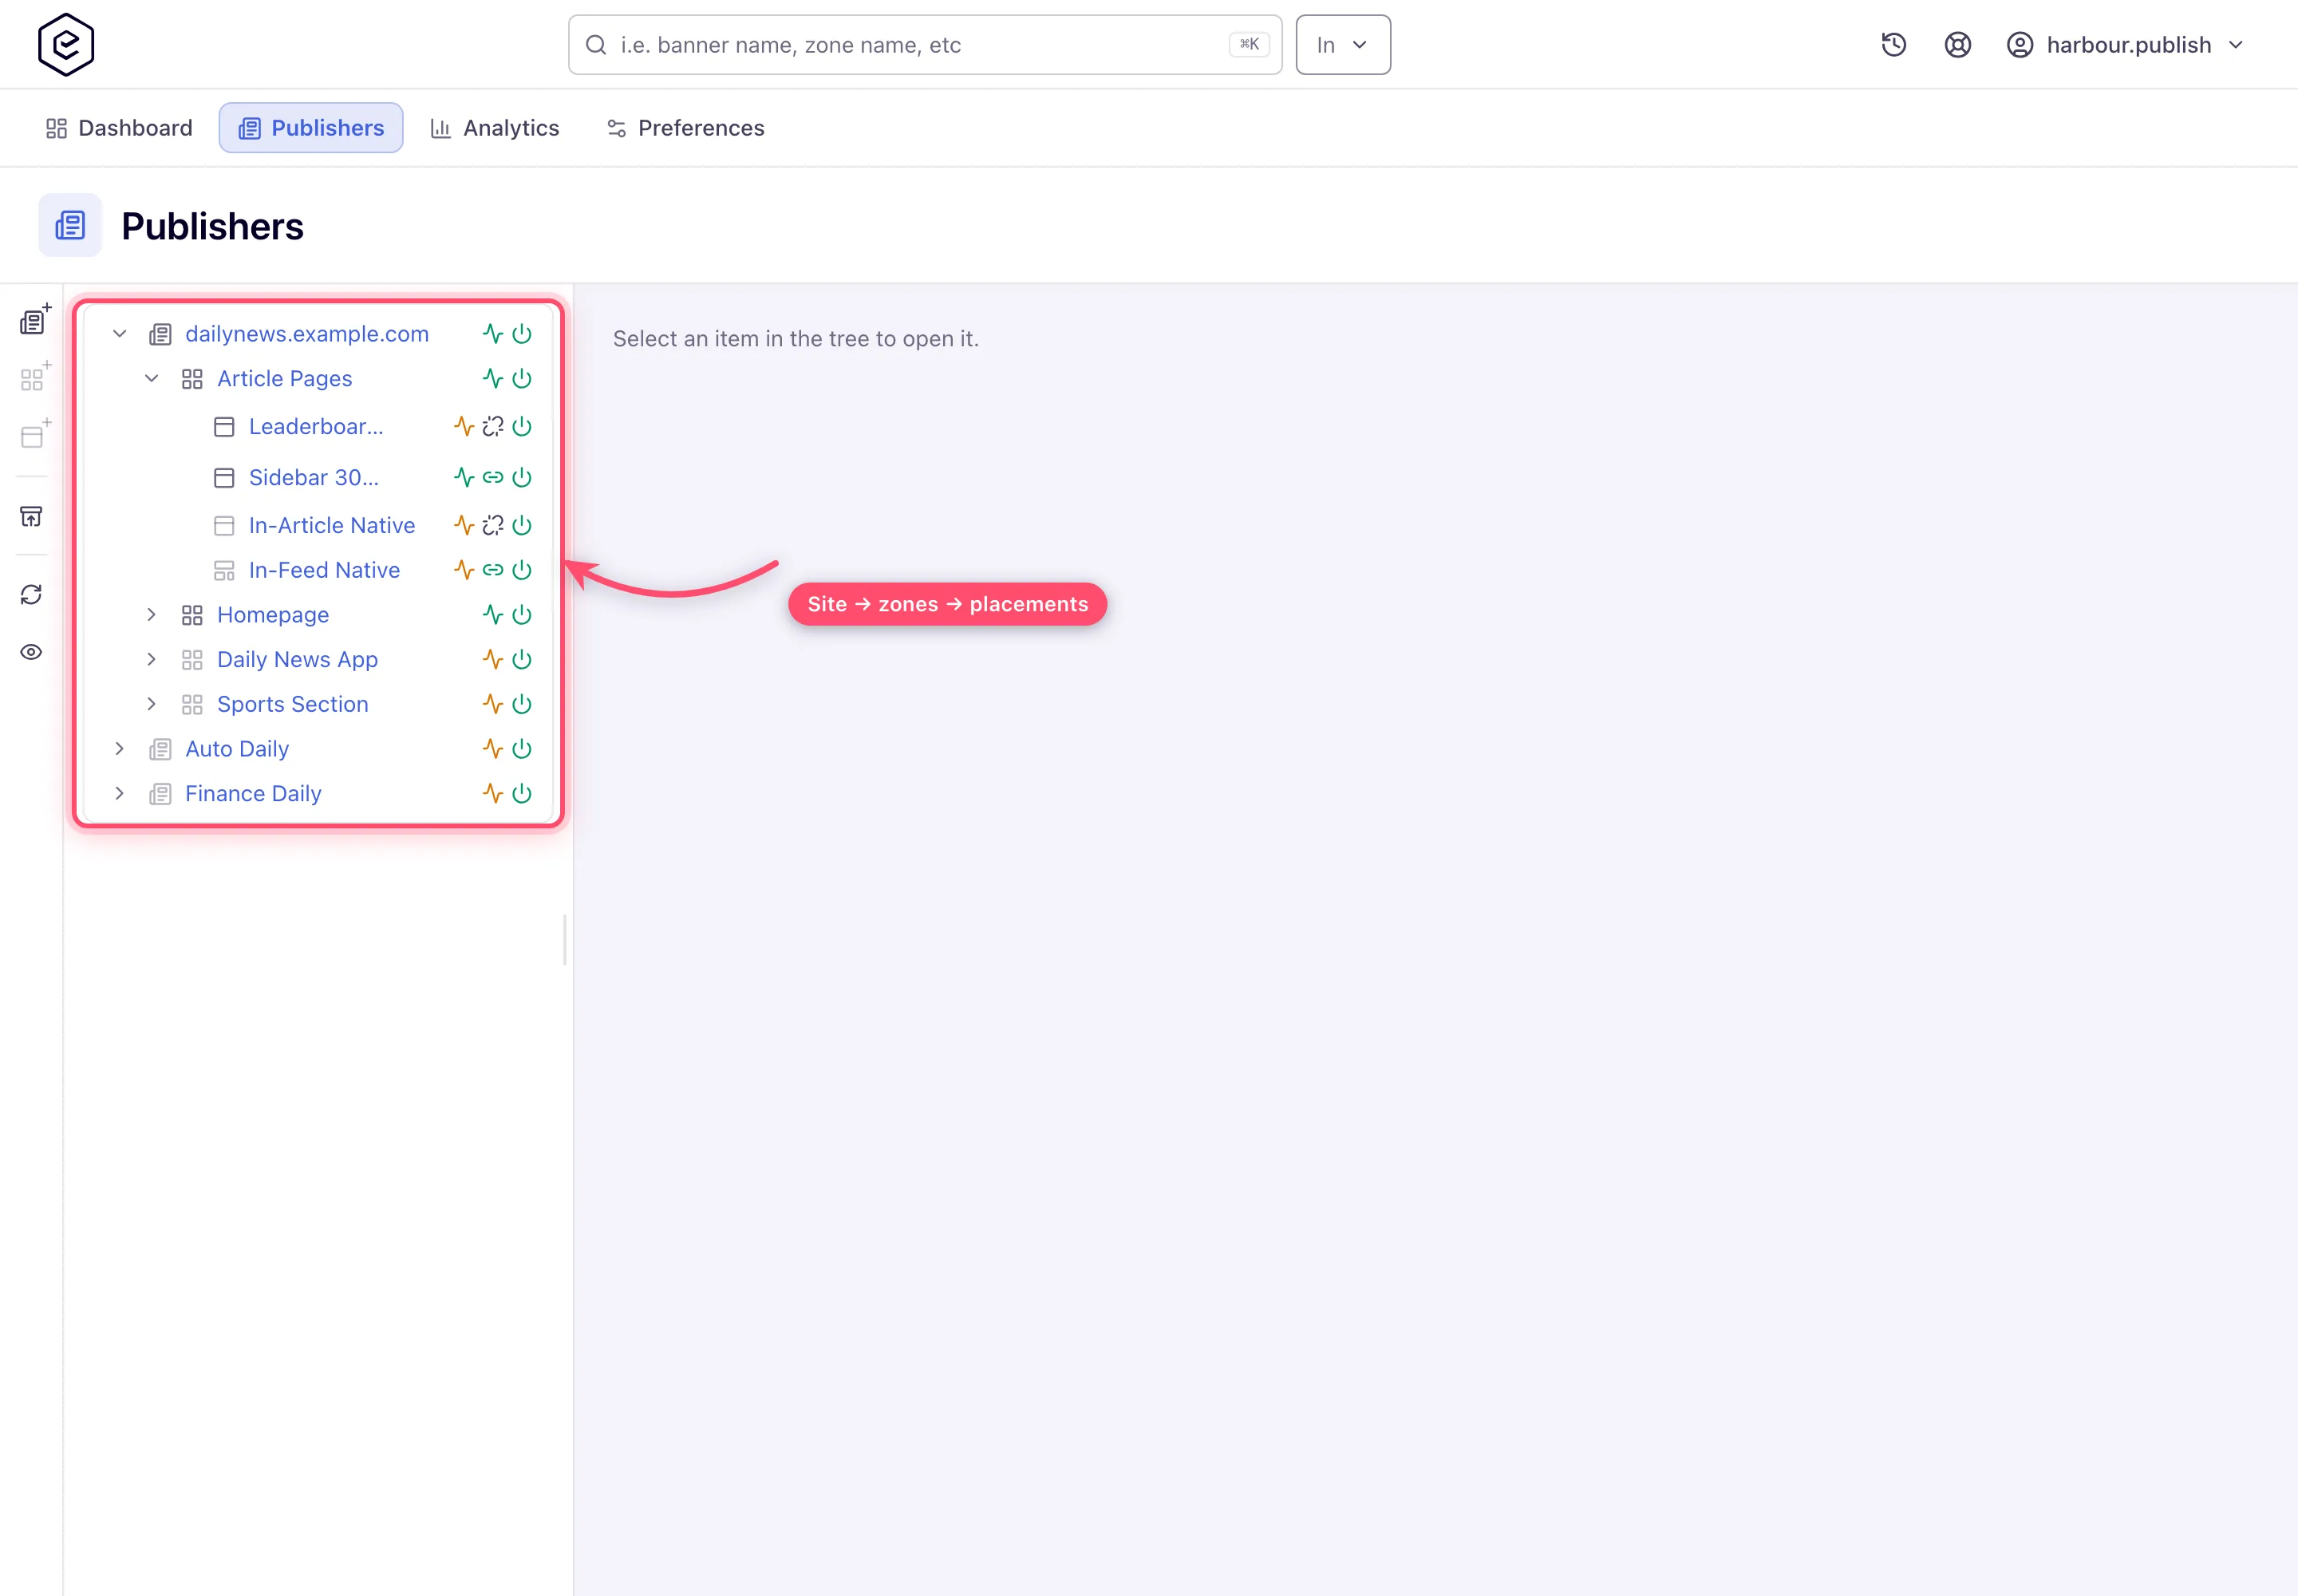
- Create one Site Placement per ad slot under the matching zone: select the zone and choose Add new placement… → Site Placement. Pick the Size ad unit the slot renders (e.g. Medium Rectangle (300x250), Leaderboard (728x90); Size is required for this type); use the Custom unit for unusual dimensions. The size is the matching key — banners link by it (details). For slots that must accept several creative sizes, see Responsive and multi-size slots.
- Set your payout (network manager). On the placement — or once for the whole site — switch on the Pricing card, pick CPM as the Pricing type and set a Global price plus per-country rows, or switch on the Revenue share card instead to pay the publisher a percentage of what the demand pays. A rule on the placement answers before the site is consulted at all (details). The cards are not on the stock Publisher role.
- Optionally set quality floors (network manager, with a grant from your network administrator). The placement and site Bid floor cards set a per-country minimum price that a programmatic (OpenRTB DSP) bid must reach — the floor rides in the bid request, and direct campaigns are not filtered by it. The site-level CPM Threshold card guarantees the site a per-country minimum CPM — a revenue floor for your reporting and payouts, and the last-resort floor sent to DSPs (details). Neither card is on any stock role; your network administrator has to switch them on for the network manager’s role first.
- Add a passback. In the placement’s Basic info → Advanced settings, paste your fallback tag into Default code — it renders whenever no banner matches a request. For a multi-layer fallback strategy, follow Passbacks and house ads.
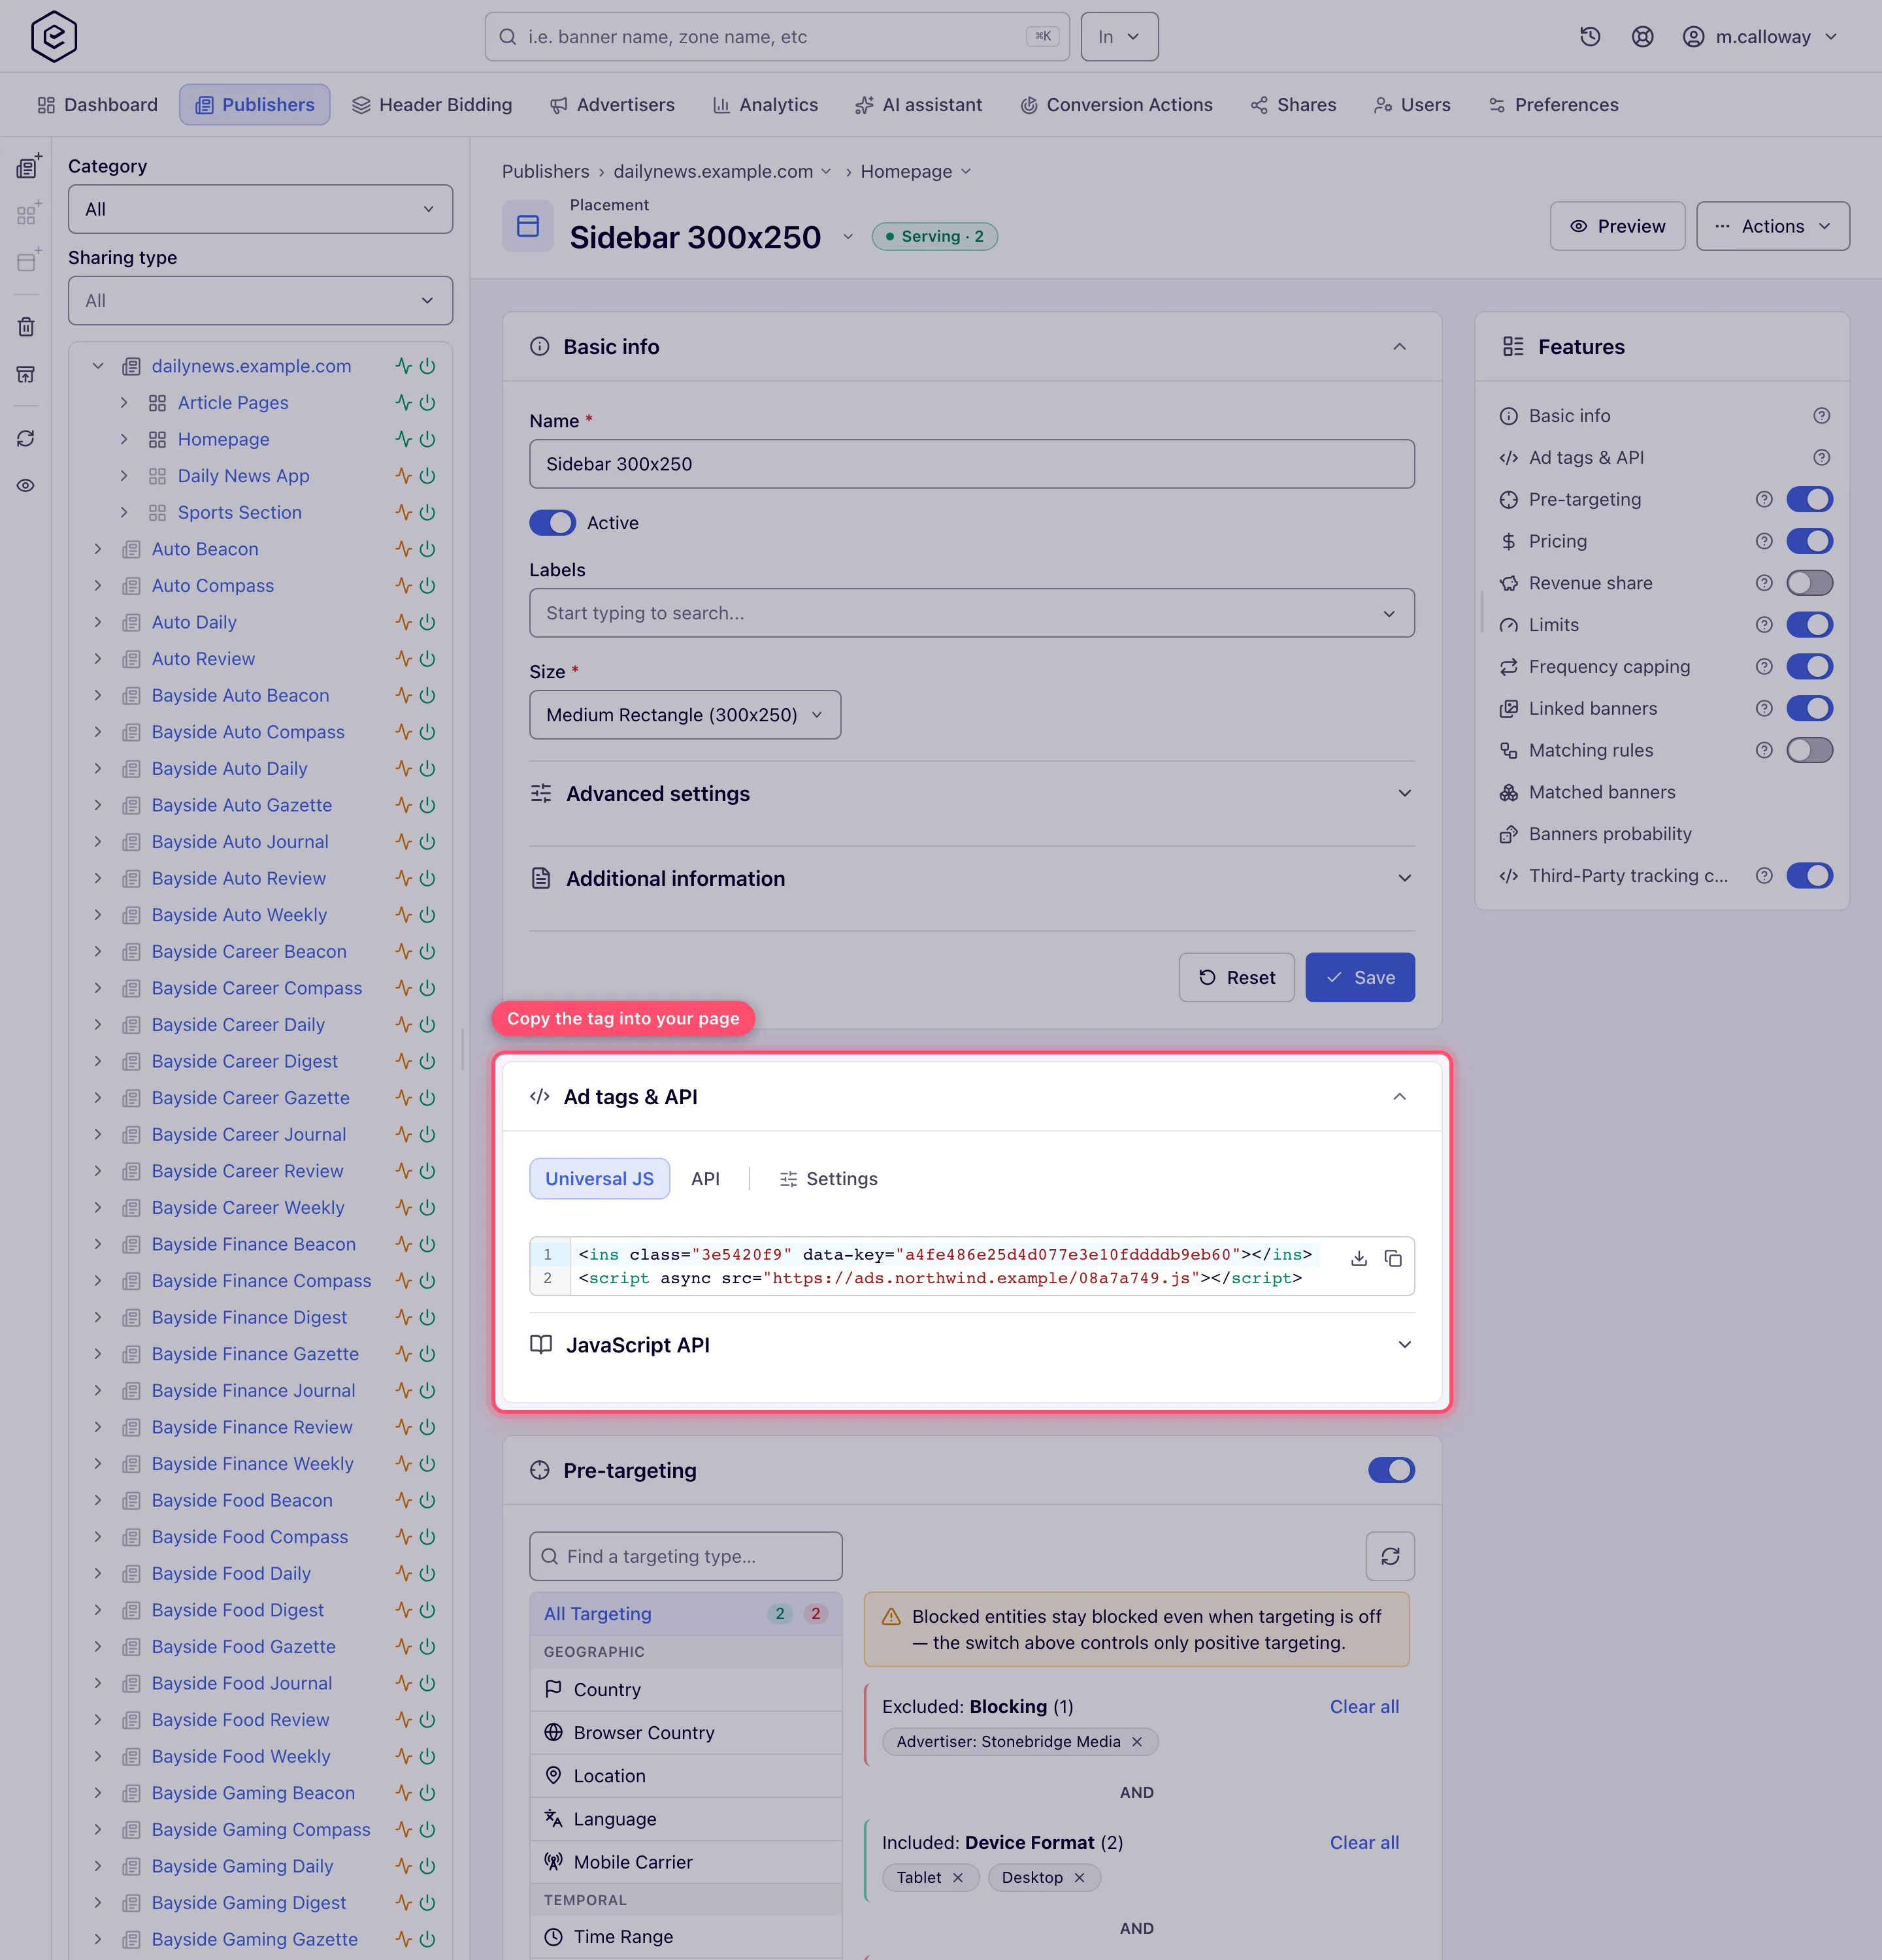
- Put the tag on your page. Open Ad tags & API, copy the tag your page needs —
Universal JS is the usual choice for a website — and paste it where the slot lives
(tag types and options). The card lists only the
tag types your role may generate. The stock Publisher role has Universal JS on Site
placements, but the tab appears only once the network has at least one ad-serving domain. A placement that is switched off (Active off in Basic info) shows no Ad tags &
API card at all. Tick Domain as default channel (Basic info → Advanced settings) if you
want per-domain reporting without editing the tag: the domain of the page that made the
request becomes the channel when the tag passes none.
- Connect demand (network manager). Link banners on the placement’s Linked banners card, switch on Matching rules, or rely on banner auto-linking by your site’s category (the three linking mechanisms). The serving pill in the placement header tells you whether anything can serve. As a publisher, tell your network manager the placement is ready.
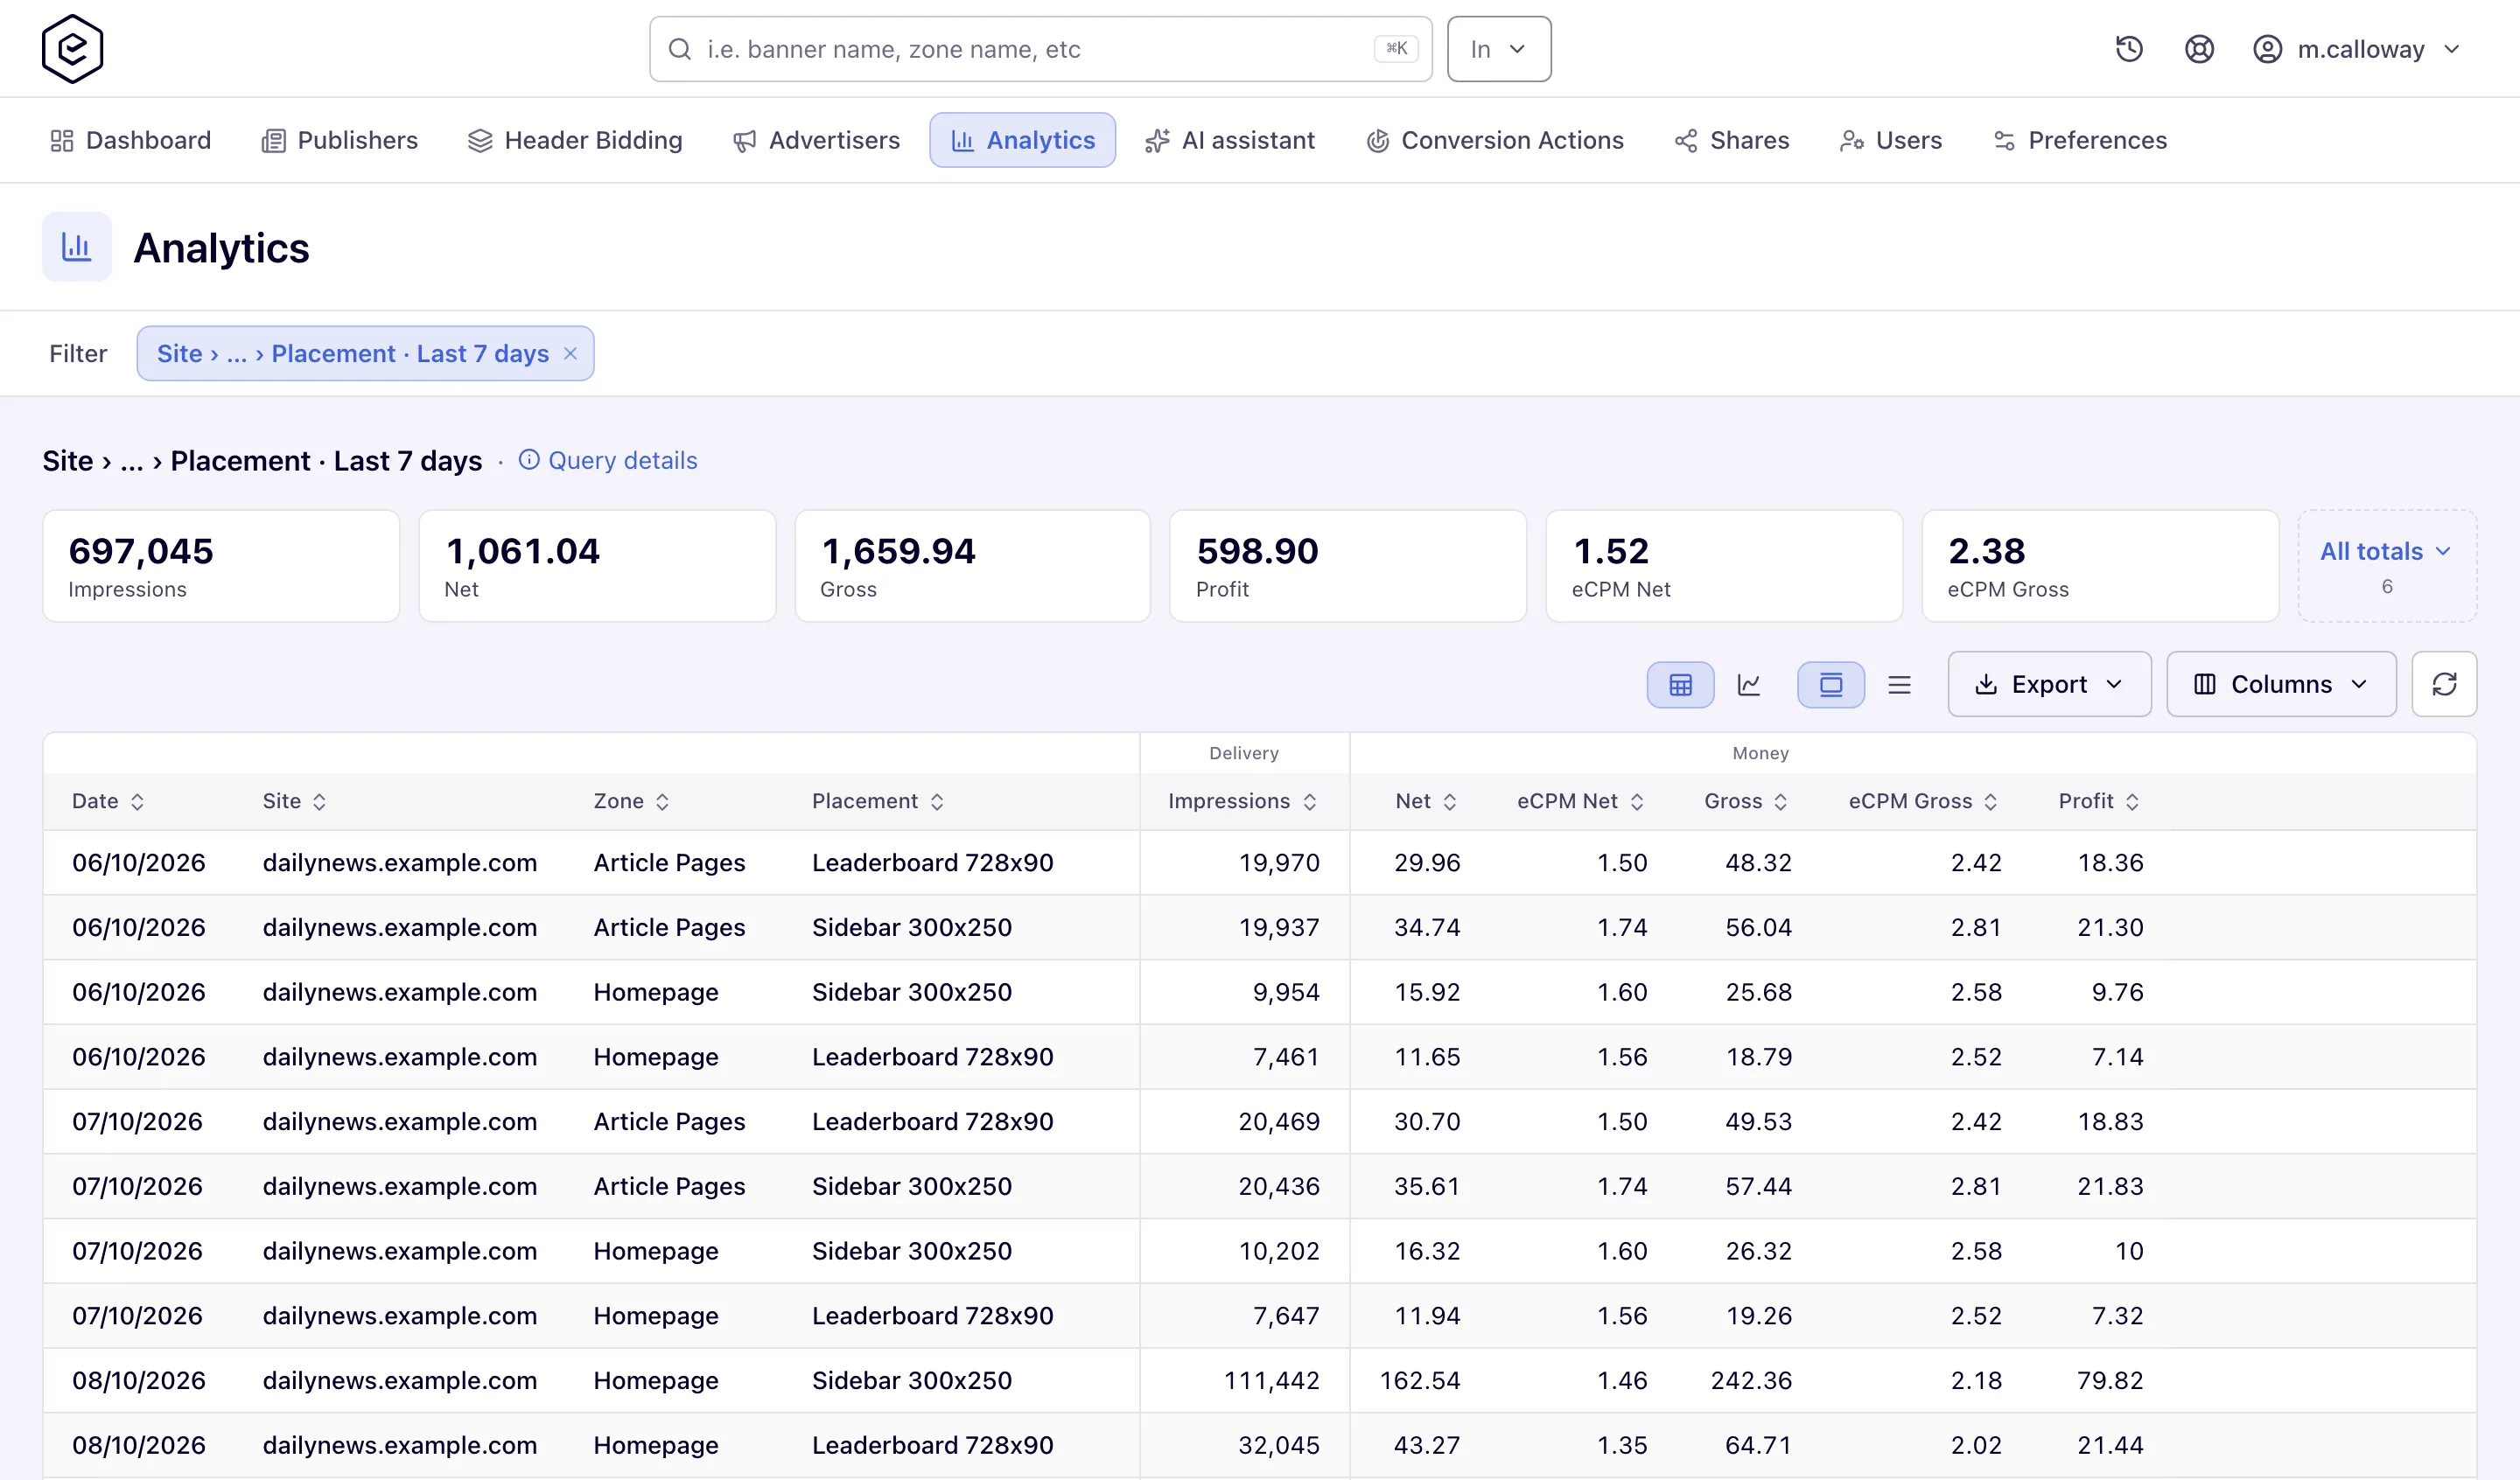
- Verify and measure. Load your page and watch ads render. Then in
Account → Analytics, run a General report with Time granularity → Day and
Group by → Placement, ticking Requests, Impressions, Fill rate, Clicks, CTR and the
money columns Net and eCPM Net in Columns settings (a publisher’s own report
names the money columns Revenue and eCPM; the frame below shows the delivery columns
only). Fill rate is impressions ÷ requests per row. The dashboard gives the headline
numbers as a daily glance (running reports).
Corner cases and gotchas
Corner case — the “wrong ad” is often your own passback. The default code renders whenever no banner matched, including when banners are linked but blocked by targeting or capping. Before blaming demand, check whether the creative on the page is the passback tag you pasted in step 6.
Corner case — zero revenue usually means one side of pricing is missing. Campaign pricing (what the advertiser pays) and placement/site pricing (what you get paid) are independent. If your reports show impressions but a Net — or, in a publisher’s own report, Revenue — of zero, no payout rule answered for that traffic: the supply side then pays
0.00. Go back to step 4. The two columns are filled separately and can differ, so read the one your role shows (metrics reference).
Corner case — a wrong ad unit matches nothing, silently. Banners link and Rules match by size. A placement saved as 300×250 when the slot (and all creatives) are 336×280 will never serve, with no error anywhere. Symptoms and fixes: Ads are not serving.
Note: don’t multiply placements for the same physical slot “per advertiser” — one slot = one placement. Splitting demand across advertisers is what linking, Rules and priorities are for.
Per-role notes
- Publisher (stock role): the structure, pre-targeting, the Default code, the tag and the reports. Payout terms (steps 4 and 5) and connecting demand (step 8) come from your network manager. See What your network controls.
- Network manager: the money — revenue share, pricing, limits and pre-targeting, where your network administrator has granted those cards. Bid floor and CPM threshold need a further grant (step 5).
- Can view share: the site and placement are read-only; changing the structure needs Can edit.