Manage network users
Create, edit, deactivate and switch into user accounts from the account area, assign roles, and manage per-user extras like API keys and payment details.
The Users page is where you create and maintain the login accounts of everyone working in your network — colleagues, publishers, advertisers, statistic accounts. Each user gets a role (permission set), a status, and optional extras such as an API key, payment details and referral settings.
Who this is for
Roles that hold the User Management UI permission — the Users tab shows only with it. The stock Publisher and Advertiser roles do not hold it, so this is where a network’s logins are created and nowhere else. A network manager needs the permission granted: your network administrator does that in Admin → Users & access → User roles & permissions.
Prerequisites
- Roles must exist for whatever you want to assign — the role list only offers roles your own role is allowed to create users in (see Users and roles). An administrator role is never offered.
- Your own role needs Manage Preferences enabled for the form to save a password and the personal details — see the first corner case below.
Steps
Find and manage existing users
- Go to Account → Users.
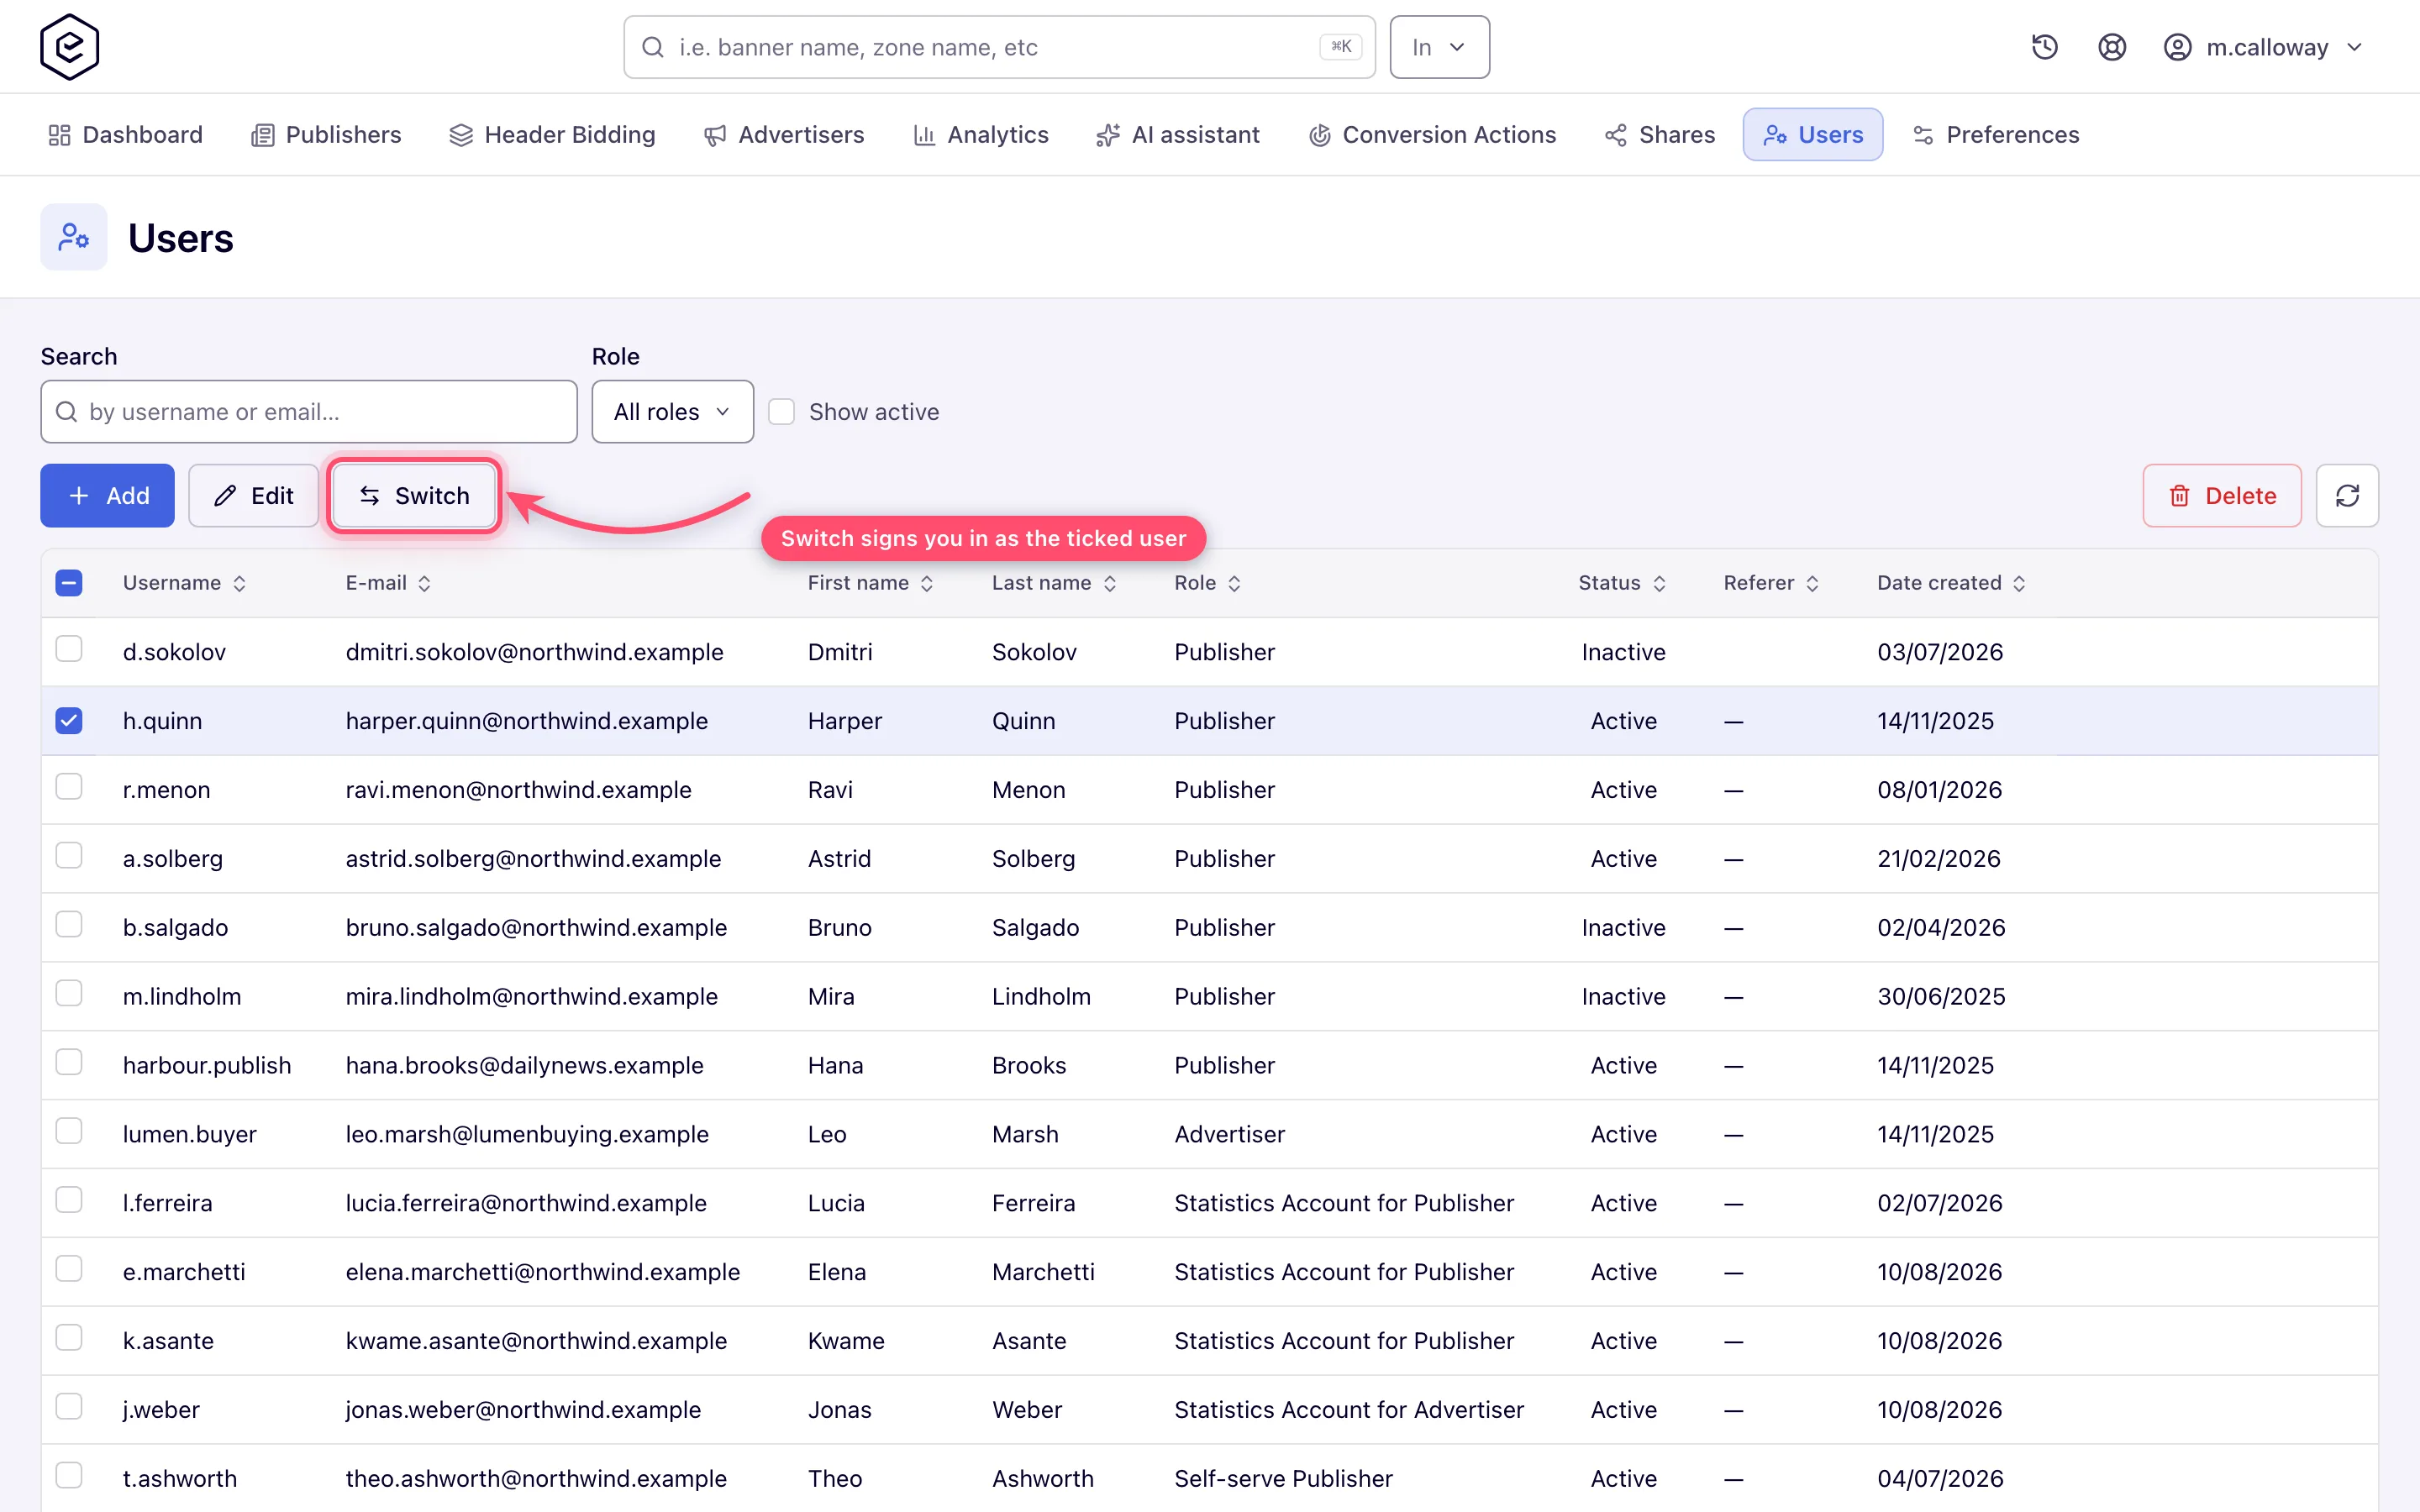
- Filter the grid: Search by username or e-mail, narrow by Role (All roles), tick Show active to hide deactivated accounts. Show referrals (only with the referral program) narrows the grid to users who have referred clients. The grid shows Username, E-mail, First name, Last name, Role, Status, Referer, Referred users (referral program only) and Date created; click a header to sort.
- Tick a row. The toolbar buttons light up according to what you may do with that user:
- Edit — opens the form (double-clicking an editable row does the same).
- Switch — signs you in as that user and lands you on their account area. Only offered for active users you’re allowed to access. Great for seeing exactly what a publisher sees.
- Delete — removes the account after a confirm (Delete record?). Disabled for your own
account and for users you may not remove.
Create or edit a user
- Click Add (the page reads Add user) or Edit on a ticked row (Edit user).
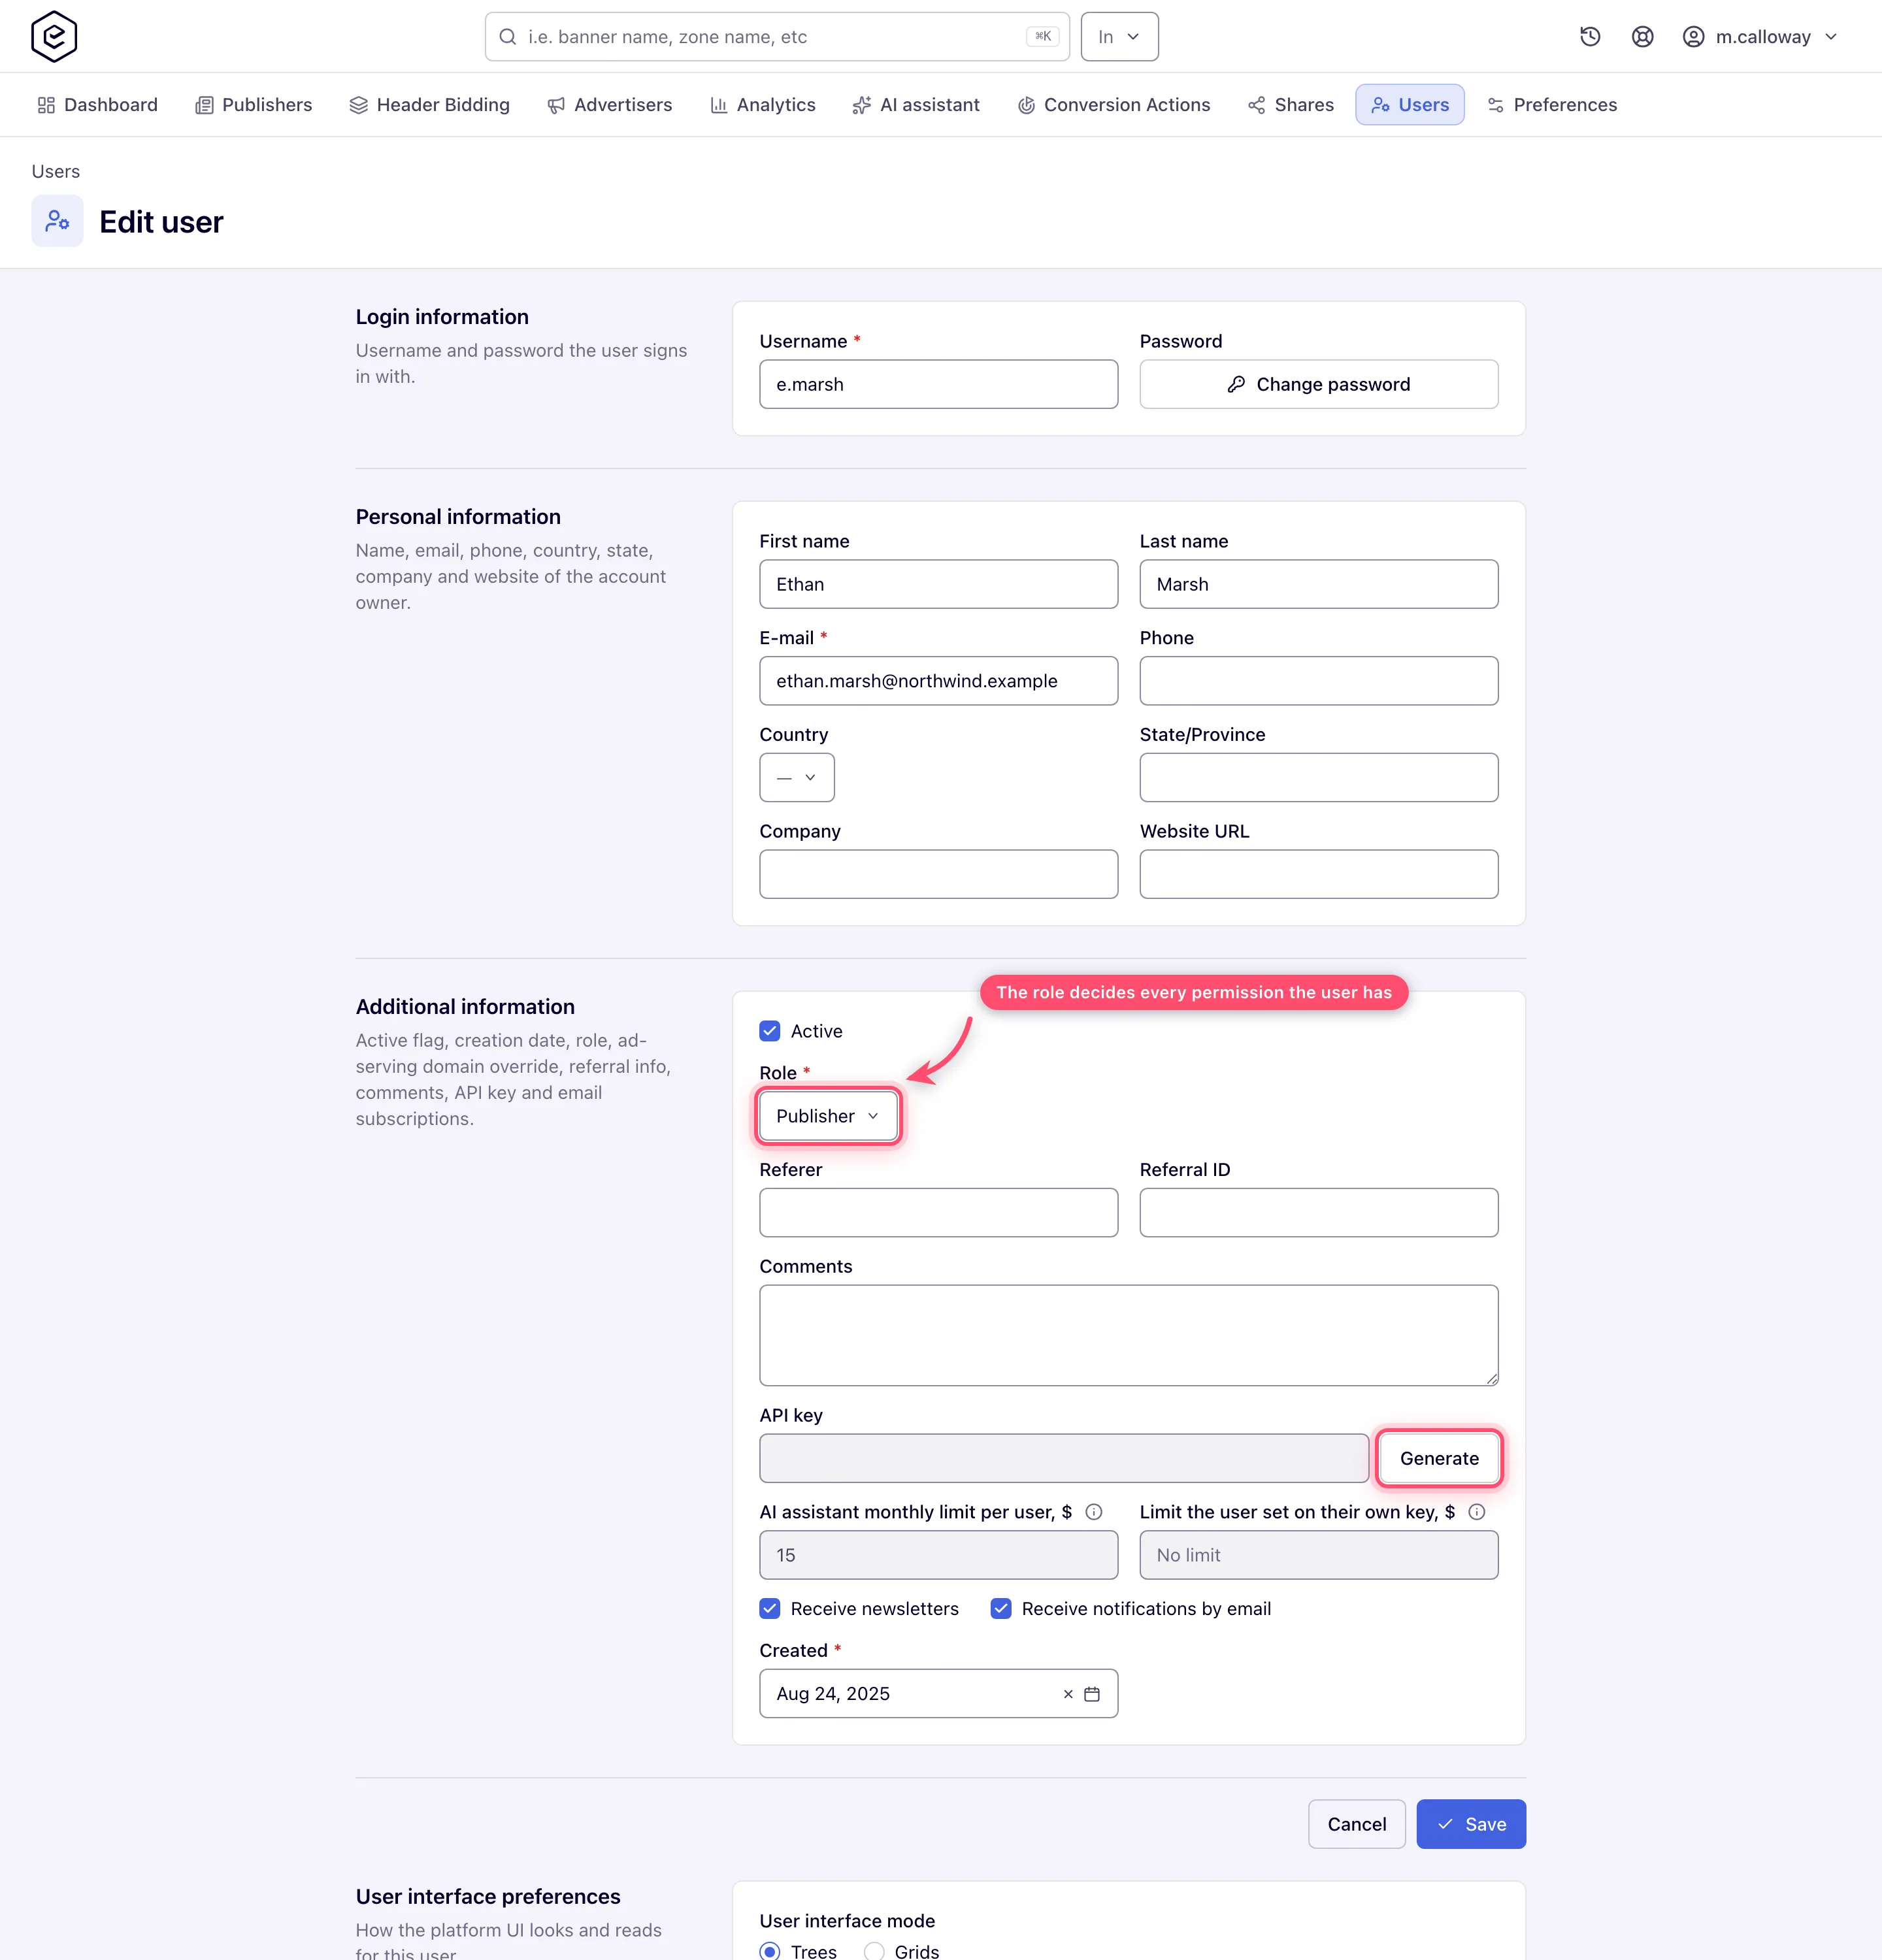
- Fill Login information: Username (required, up to 64 characters, unique) and the password. On create the password is required; the field shows what you type. On edit it is hidden behind a Change password button, which reveals New password with a cancel button — leave it untouched to keep the current password. A password must be 8–64 characters, must not begin or end with a space and must not be among the widely used passwords; the “must not contain the username or e-mail” rule is not applied on this form (it applies when users change their own password). Epom can tighten the limits for your network. The password is never mailed: when the account becomes active — including when you create it with Active ticked — the platform sends the user the activation e-mail, which carries a single-use link for setting their own password.
- Fill Personal information: first/last name, E-mail (required, up to 64 characters), phone, country, state/province, company, website URL.
- Fill Additional information:
- Active — untick to deactivate the account without deleting it. Deactivated users cannot sign in and cannot be switched into.
- Role (required) — the role the user gets, which decides what they can reach.
- Ad-serving domain — System default or one of the network’s domains; applies to newly created objects only.
- Referer and Referral ID — referral bookkeeping fields.
- Comments — free-text notes about the account. The user’s Preferences page has no such field,
but their own REST profile (
user-preference/get.do) returns it ascomments, so do not write anything in it you would not show them. - API key — read-only; Generate replaces the key at once.
- Receive newsletters / Receive notifications by email — e-mail subscriptions.
- Created — a required date, today on a new user. It is a normal field: you can change it.
- Click Save. The toast reads Record successfully processed. On success you stay on the form; a newly created user gets its own edit URL so further saves update it.
Per-user panels (edit mode only)
Below the form, self-contained panels manage the user’s details. Some fields and panels — Ad-serving domain, API key, Payment details, Referral program — appear only if your role holds the matching permission; see Users and roles.
- User interface preferences — same options the user has on their own Preferences page.
- Payment details — the user’s payout details. Shown and saved only for your own account or a user whose role you may assign — the same bar as editing the user; for anyone else the details stay hidden and a save is refused (Payment details can be changed only on your own account or on a user whose role you may manage.).
- Default sharing settings — who automatically gets shares on this user’s new entities, with Apply to existing entities. Shown only when that user’s role holds the Share permission on Inventory or Campaigns.
- Referral program tab — enable a personal referral revenue share, hide the terms from the user, and review their referred clients and referral revenue. Changing the share needs a role you may assign (your own account included — you cannot set your own referral share); the lists need one you may view.
Options and fields
| Field | Required | Notes |
|---|---|---|
| Username | yes | Max 64 characters, unique |
| Password | on create | 8–64 characters, no leading/trailing space, not a common password; blank on edit keeps the current one. Never mailed — the activation e-mail carries a set-password link |
| yes | Valid address, up to 64 characters, unique | |
| Role | yes | Determines every permission the user has |
| Active | — | Off = cannot sign in; row shows Inactive |
| Ad-serving domain | — | New objects only |
| API key | — | Generated, never typed |
| Created | yes | Date; defaults to today on create |
Corner cases and gotchas
Corner case: the form posts every field, but the server drops some of them unless your own role has Manage Preferences enabled: the password, e-mail, phone, country, state, company, website URL and the user’s interface mode are ignored, and the save still reports success. If those fields do not stick, check your own role’s grant.
Corner case: setting a user’s password from this form does not send them the password changed notice and does not end their open sessions — both happen only when users change their own password or use a reset link.
Corner case: rows you cannot manage still appear in the grid (visibility and manageability are separate rights). If Edit/Delete stay grey for a ticked row, your role can’t manage that user’s role — it’s not a bug. A save is accepted only for a role your role may create users in, and re-saving a user whose current role you may not hand out is refused.
Corner case: Switch replaces your session with the target user’s. To come back, open the user menu (top right) and choose Exit user, which replaces Log out while you are switched in. After you exit, the browser lands on your account home rather than on the Users grid.
Corner case: Generate takes effect at once — the key is minted on the server and the old one stops working immediately, with no Save needed. It needs an existing user: on a new one, save first.
Corner case: statistic accounts created from a site/advertiser edit page (see Shares) show up in this grid like any other user, with the first name statisticsAccount — deactivate them here when the client’s access should end.
Corner case: each user’s login IP whitelist is not on this form — users manage their own under Preferences, and it applies to their sign-ins only.
Over the API
GET /rest-api/system-users/search.do finds users the way this grid does, a page at a time: query (substring of
username, e-mail or name), roles (comma-separated ids or names), activeOnly, start and limit (1–500). Passwords
and API keys are never returned.
To create an account without choosing a password for it, use POST /rest-api/system-users/create-and-share.do: the user
is invited by e-mail to set their own, and can be given advertiser and site shares in the same call — see
Share sites and advertisers with users.
Per-role notes
- Network manager — this page is yours alone, and nothing on it is share-scoped. The API key, payment details and referral parts stay hidden until your network administrator grants them to your role.
- Publisher and advertiser — no Account → Users tab; create a recipient login with the statistic-account action on a site or advertiser instead.
- Custom-role user — the Role select lists only the roles your role may create users in.