Quick start: monetize your site as a publisher
Publisher-role walkthrough — add a site, zone and placement, install the ad tag, and read your revenue on the publisher dashboard and in reports.
As a publisher you own the supply side: sites, zones and placements. This tutorial adds your first site, shows where the ad tag comes from, installs it on your page and shows you where your revenue numbers live. What ads run in your slots is up to the network — your job ends at the tag, and starts again at the reports.
Who this is for
Users on a publisher role. The stock Publisher role opens four tabs — Dashboard, Publishers, Analytics and Preferences — and its Dashboard is the publisher dashboard. Your network administrator may have edited the role, so your strip can differ; see Which tabs you get.
Prerequisites
- A publisher account on the network (self-registered or created by your network manager).
- Access to your website’s HTML (or your app / newsletter template) to paste the tag.
Steps
- Go to Account → Publishers and click New site. Fill in:
- Name — how the site appears in your lists and reports.
- Category — the stock Publisher role has no Category field; your network assigns categories. If your network has added the field to your role, pick the categories that describe the site.
- Inventory type — Website (asks for Site URL) or App (asks for
App bundle).
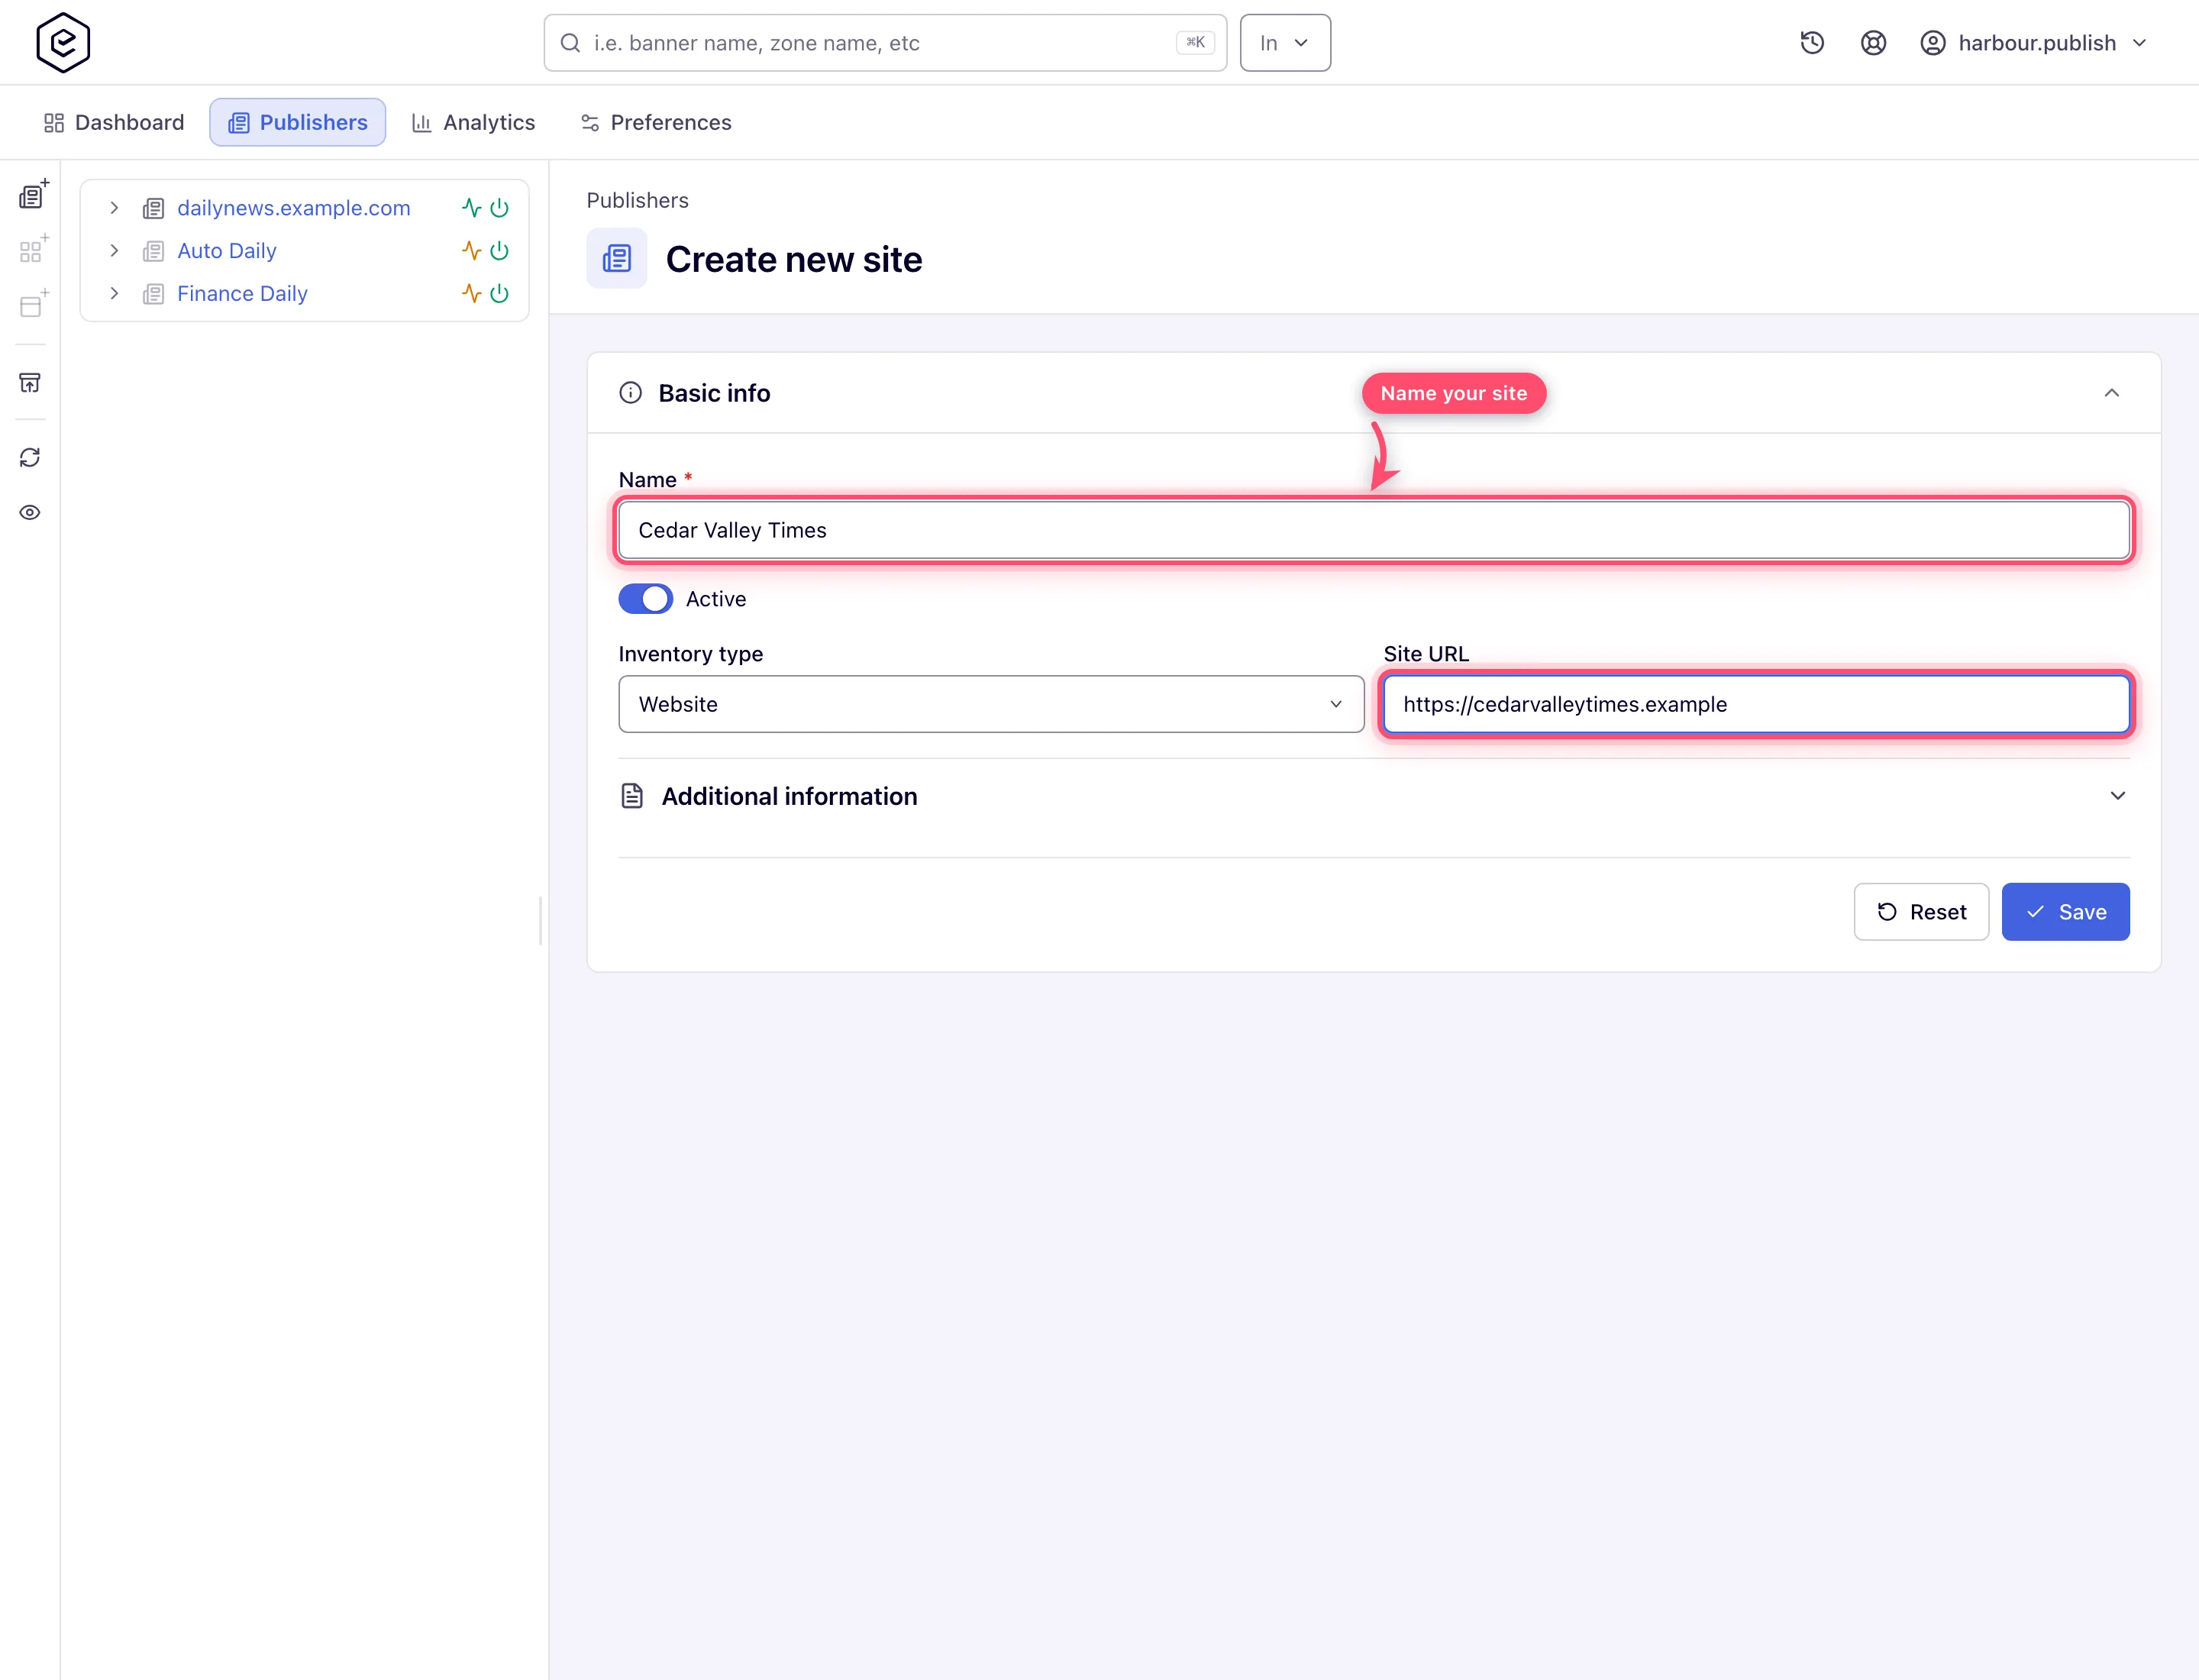
- Click Save. Success: a “Site saved” toast and the site edit page.
Note: on networks whose Site default status is Pending, your new site is queued for review and its approval status shows on the site page. Carry on building zones and placements straight away — you do not have to wait for the review to finish.
- Click Add new zone in the site’s header (or the New zone icon on the rail) and name it after the page or section it represents (“Homepage”, “Article pages”). A zone only groups placements; its page holds Basic info alone.
- With the zone selected, click Add new placement… and pick the placement type that matches the slot: Site Placement for a standard desktop banner slot, mobile, video, native and other types if your role allows them.
- Fill in Name and Size — pick the ad-unit size the slot actually has on your page (e.g. 300×250). Click Save.
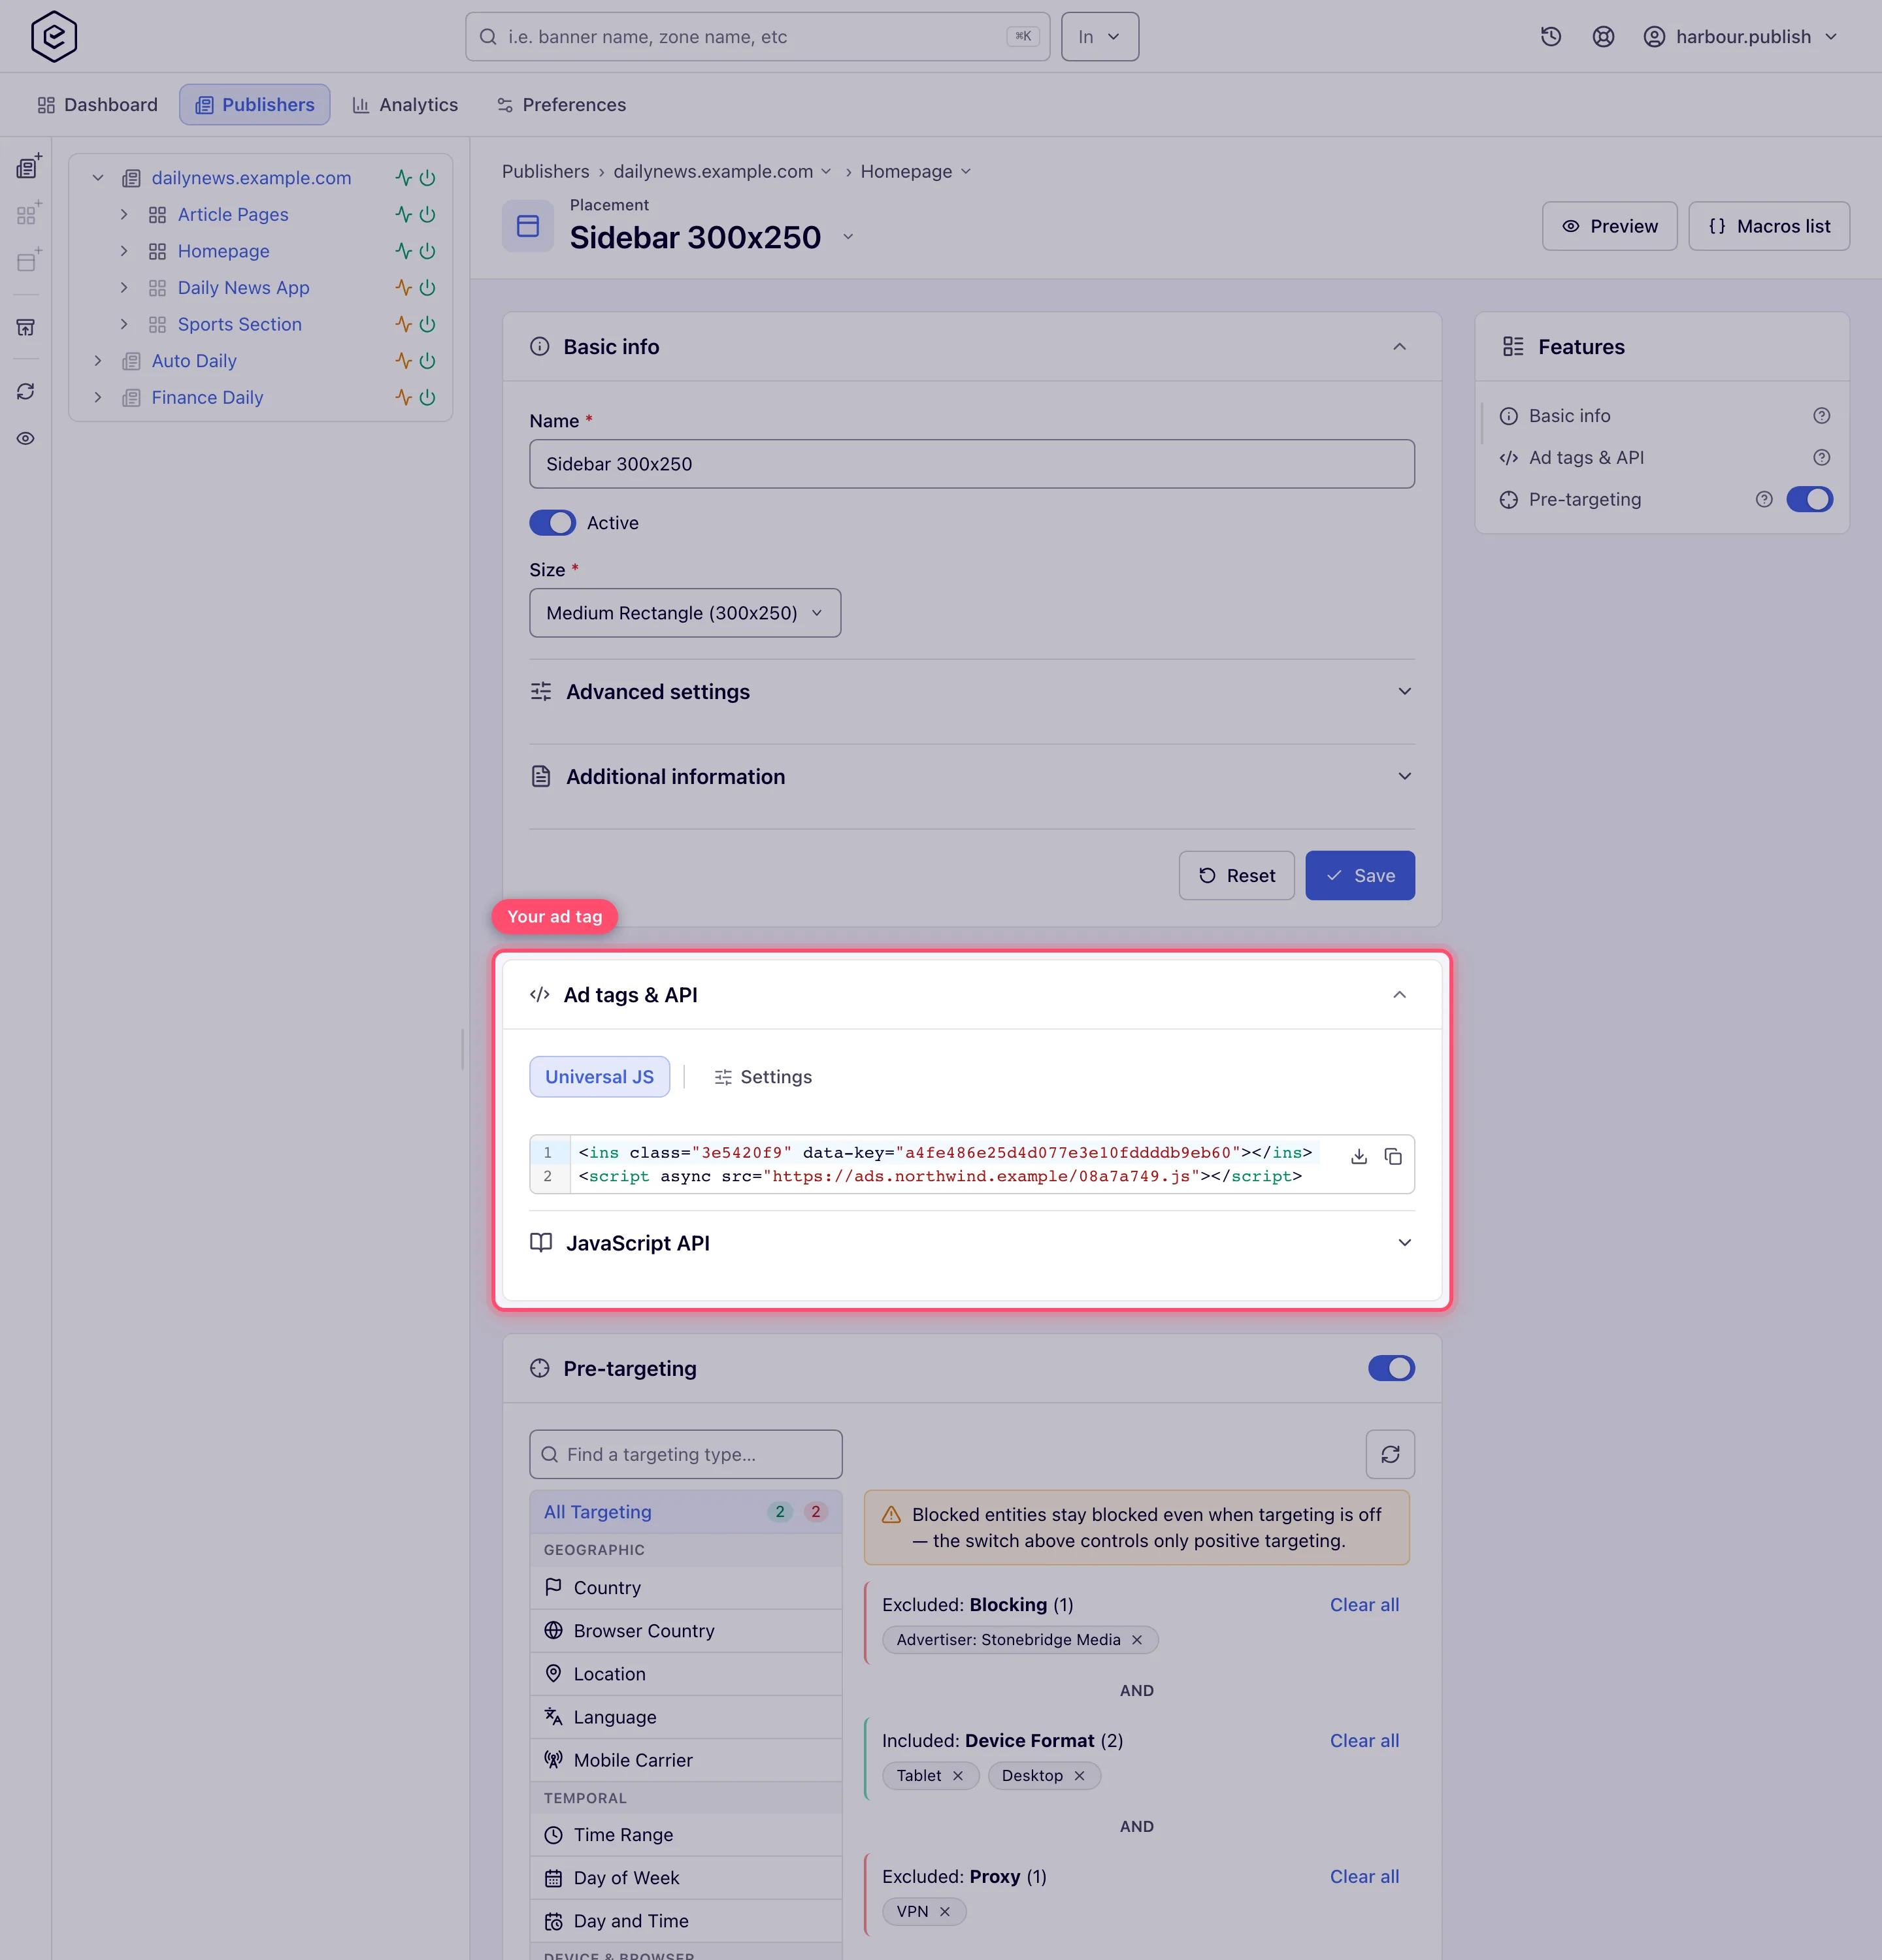
- On the placement edit page open the Ad tags & API card. It holds one tab per tag type
your role may use for this placement type, plus Settings, and opens on the first. On a
site placement that is Universal JS: copy the code and paste it into your page where the
ad should render — on WordPress, into a Custom HTML block (see
Install a tag on WordPress or another CMS).
If there is no card at all, see the corner case below.
Note: the Copy ad tag icon copies a placement’s tag without opening it. In the tree it shows only on placements that have had traffic recently, so a brand-new placement has none there; the Grids view shows it on every Site, Mobile Site, Non-standard, Video and Email row. It does not always copy Universal JS: it takes the first type your role may use in a fixed order (Simple Iframe, Video Player, API, Direct URL, Email, Universal JS, Mount JS), so on a Non-standard placement a stock Publisher gets Direct URL. Copy from the card when you need a particular tag.
- Before real traffic arrives, check how the tag handles consent on your pages and add your
network’s lines to your
ads.txt— see Privacy signals and ads.txt. - Load your page. Once the network has linked demand to your placement — by hand or through its matching rules — an ad renders; until then the slot returns the placement’s Default code (or stays empty). That is expected on day one.
- Check your numbers:
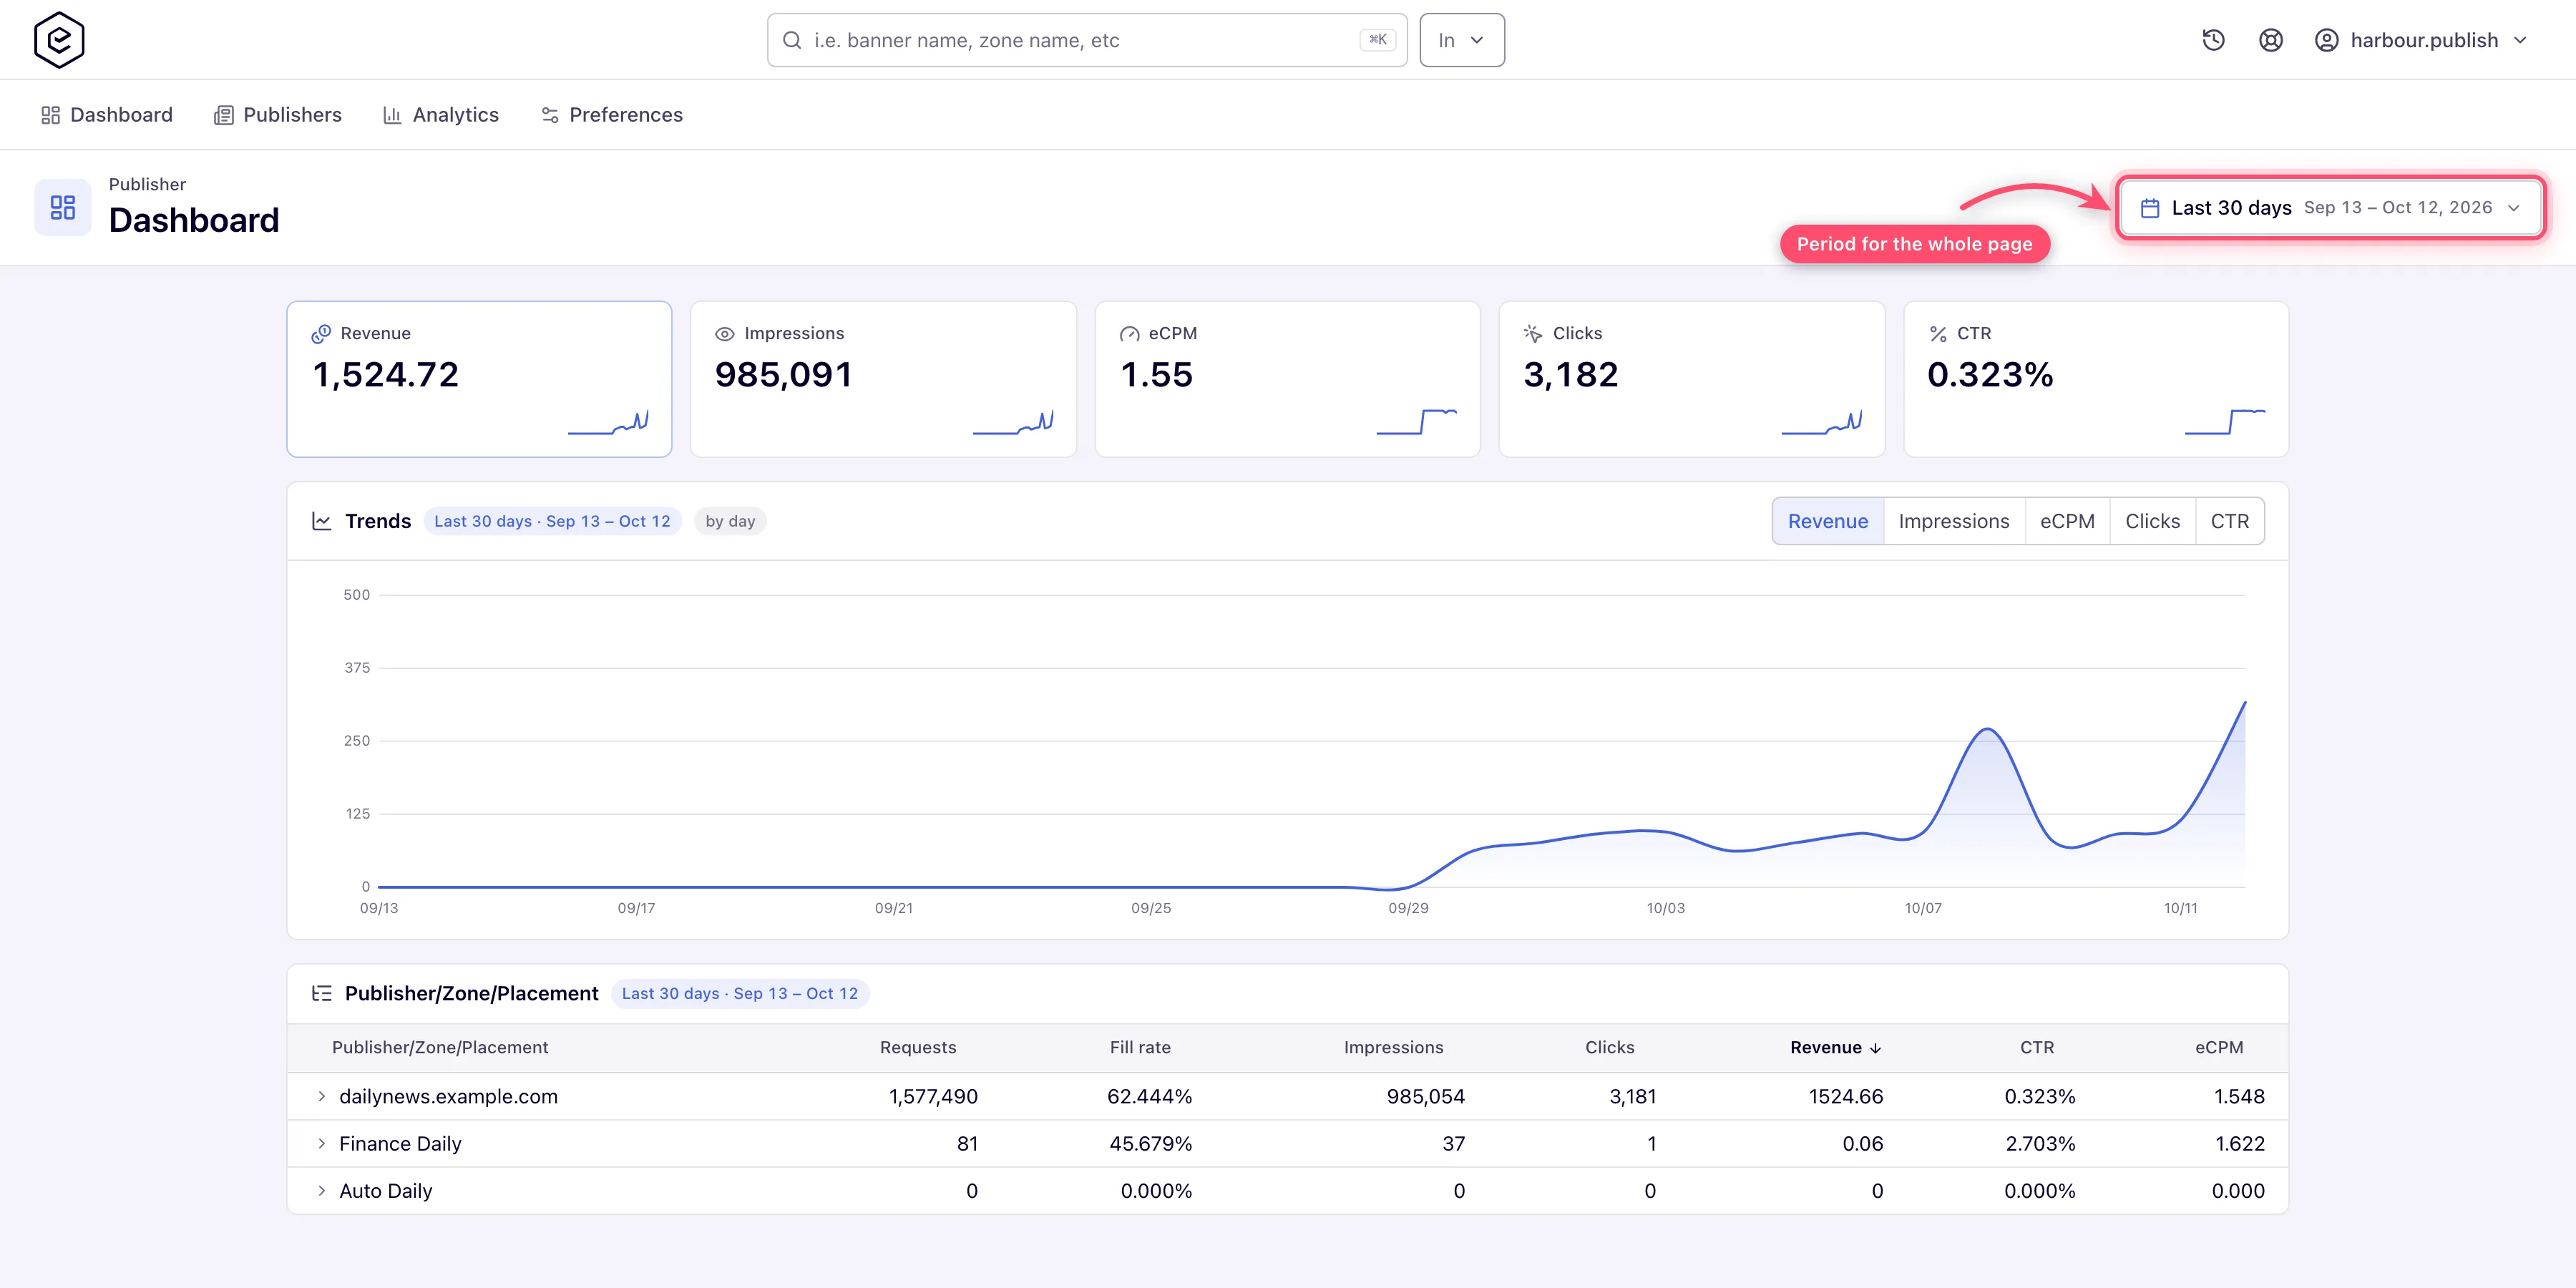
- Account → Dashboard — the publisher dashboard. One period control in the page
header sets the window for the whole page: the Revenue, Impressions,
eCPM, Clicks and CTR tiles, the trend chart, and the
Publisher/Zone/Placement tree all report the period you pick. Presets run from Today
and Yesterday through the current week, last week and last 2 weeks, the last 7 and 30 days, the current and
last month, the last 3 and 6 months, and the current and last year; Custom range opens a
calendar for any start and end date. A single-day period is charted by hour rather than as
one point, and Compare with previous period adds the preceding window of the same length
as a dashed line plus a change figure on each tile.
Note: a preset your role may not use stays in the list but is greyed out with a lock, and its tooltip reads Not available for your role.
- Account → Analytics — run a report grouped by Placement with the Date range you need for the detailed view; click Run report.
- Account → Dashboard — the publisher dashboard. One period control in the page
header sets the window for the whole page: the Revenue, Impressions,
eCPM, Clicks and CTR tiles, the trend chart, and the
Publisher/Zone/Placement tree all report the period you pick. Presets run from Today
and Yesterday through the current week, last week and last 2 weeks, the last 7 and 30 days, the current and
last month, the last 3 and 6 months, and the current and last year; Custom range opens a
calendar for any start and end date. A single-day period is charted by hour rather than as
one point, and Compare with previous period adds the preceding window of the same length
as a dashed line plus a change figure on each tile.
Options and fields
| Field | Where | What it does |
|---|---|---|
| Inventory type | site | Website vs App — switches the URL field to an app-bundle field and changes which placement types make sense. |
| Private | site (Advanced settings) | Marks the site private. Not shown on the stock Publisher role. |
| Monthly impressions / visitors | site (Additional information) | Traffic estimates picked from preset ranges; informational. |
| Size | placement | Must match the real slot on your page — a wrong size means wrongly rendered or missing ads. |
| Domain / Ad wrapper / Protocol / Fit container | Ad tags & API card | Shape the generated JavaScript tag: custom ad-serving domain (not on the stock role), wrapper, HTTPS, responsive container (mobile and non-standard placements). |
Full field tables: Sites, Placements, Invocation codes.
Corner cases and gotchas
Corner case: the stock Publisher gets Universal JS on Site, Mobile Site and Non-standard placements, Direct URL on Non-standard ones and API on Native and Application ones; Video and Email placements show their own tabs. Universal JS appears only once the network has an ad-serving domain — without one, a Site or Mobile Site placement has no Ad tags & API card at all, and a Non-standard one offers only Direct URL. The card also disappears while the placement’s Active switch is off. Mount JS, Simple Iframe and the other tag types are role permissions your network manager can add.
Corner case: if a slot stays empty, the review queue is not the place to look — a site awaiting review still serves. Work through My ad is not serving instead: it starts with the checks that actually stop delivery.
Corner case: revenue figures are your share, not the gross ad spend. A publisher’s payout is either a fixed price or a revenue share — a percentage of the advertiser’s gross for the same event — that the network sets on your site or placements, in cards the stock Publisher role does not see. If your eCPM looks lower than the advertised rate, see Why is my revenue below the advertised rate?; for payment dates, ask your network manager.
Corner case: an empty slot is not always an error. If no linked ad matches the visitor (geo, device, capping), the placement serves its passback or collapses. Fill rate (impressions as a share of requests) tells you how often that happens. It is not one of the dashboard tiles: read it in the Fill rate column of the dashboard’s Publisher/Zone/Placement tree, or add the Fill rate column to a General report in Analytics. Both need your role to see Requests, which the stock Publisher does. See My fill rate is low.
Tip: the create menu offers the placement types your role may create. Pick the one that matches where the ad will actually appear — a banner slot on a page, a video player, a native unit in a feed — because the type decides which ad tag you get at the end.
Corner case: a site shared with you as Can view is yours to browse and report on, and you can still copy its tags — it opens with a Read-only marker and no Save button. Ask your network manager to raise it to Can edit if you need to change it.
Corner case: on a demo account every step here works the same way, against demo data. Do not put a demo tag on a production site.
Per-role notes
- Publisher (stock role): pre-targeting and the Default code are included; revenue share, pricing, bid floors, limits, capping, daisy chaining, linking and sharing are not. See What your network controls.
- Read-only (Can view) and demo accounts: see the corner cases above.
- Sharing your numbers: schedule a saved report to e-mail anyone you choose (Schedule recurring emails). A read-only login for a partner (Actions → Create user & share) needs sharing, which your network manager can switch on; see Shares.
- Header bidding: if your network sells your pages through Prebid, see Header bidding: what a publisher installs.