Get the pixel and S2S tracking code
Copy the JS pixel, image pixel or server-to-server postback URLs for a conversion action, install them, and verify conversions arrive.
Once a conversion action is linked to a campaign, you need to fire it from the advertiser’s side. This page shows where to copy the tracking code, what each variant does, and how to check that conversions arrive.
| You want to | Go to |
|---|---|
| Copy and install the pixel, the snippet or the postback URLs | This page |
| Set each field of the Snippet tab | Snippet tab options |
Pass partner sub-values, send conversions on to a traffic source, wire an MMP link, price with payout, declare att= | Postback parameters and partner integrations |
| Find out why a conversion did not count | Why a conversion did not count |
Who this is for
Network managers integrating conversion tracking: the stock Network Manager role gets the whole of this page — the toolbar on the campaign’s Conversion actions card, the Pixel Tracking tab and the Postback (S2S) and Snippet tabs behind the tracking-code button. The stock Advertiser role has none of it: no Conversion actions card on a campaign and no tracking-code tabs, so an advertiser asks the network manager for the code, or for those permissions on their role. See Per-role notes; an advertiser who already has a code starts at Got a code from your network manager?.
Prerequisites
- A conversion action (create one).
- For pixel tracking: the campaign’s Conversion actions card switched on — the pixel code embeds a key generated per advertiser + campaign + action, so it only exists in the campaign context.
- Manage Action Tracking switched on for your role (not read-only): it is what puts the search box and the Conversion tracking code button on the campaign’s Conversion actions card. With it read-only the card lists the actions but has no toolbar.
- Access to the page or backend where the conversion happens (order confirmation page, server callback, etc.).
Steps
Open the tracking window
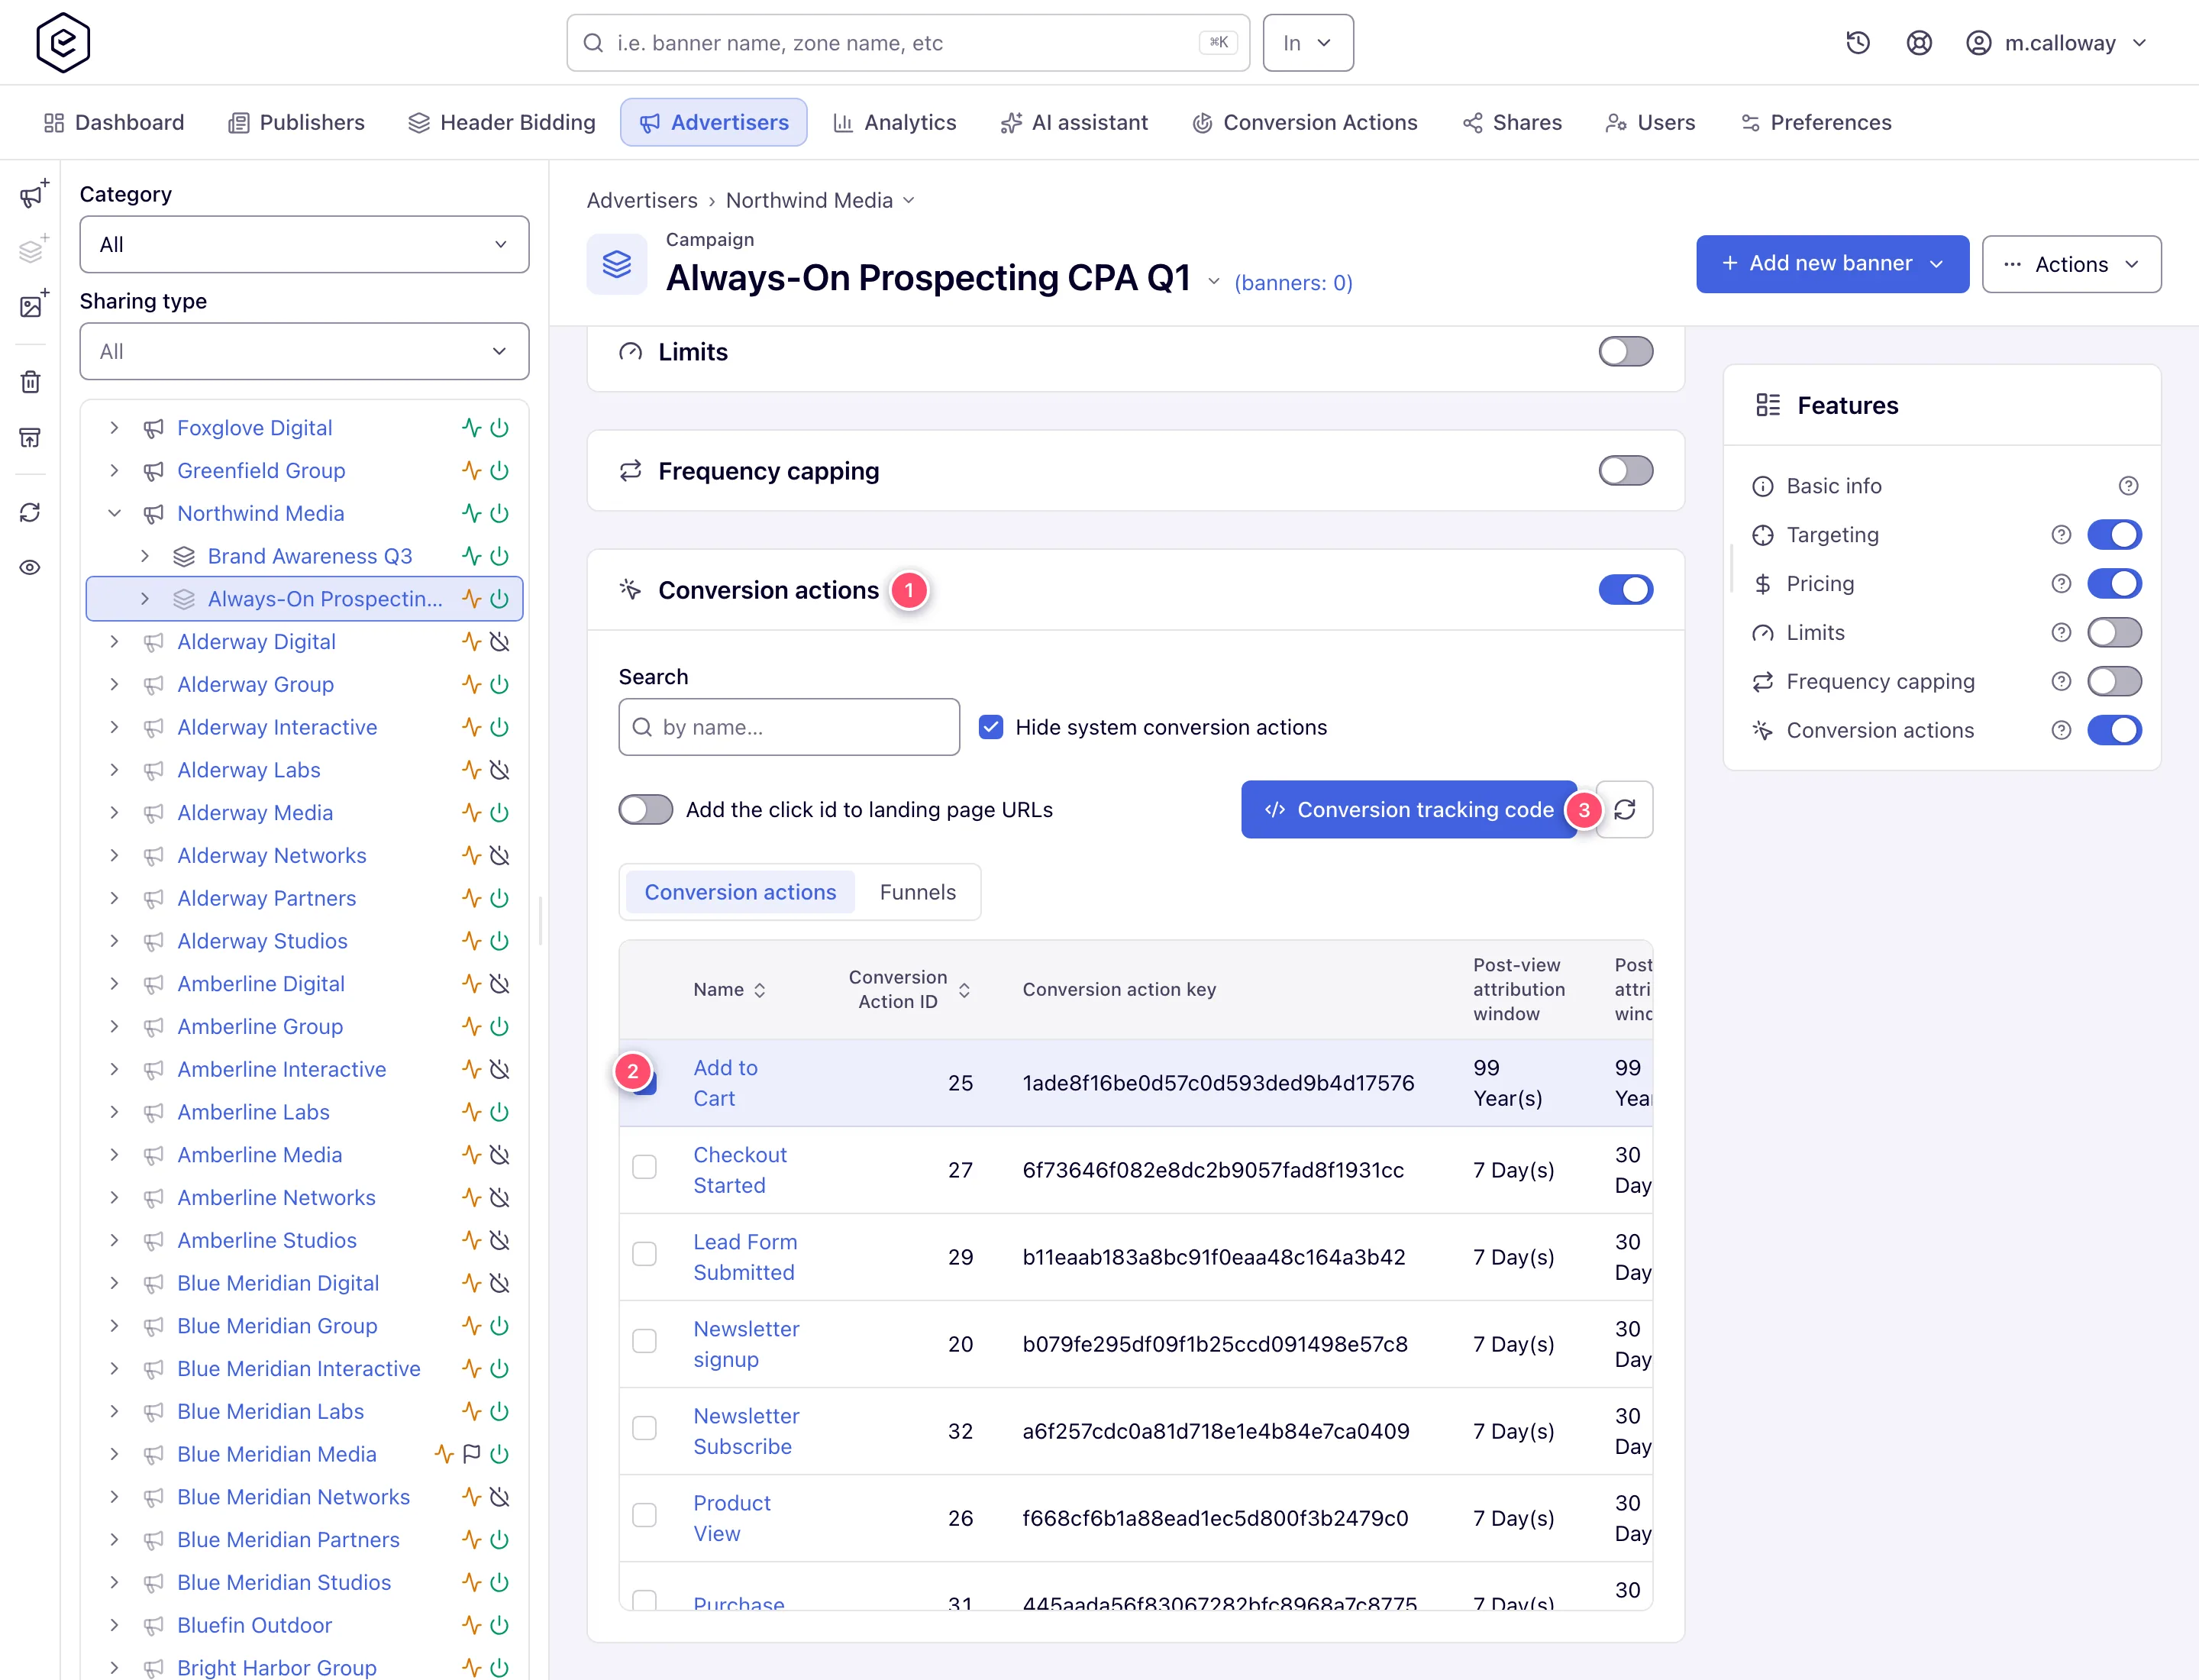
- Go to Account → Advertisers → advertiser → campaign and open the Conversion actions card.
- Tick an action row. The grid holds one tick at a time: ticking another row moves the tick to it, ticking the ticked row again clears it, and the Conversion tracking code button stays disabled while nothing is ticked. Click it.
- The Conversion tracking code window opens: an Ad-serving domain selector across the
top, then up to three tabs below it — Postback (S2S), Snippet and Pixel Tracking,
in that order. It opens on the first of those tabs. Each tab has its own permission — the
Pixel Tracking tab needs Action Tracking: Code, the other two Action Tracking:
Server-to-Server — so a tab your role lacks is simply not there.
Note: the same button serves the card’s Funnels tab. Select a funnel instead of an action and the window opens on the Snippet pane alone, building one block that names every step of the funnel in order — a funnel has no key and no pixel of its own, so there is nothing for the other two tabs to show. See Save a conversion funnel and report on it.
Pick the ad-serving domain
The selector sits above the tabs because it governs everything the window generates — the pixel code blocks, the generated snippet and both server-to-server Conversion Tracking URLs. Choose the domain your ad tags actually serve from:
- The pixel matches a conversion against the browser cookie written when the ad was viewed or clicked. That cookie belongs to the serving domain, so a pixel loaded from any other host has nothing to read.
- The Conversion Tracking URLs are the endpoint your server calls, so they have to name a host that serves your ads.
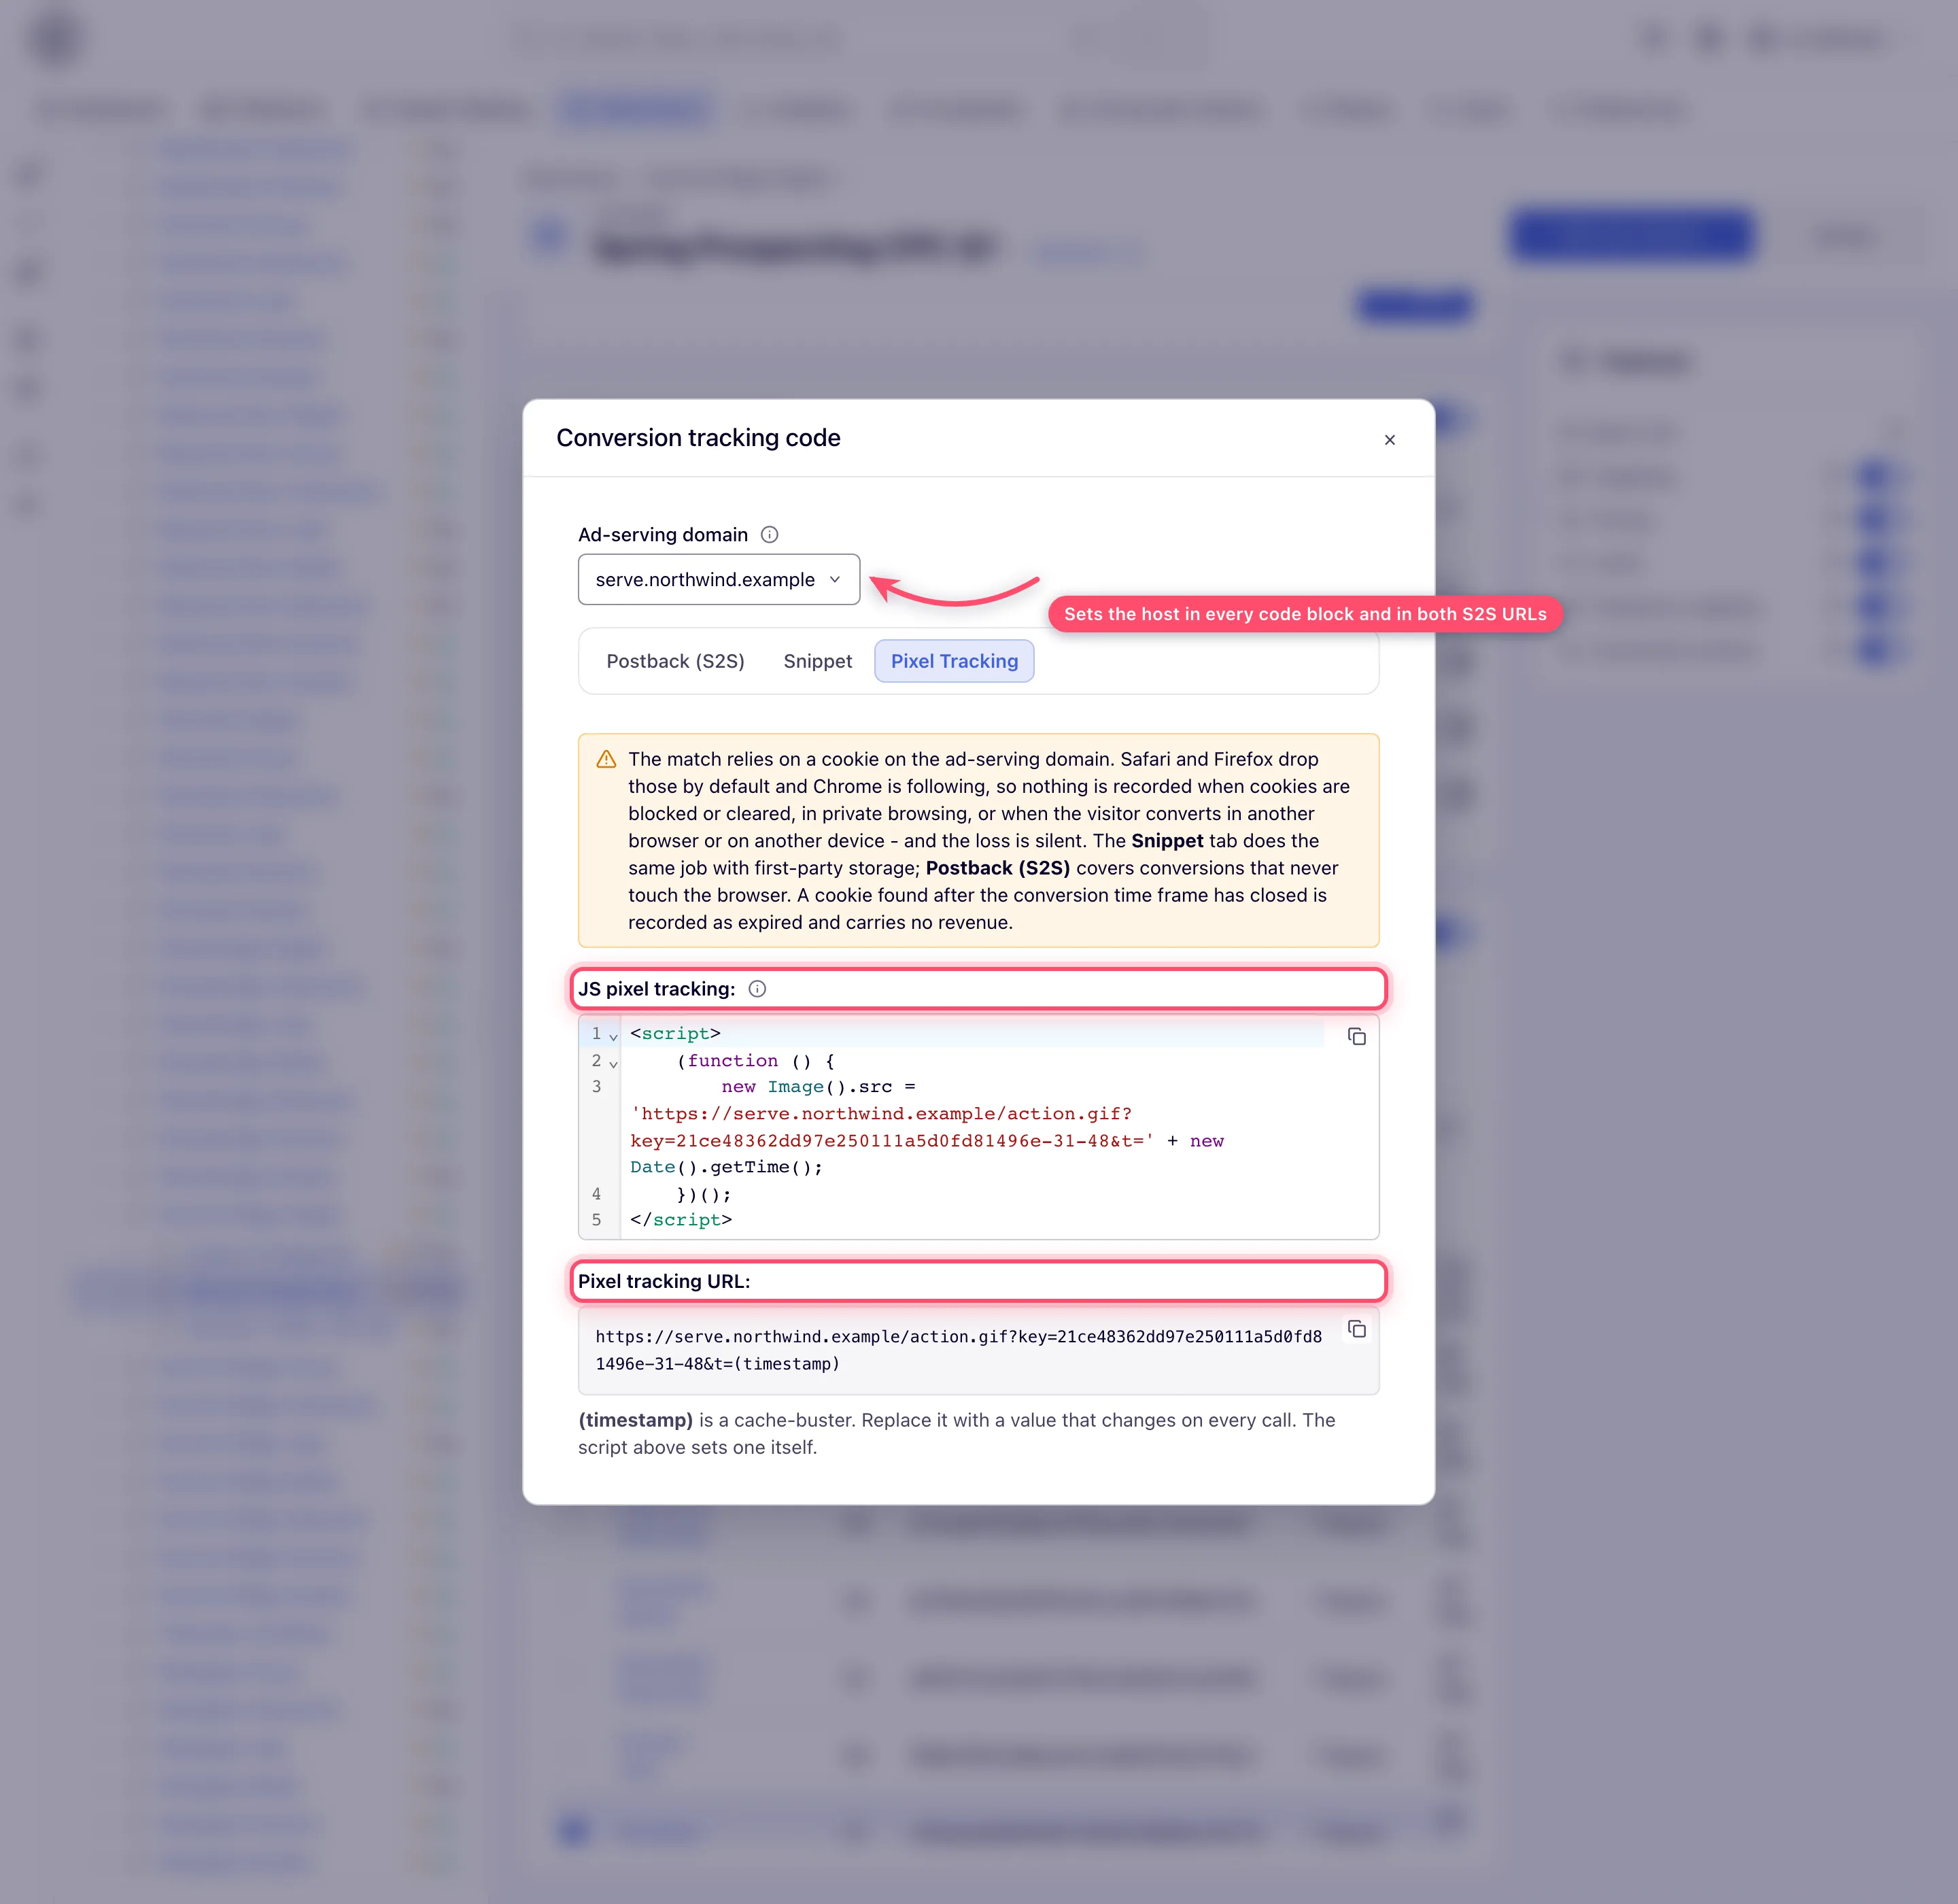
It starts on the domain the codes would use anyway. Opened from a campaign that is the campaign’s own action-pixel host; failing that, its advertiser’s ad-serving host; failing that, the network default. Opened from Account → Conversion Actions it is instead the host bound to the action’s owner, again falling back to the network default. Changing it rewrites the codes and URLs in place.
Opened from a campaign, your choice is saved on that campaign, so everyone who opens this window next sees it. Opened from Account → Conversion Actions there is no campaign to save it on: the choice applies to what you are copying now and is forgotten when you close the window. The (i) beside the Ad-serving domain label says which of the two you are in.
Saving a pick onto the campaign needs the Action Tracking: Code permission (the one behind the Pixel Tracking tab) and Update on the campaign. Without either, the pick is refused with a Permission denied toast and the selector keeps its old value — a role that holds only the server-to-server permission can read every code here but cannot move the domain.
Pixel tracking (browser-side)
-
Open the Pixel Tracking tab.
-
Copy one of the code blocks and place it on the page a user reaches after converting. They appear in this order:
Block What it is When to use JS pixel tracking Script that requests a 1×1 tracking image from /action.gifStandard choice for web pages JS pixel tracking with piggybacks Script that loads /action.jsfrom the ad server, which can return client-side piggyback markupLegacy. Only for a page that already carries it — the Snippet renders client-side (JS) piggybacks on its own Pixel tracking URL The bare /action.gifURLFor systems that only accept an image URL (email templates, third-party builders) The “with piggybacks” block appears only when the campaign’s Piggybacks card is switched on and your role holds the Piggyback Pixel Tracking permission.
Note: the
t=(timestamp)at the end of the Pixel tracking URL is a cache-buster you replace yourself with something that changes on every call. It is deliberately not written as a$$…$$macro, because nothing on the ad server expands it — this URL is fired by whatever system you paste it into. The two script blocks set it themselves fromnew Date().getTime().
There is nothing to declare on this path. The pixel is matched against the click or view cookie written when the ad was served, and post-click or post-view follows from whichever the cookie carried; a click beats a view when both are present.
That match is window-checked, always. A cookie older than the action’s post-click / post-view
window does not produce a conversion: it is recorded as a zero-revenue expired diagnostic
(XD-reason: expired), and a window set to 0 means that event type never converts at all
(window-disabled). Server-to-server postbacks have a per-action opt-in for this; the pixel does
not need one, because it can see how old the cookie is.
Everything else the pixel can lose, it loses with the cookie: nothing is recorded when cookies are blocked or cleared, in private browsing, or when the user converts in another browser or on another device — and the loss is silent. The window’s own warning note says the same, and names the two alternatives: the Snippet does the same job out of the advertiser’s own first-party storage, and Postback (S2S) covers conversions that never touch a browser.
The landing-page snippet
The Snippet tab builds a JavaScript block you hand to the advertiser to paste on their own
site. It captures the click id out of the landing URL, keeps it in the advertiser’s own
first-party storage, and posts the conversion from the page when it happens — which is why it
keeps working where the pixel’s cookie does not. In the HTML format the block is complete as it
comes out, with nothing in it for the integrator to fill in; the Google Tag Manager format ends
with an optional one-tag-for-every-step alternative, and its {{…}} variable names are the one
thing the integrator has to point at real GTM variables.
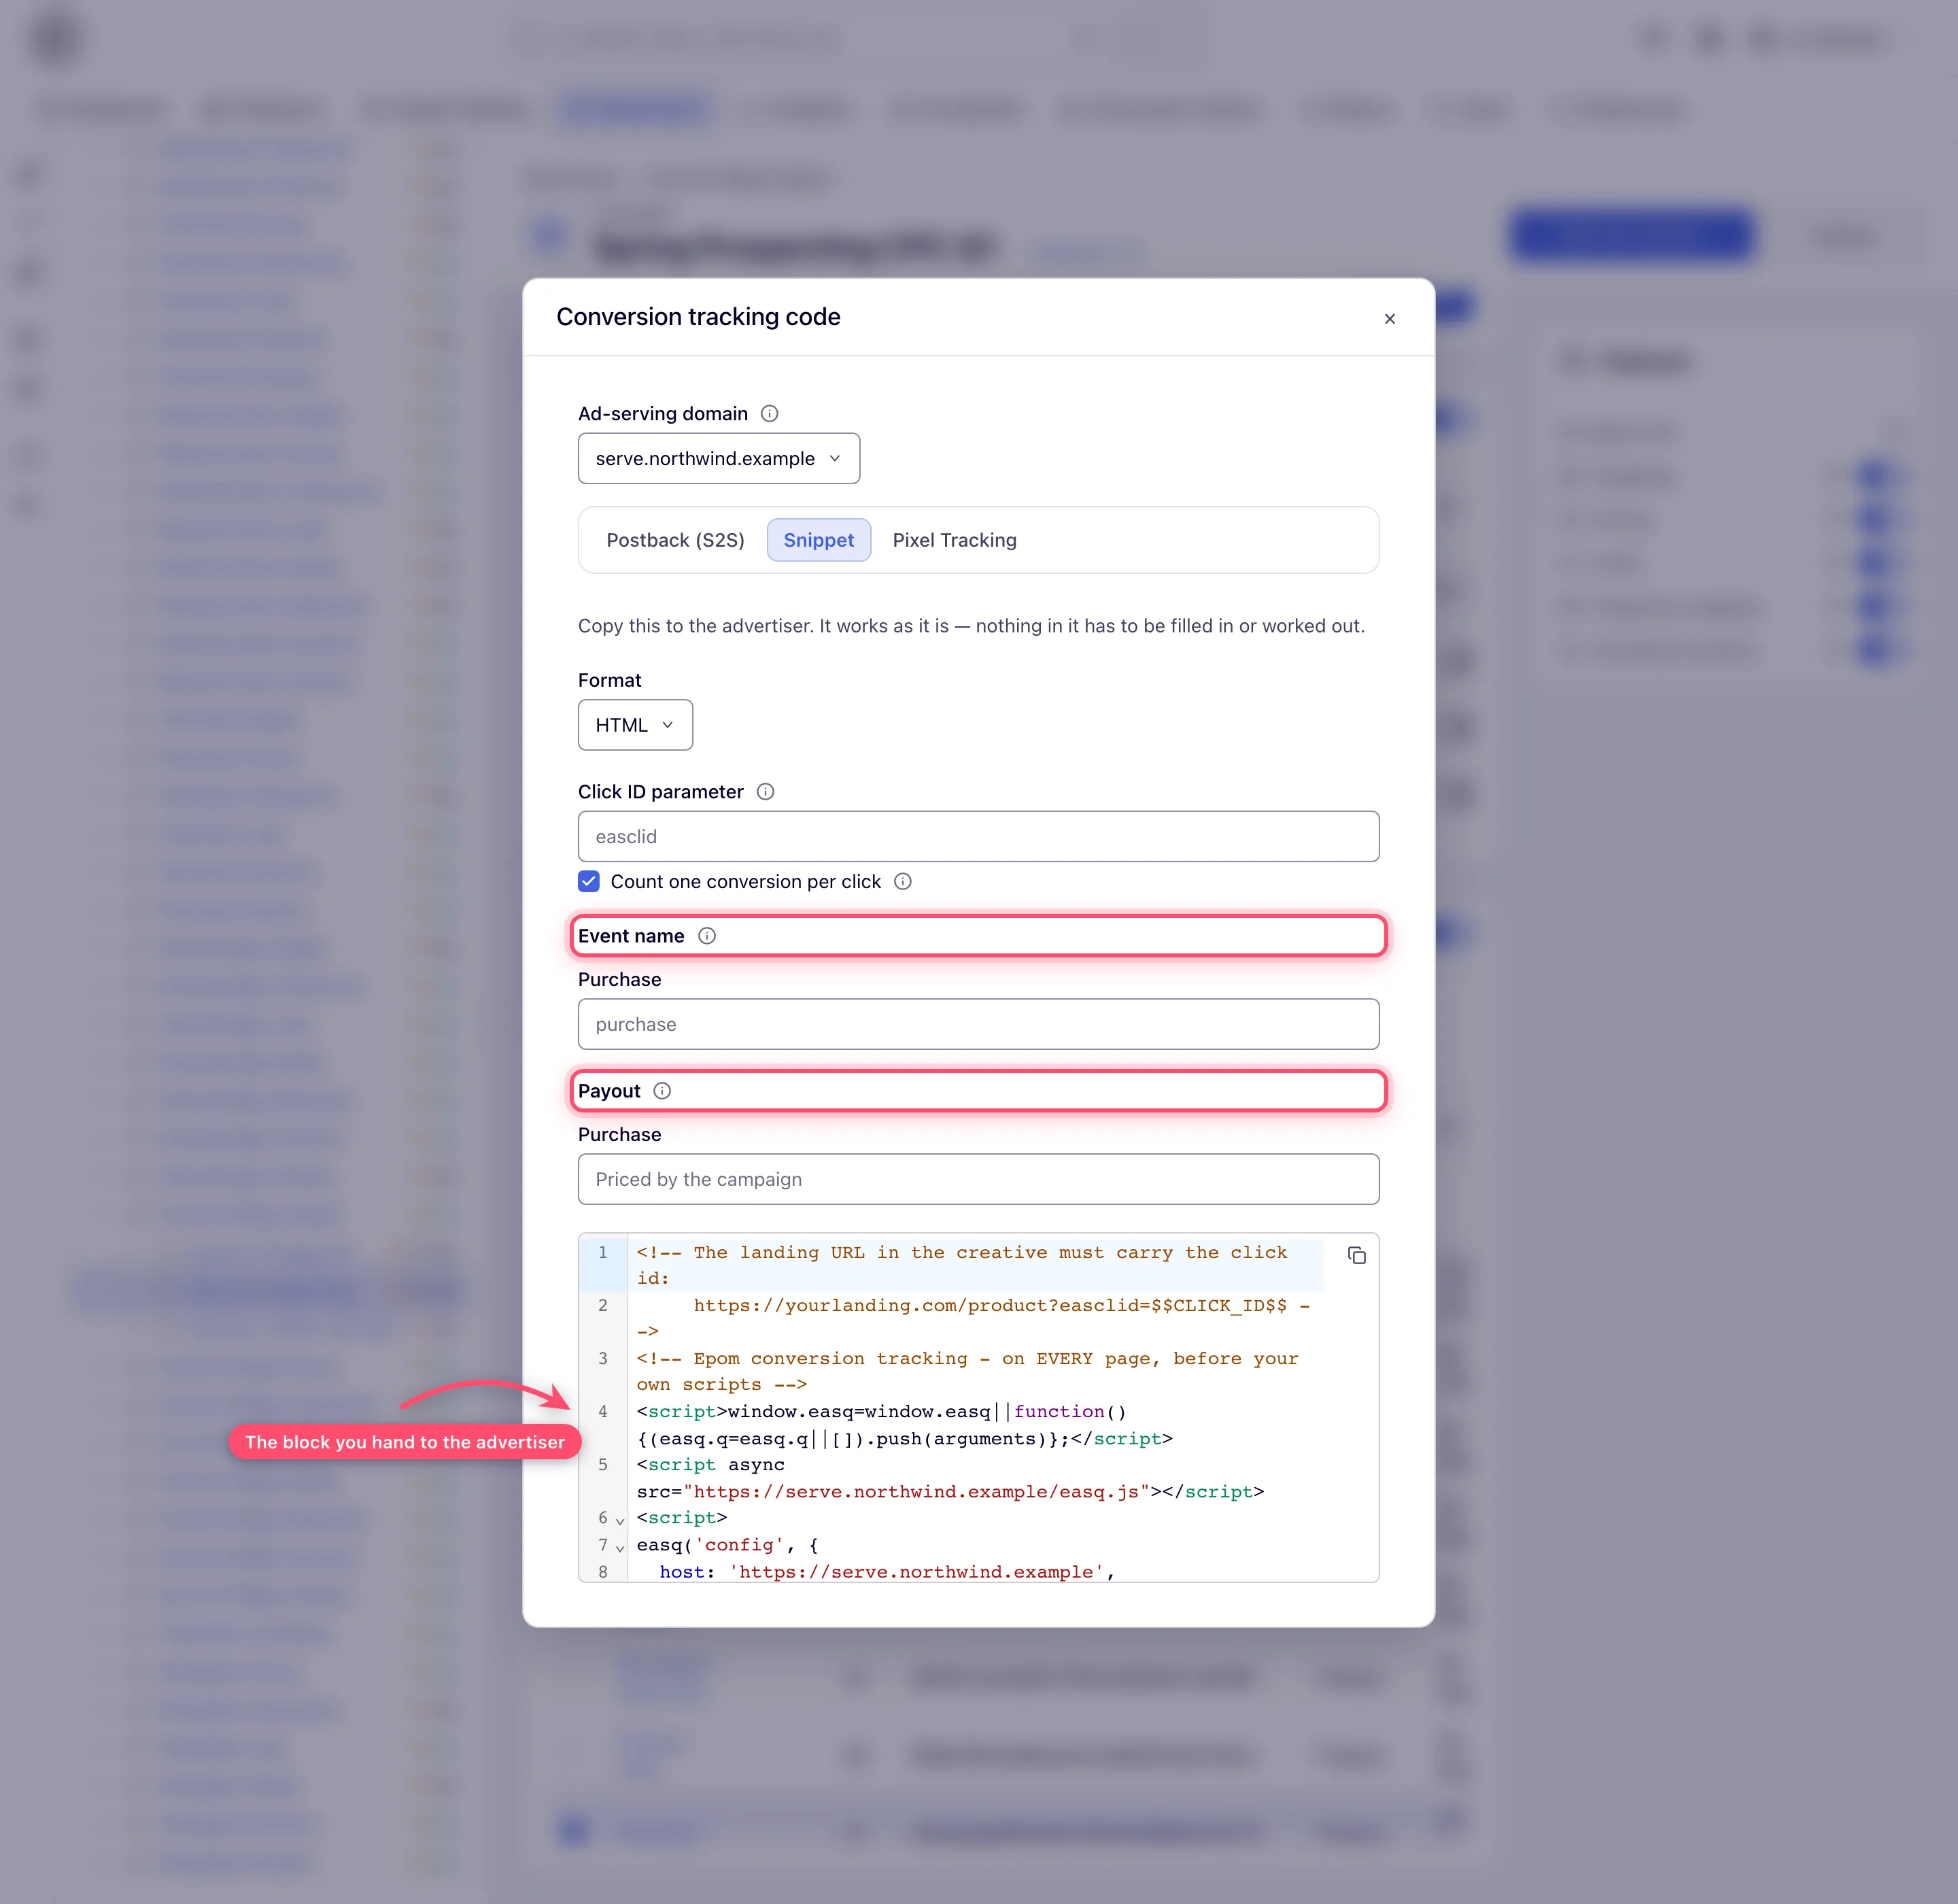
The code box scrolls inside itself, so only the first lines of the block are in the picture — use the copy button in its corner rather than retyping it from the screenshot. Install the landing-page helper walks through the whole block line by line.
The tab’s fields — Format, Click ID parameter, Count one conversion per click, Event name and Payout — are described one by one in Snippet tab options.
The block goes on every page, not only the conversion page — it is what captures the click id when the visitor arrives — and the per-step lines go where the step happens.
How the block behaves once installed — how an action is counted once per click, how long the
stored click id survives on each browser, why payout is not the value of the order, and how to
ask it what went wrong: see Install the landing-page helper.
Note: the tab does not check whether the campaign is tagging its landing URLs, and it will build a block for a campaign that is not. The reminder travels as a comment at the top of the generated block, naming the click-id parameter you chose: the creative’s landing URL has to arrive carrying the click id. Turn on Add the click id to landing page URLs on the campaign’s Conversion actions card — it reaches every creative whose click-through is built out of its own Link field, including the email-placement click and a click-through placement’s URLs. HTML Code, Template, native and OpenRTB creatives need
$$CLICK_ID$$put in the landing URL by hand. See auto-tagging.
Server-to-server (postback)
Open the Postback (S2S) tab. It offers two methods. Both work the same way: the ad server writes a tracking value into your landing page URL, you store it, and you hand it back on a Conversion Tracking URL when the user converts. Pick one per integration — running both buys you nothing.
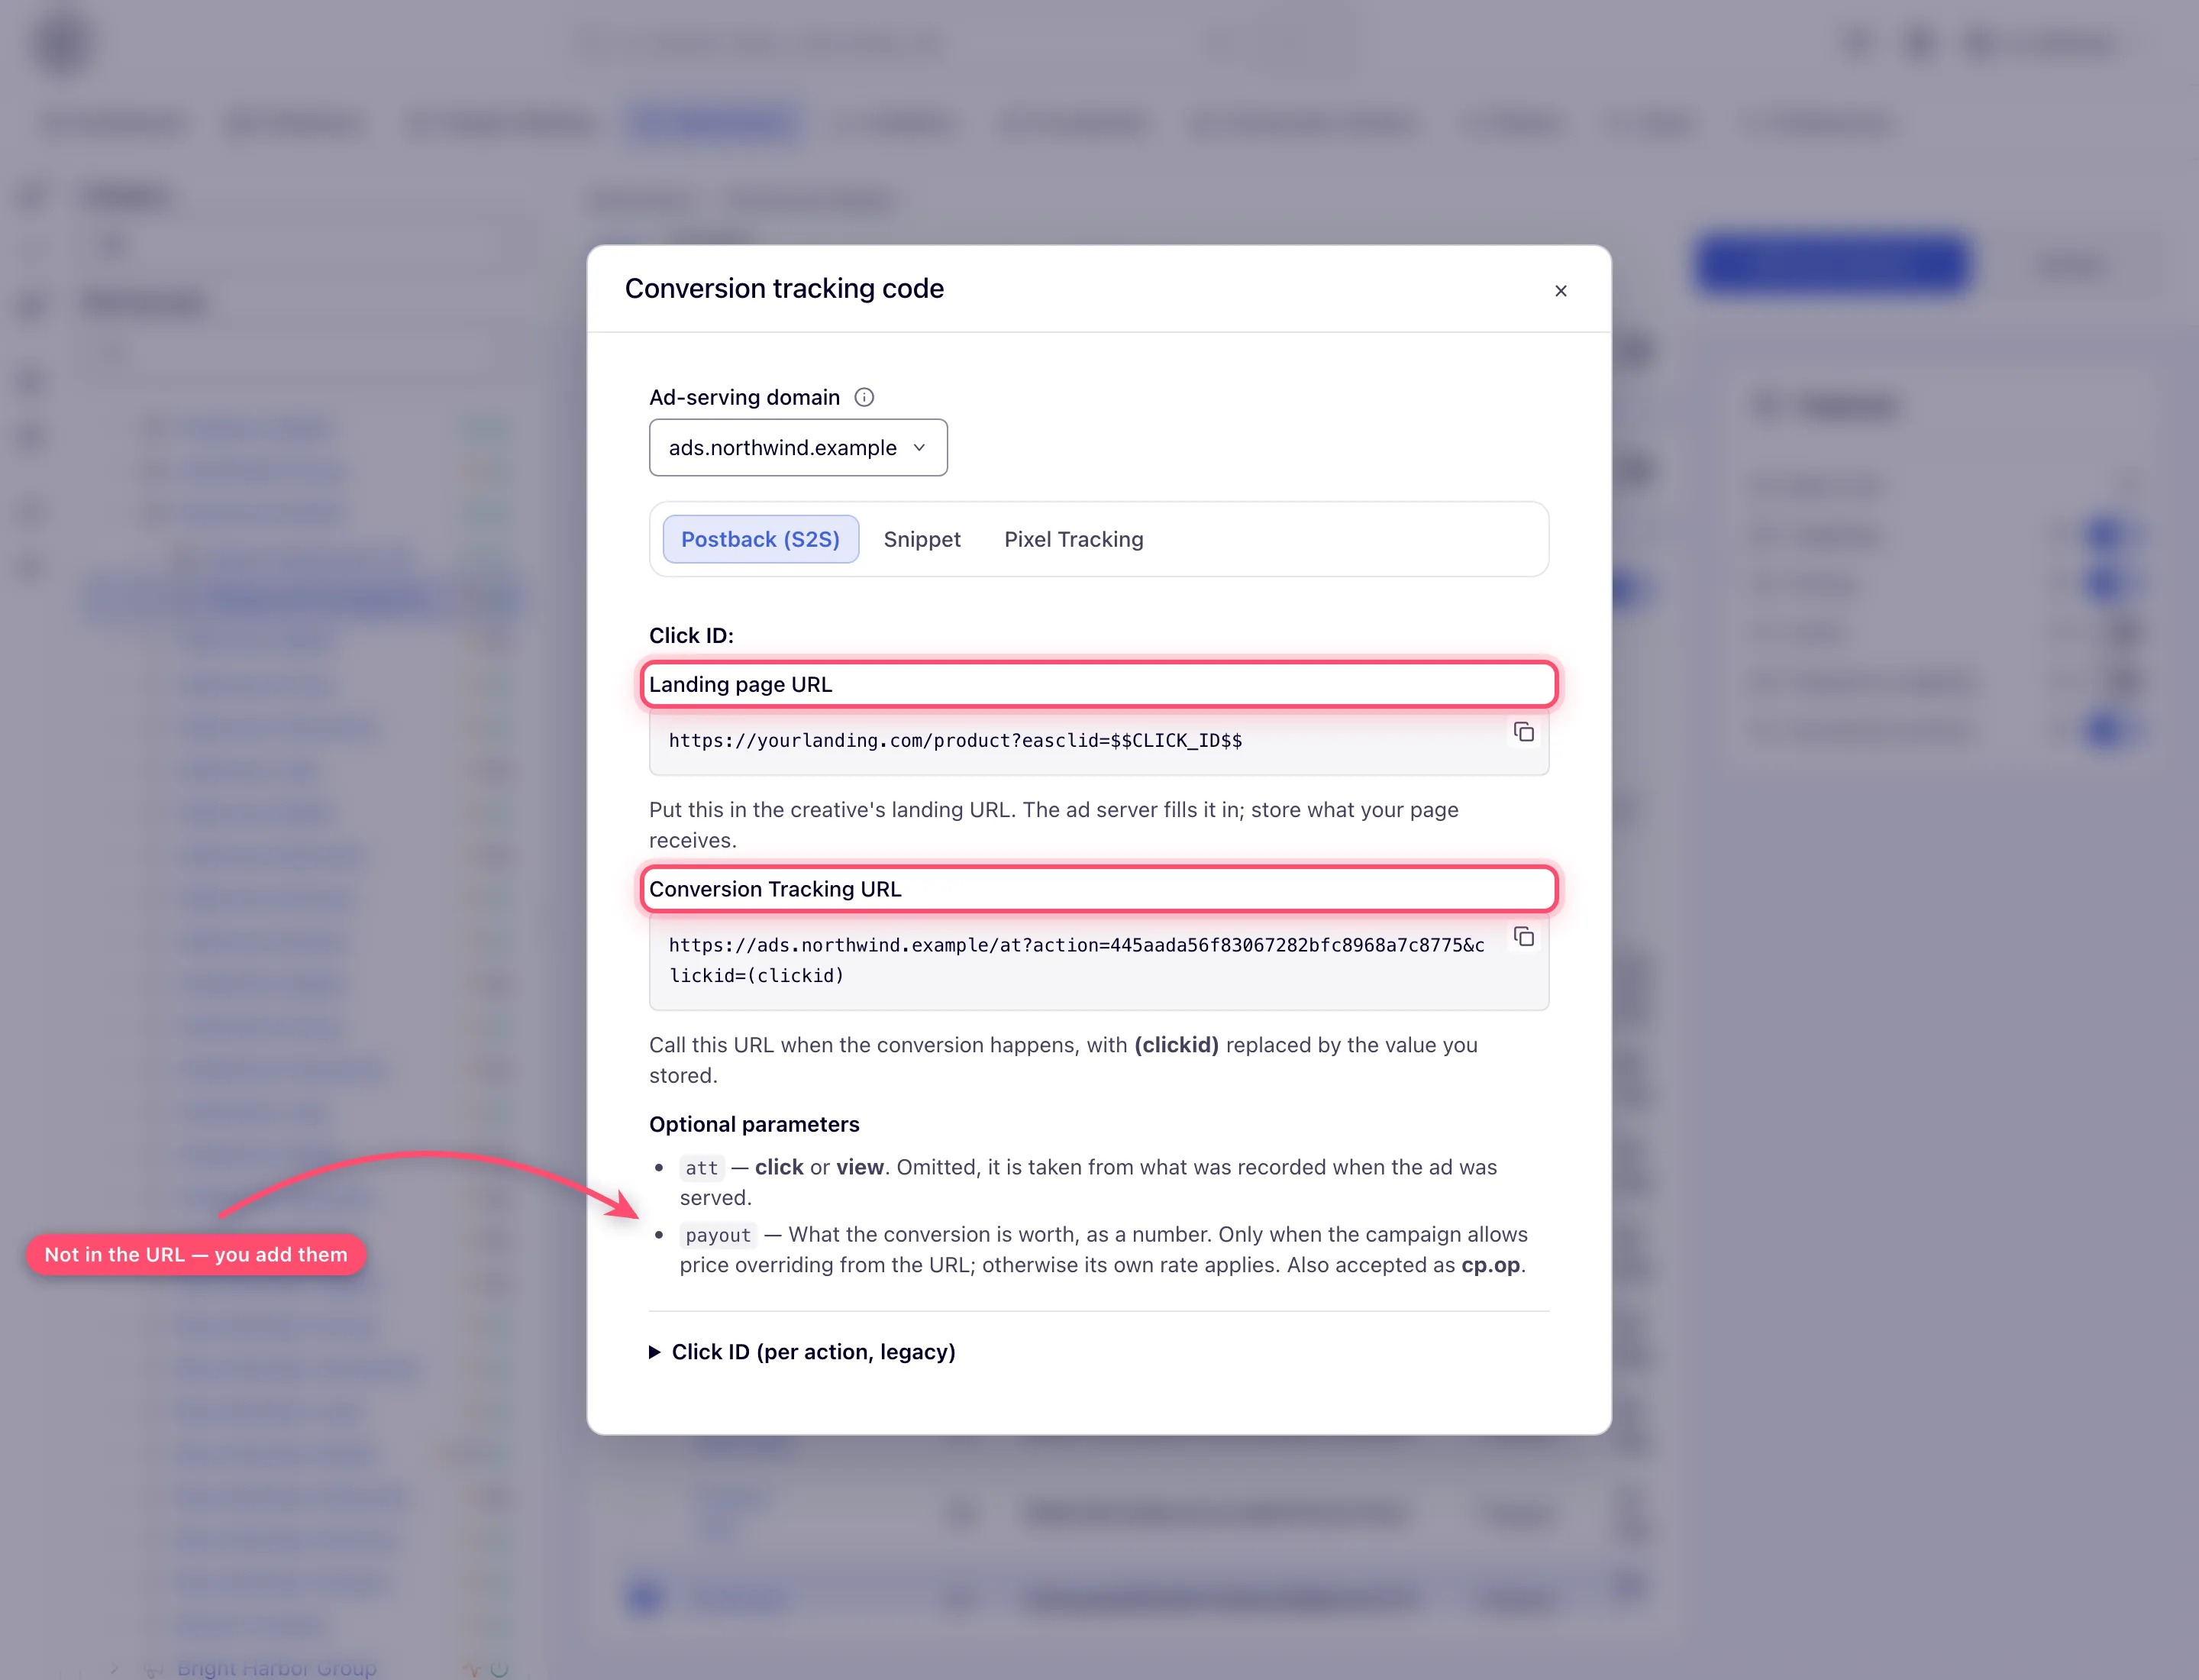
Which of the action’s two keys goes into the URL, and which into the pixel, is set out in Two keys, and which one goes where.
Click ID
-
In the landing page URL in your creative:
https://yourlanding.com/product?easclid=$$CLICK_ID$$If the URL already has a query string (UTM tags, for example), append with
&instead:https://yourlanding.com/product?utm_source=epom&easclid=$$CLICK_ID$$.On an image or video creative — and on a click-through placement’s URLs — you can let the campaign do this for you; see auto-tagging. HTML Code, Template, native and OpenRTB creatives need the macro written in by hand.
$$ACTION_DATA$$is the same token under its older name and still works — a creative carrying both spellings mints one value, not two. -
Call the Conversion Tracking URL from your server, with
(clickid)replaced by whatever your page received ineasclid=:https://<ad-serving-domain>/at?action=<conversion action key>&clickid=(clickid)The endpoint answers to more spellings than the two it generates, so a postback already configured against another tracker usually needs no change:
clickid,actionData,cidandtxidare all read as the click id, andaction,actionKey,event,goal,event_idandgoal_idare all read as the key. The first one present and non-blank wins.
Click ID (per action, legacy)
Collapsed in the window, and kept only for integrations already on it. It works the same way, but the value is issued per action rather than per click, so a new integration should use Click ID above.
-
Put the Sub ID macro in the landing page URL in your creative. The tab shows the macro for your action, in the form
$$SUB_ID(ActionName_ID)$$:https://yourlanding.com/product?subid=$$SUB_ID(purchase_22)$$The ad server replaces it when it serves the ad, so your page is reached with a unique value in
subid=. Store that value with the visit. -
When the user converts, request the Conversion Tracking URL from your server, with the value you stored in place of
(subid):https://<ad-serving-domain>/at?subId=(subid)
Note: there is no fingerprint-matching endpoint for app installs. An app integration posts to the Conversion Tracking URL above, which matches by click ID — so the partner that reports the install has to receive the click ID with the click and send it back as
clickid. A postback still pointed at/app/atanswers404.
What you replace, and what is replaced for you
Two kinds of token appear on this tab, and each belongs to exactly one of the two URLs:
| In this URL | Written as | Filled in by |
|---|---|---|
| The landing page URL, in your creative | $$CLICK_ID$$, $$SUB_ID(purchase_22)$$ | The ad server, when it serves the ad |
| The Conversion Tracking URL, called by your server | (clickid), (subid) | You, before you call the URL |
The round brackets are deliberate: the URL has to survive being fired exactly as copied, and the
ad server rejects a request URL containing < > | { } with a 400.
Nothing else is baked into the URL. The tab lists two Optional parameters beside it — att
and payout, both covered in Postback parameters and partner integrations — for the integrations that need them; leave both off and the conversion is
counted at the campaign’s own CPA rate, classified from whatever the stored value carries.
Note: the same window opens from Account → Conversion Actions (select a row and click Conversion tracking code), and the action’s own edit page carries it as a Conversion Tracking card. In both places you get the Postback (S2S) tab only, because the pixel code and the snippet are campaign-specific. The URLs are otherwise identical; only the host differs, and it follows the Ad-serving domain selector in both places.
The partner-facing side of the postback — sub1 to sub10, forwarding a traffic source’s click ID,
AppsFlyer and other attribution links, payout, att= and the action’s default attribution type —
is on Postback parameters and partner integrations.
Test a conversion
- Open a page that serves the campaign’s ad and click the ad (a click is the strongest attribution signal), or at least let the impression load.
- Complete the conversion path in the same browser: land on the page with the pixel, or trigger your backend postback with the captured click id / Sub ID value.
- Verify:
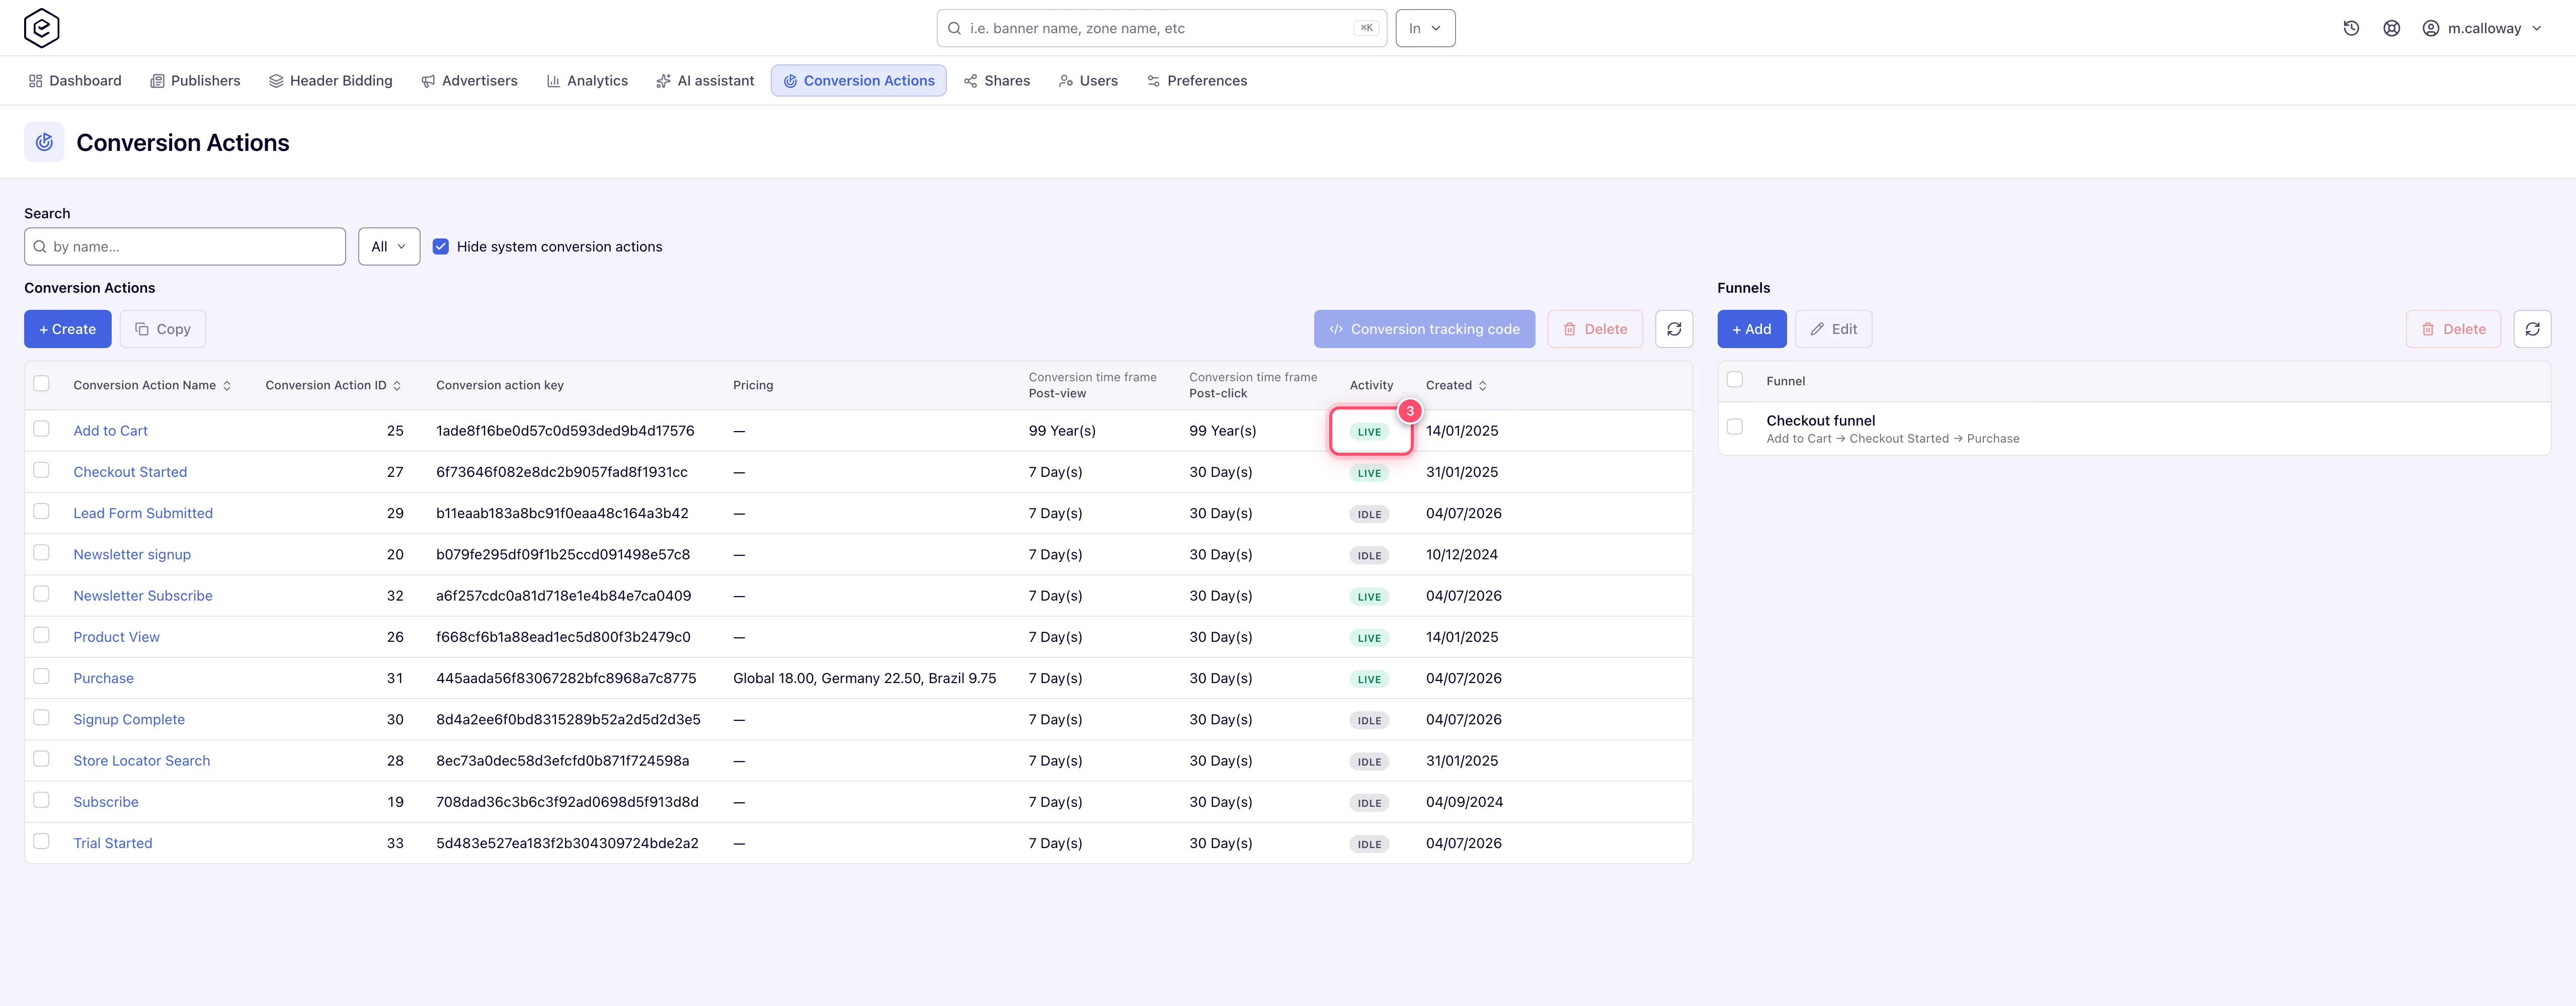
- Account → Conversion Actions — the action’s Activity badge turns Live (it means conversions were recorded in the last 2 days; otherwise it reads Idle).
- Run a report with the Conversions column, or open the Conversions Log report for
a per-event row (requires the action’s Detailed conversion log option to be on).
- If nothing arrives, ask the pixel why — see Why a conversion did not count.
Options and fields
For the action-level settings that govern matching (attribution windows, per-IP duplicate windows, detailed log), see the field table in Create and edit conversion actions.
Corner cases and gotchas
Corner case: the Pixel Tracking and Snippet tabs exist only when the window is opened from a campaign. On the global Conversion Actions page and on an action’s own edit page you will only ever see the Postback (S2S) tab — that is by design, because the pixel code and the generated block are both campaign-specific.
Corner case: the Ad-serving domain selector governs the pixel blocks, the snippet and both Conversion Tracking URLs — it is one choice for the whole window, not a pixel-only control. If your tags serve from a custom domain, pick it before you copy anything. Change it after you have already handed a partner a Conversion Tracking URL and the two of you are naming different hosts: re-send the URL rather than assuming the old one still lines up with the cookie the pixel expects.
Corner case: the domain list is network-wide — every ad-serving host configured on any account of this network, plus the network default and the ad server’s own host aliases. It is not filtered to your own advertisers, so a host you do not recognise on the list is not a bug. A host that is not on the list is refused outright (“Unknown ad-serving domain”), so a hand-edited request naming an arbitrary domain will not have a URL generated for it.
Corner case: if the advertiser installs the plain Pixel tracking URL, client-side (JS) piggybacks never fire for those conversions: an image has no way to run anything. The Snippet and the legacy “JS pixel tracking with piggybacks” variant both deliver them. Server-side (URL) piggybacks are unaffected either way.
Corner case: pixel tracking depends on the browser cookie written when the ad was viewed or clicked, and on that cookie still being inside the action’s window. Conversions completed in a different browser, after clearing cookies, or in environments that discard cookies never attribute at all; conversions completed too late attribute as an expired zero-revenue diagnostic. Use the snippet or server-to-server tracking for the first group, and widen the window for the second.
Per-role notes
- Network manager — every campaign and conversion action on the network, from the campaign card or from the action’s own edit page.
- Advertiser — on the stock role you create and edit conversion actions on the Conversion Actions tab, but the campaign’s Conversion actions card and the Pixel Tracking, Postback (S2S) and Snippet tabs are not shown. Your network manager attaches the action to the campaign and sends you the code, or switches on Manage Action Tracking, Action Tracking: Code and Action Tracking: Server-to-Server for your role; you then get this page over your own campaigns and those shared with you. See What your network controls.
- Publisher — no Conversion Actions section and no tracking-code tabs on the stock role.
- Can view share — you can open the window and copy every code, but an Ad-serving domain pick is refused (Permission denied).
Exact grants: see User roles.
Via the API
GET /rest-api/action/id/{id}/tracking-code.do answers what this window shows, under the same
permissions: postback (the S2S tab — actionTrackUrl, the landing-page example with
easclid=$$CLICK_ID$$, and the legacy subIdMacro / subIdLandingUrlExample /
subIdActionTrackUrl) with the S2S permission, and pixel (jsPixelCode, the image
pixelTrackingUrl, and jsPixelCodeWithPiggybacks when the campaign has piggybacks on and your
role may use them) with the pixel-tab permission and a campaignId — the pixel is
campaign-specific, so without one the pixel-only caller gets a 400. host picks the ad-serving
domain the way the selector above the tabs does (one of the served domains, else 400); left out,
the codes use the campaign’s saved pixel domain (failing that its advertiser’s, then the network
default), or the action’s own host when no campaignId is sent, and the answer names the one used
in host. An unknown action or campaign is a 404; an action or campaign you cannot see, or a role
holding neither tracking permission, is a 403. The landing-page snippet is not part of it.
Related
- Conversion tracking overview
- Postback parameters and partner integrations
- Why a conversion did not count
- Snippet tab options
- Create and edit conversion actions
- Install the landing-page helper
- Save a conversion funnel and report on it
- Piggyback pixels
- Server-side trackers
- Third-party tracking codes
- Macros reference
- Run a report
- Analytics discrepancies