Application, email and click-through placements
Configure the specialist placement types — in-app slots served via the ad API, email placements with creative and landing URLs, and click-through placements for pure click tracking.
Three specialist types round out the placement family. Application placements serve into native mobile apps through the ad API; Email placements produce email-safe image and click URLs; Click-through placements carry no ad markup at all — they exist to track clicks. (Mobile web pages use the Mobile Site Placement, covered with the display family.)
Who this is for
Publishers with app, newsletter or tracking inventory; network managers configuring it.
Prerequisites
- A saved placement of the respective type (create one).
- For application placements: an app, or a server on its behalf, able to call the ad API.
- For email placements: an email template you can paste an image + link pair into.
Steps
Follow the part for the placement type you are creating.
Application placements (in-app)
- Open the placement. Beyond the shared fields, fill the app-specific selects:
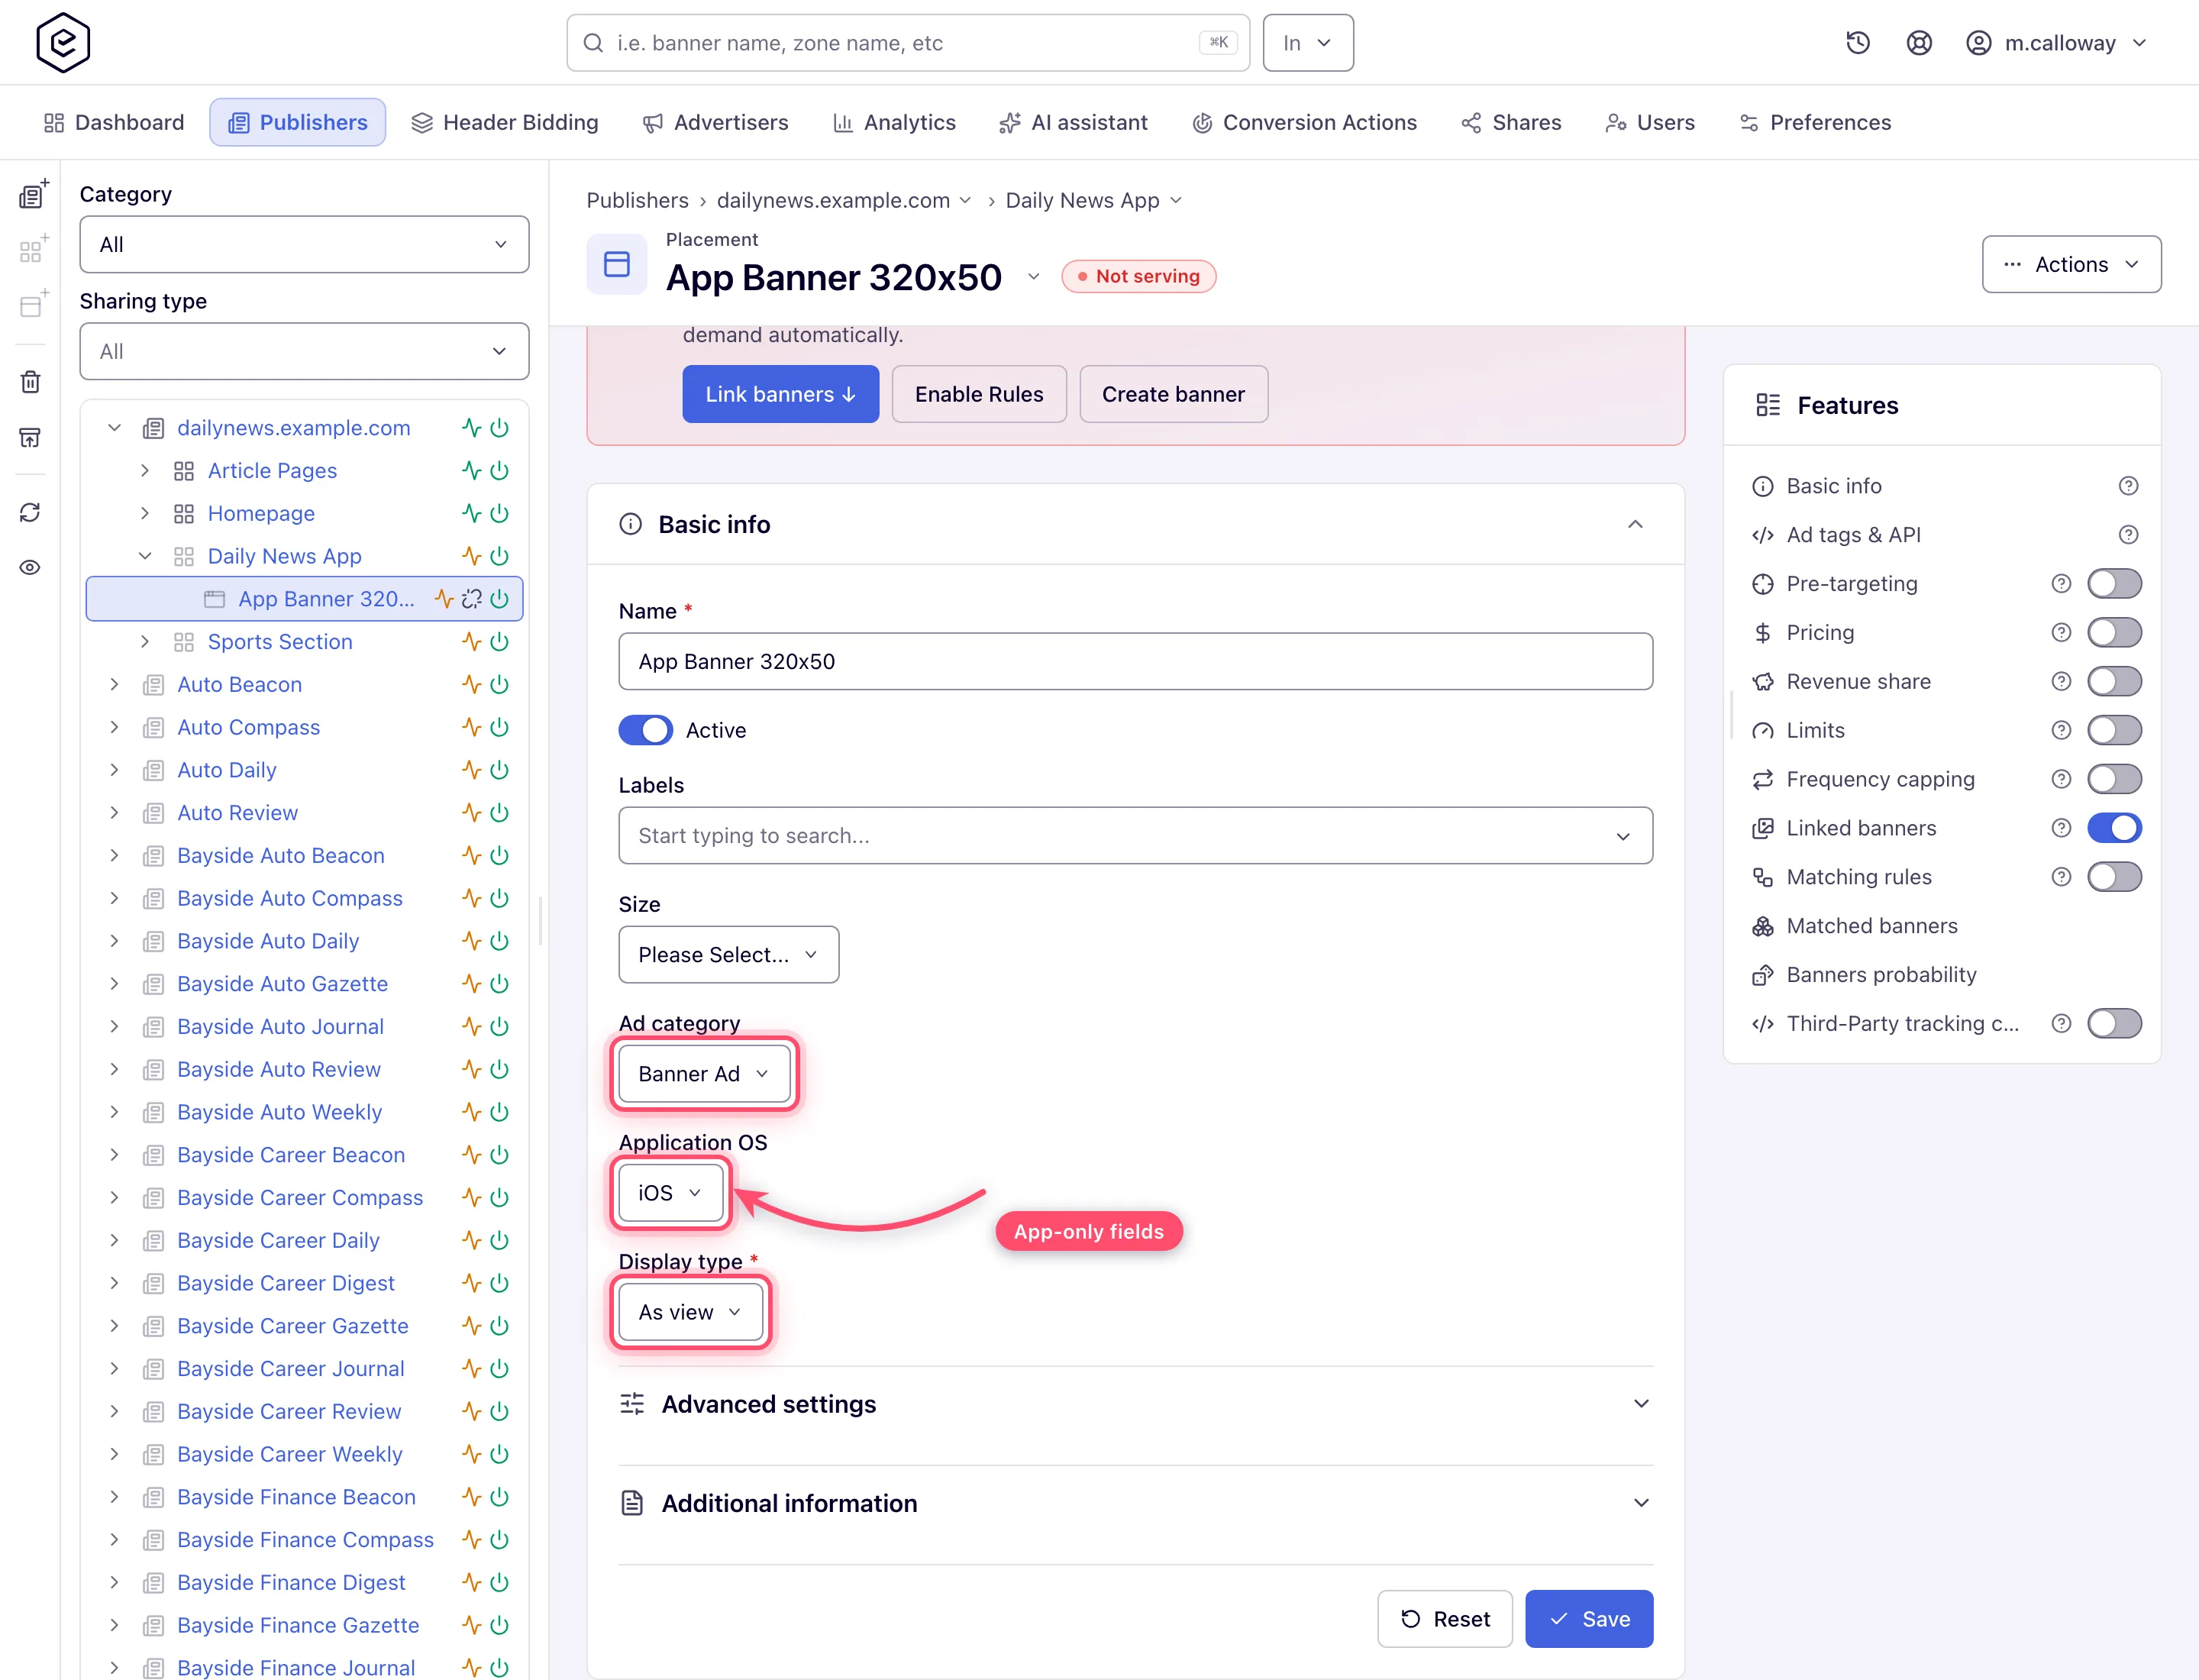
- Ad category — the ad format of the slot: Banner Ad, Interstitial Ad, Native Ad or Rewarded video (a new placement starts on Banner Ad);
- Application OS — iOS (the default) or Android. A non-native application banner is eligible for the slot only when its OS and ad category both equal the placement’s;
- Display type — As view or As activity: how the app shows the ad. It is returned in the
API response as
DISPLAY_TYPE, unless the banner names its own.
- Refresh interval (sec) — how often the app should re-request an ad (
0= no refresh) — is drawn only on a placement that already has a value stored, and a new Application placement has none, so the console does not offer it to set. Give it over the REST API (refreshIntervalonPOST /rest-api/placements/update/app.do); once stored it shows here. It is the application/native flavor of refresh, distinct from the display family’s “Refresh after”. - Save, then open Ad tags & API → API tab: the request URL, the parameter table
(
key,clientIp,clientUa,format, device identifiers…) and sample responses. It is the only integration path for this type — call it from the app or from your server.
| Field | What it does | Notes |
|---|---|---|
| Ad category | Ad format of the slot (Banner Ad, Interstitial Ad, Native Ad, Rewarded video) | Default Banner Ad; part of banner matching; validation errors from saving land on this field |
| Application OS | Platform of the app (iOS, Android) | Default iOS; part of banner matching |
| Display type | Presentation style in the app (As view, As activity) | No default; see the corner case below |
| Refresh interval (sec) | Ad-refresh cadence, 0 = off | Only on a placement that already has a stored value; set over REST |
| Size | Ad unit for the slot — 8 units, from Leaderboard 728×90 to the four phone/tablet interstitials | Not required. Only Site and Email placements require one; every other type that has a Size field leaves it optional |
| Placement key | Identifier used by API calls | Read-only, saved placements only |
Corner case: the classic page hid Domain as default channel on application placements — apps have no domain for it to read. On the new interface the checkbox is rendered anyway, along with the rest of the display family’s Advanced settings; leave it off and pass a channel explicitly as a request parameter if you segment reporting by channel.
Corner case: Display type is marked required on the form but nothing on the server enforces it and nothing pre-selects a value — a placement can be saved without one. Ad category and Application OS, by contrast, are both defaulted and validated.
Email placements
- Create and save the placement — the integration URLs exist only after the first save. Open
the Ad tags & API card and its Email tab:
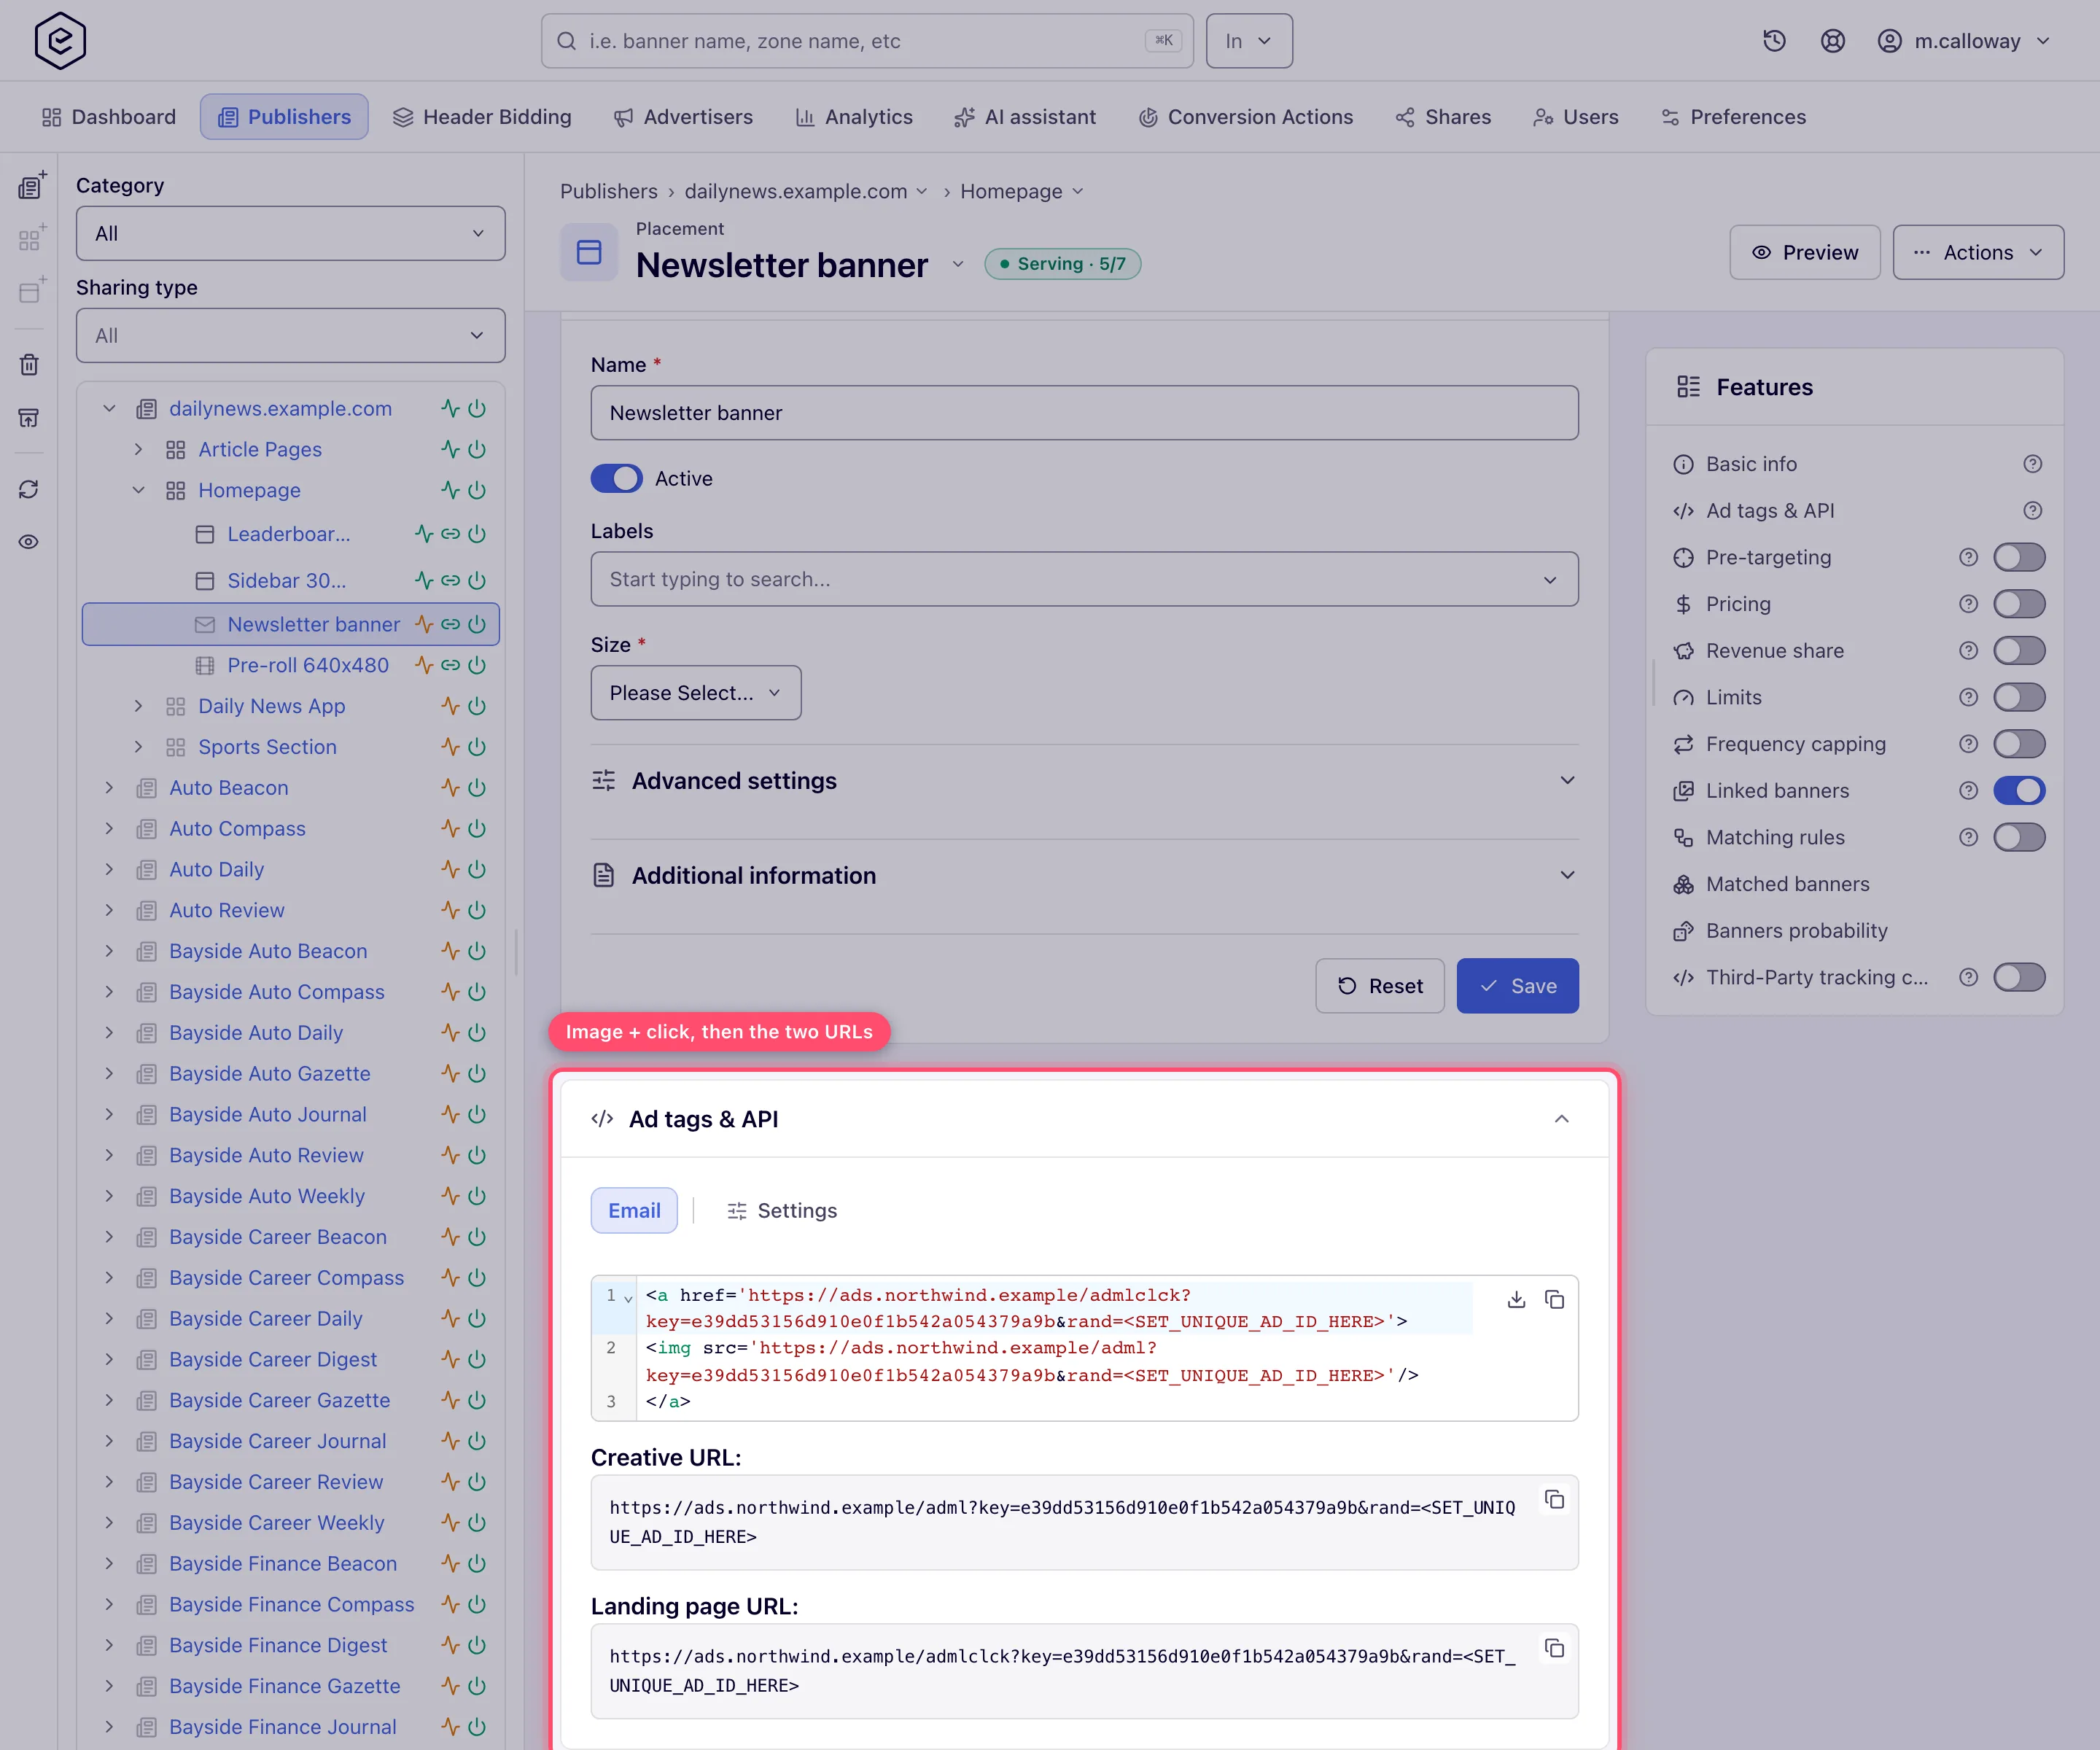
- the image + click code block — a ready-to-paste
<a><img>snippet; - Creative URL — the
<img src>beacon, on its own copyable field; - Landing page URL — the
<a href>click target, on its own copyable field.
- the image + click code block — a ready-to-paste
- If your network serves from several domains, pick the Domain on the Settings tab — the URLs are rebuilt for the chosen domain (it saves immediately).
- Any default parameters you set in Settings are baked into all three, and they refresh in place when you change a default or the domain.
Corner case: email clients execute no JavaScript, so an email placement can only rotate whatever renders as a static image at open time. Both URLs are read-only — you never edit them, only copy. Add a cache-busting merge tag for the
randparameter if your email platform supports it.
Click-through placements
A click-through placement records clicks and redirects — useful for text links, sponsorships or off-platform media you can’t tag with markup.
-
Create and save the placement (name is essentially the only field — there is no size and no generated ad tag).
-
Link creatives to the placement — the tracking URLs are per creative, so an unlinked placement has none. Only image and video creatives (local or external) produce them; an HTML, template, native or OpenRTB creative linked here is skipped.
-
Open the Ad tags & API card. On this type it carries no tag tab — it opens on Show tracking URLs, a grid of the linked creatives with their Type and Landing page URL:
Note: the grid is not pictured here. It only lists linked image and video creatives, and the reference environment the help-centre screenshots are taken on has click-through banners switched off at the role level, so the tab renders “No linked image or video banners yet”.
- Tick a row and click URLs — or double-click it — to open that creative’s six URLs, each on its own copyable field: Landing page URL, Creative URL, Impression pixel URL, Click-through URL, Click-through URL (hidden landing page) and Click pixel URL. The dialog renders the creative itself above them and links to its Preview, so you can confirm you are copying the right row’s URLs.
- Export downloads the same eight columns as CSV — the rows you ticked, or every row when you ticked none.
-
Give the third party the URL that matches what they can fire: a click-through URL where they send the visitor (it logs the click and forwards to the landing page), the click or impression pixel where they can only request an image.
Which interface: the above is the new interface. The classic placement page has no such tab — it keeps a Show tracking URLs button in the Basic-info form’s button row, beside Reset and Save, which opens the same list as a separate page. Both are built from the same URLs.
Corner case: click-through placements are the one type whose Ad tags & API card exists without a single code tab, and the copy-ad-tag quick action in trees/grids still answers “This placement type has no ad tag” — correctly, since there is none to copy. The card shows even on shares where the rest of the form is read-only; the Settings tab beside it is the part that disappears when you cannot edit.
Corner case: the tracking URLs are built on the placement’s own Domain, Protocol and default parameters, all set on the Settings tab of the same card — change one and the URLs are rebuilt, so a URL already handed to a partner is not necessarily the URL the tab shows today. Re-issue after a domain change.
Corner case: on a share carrying Mask campaigns, the rows keep their URLs but lose the identifying parts — you can still hand out a tracking URL for a creative whose advertiser you are not entitled to see.
Corner cases and gotchas (all three types)
Corner case: Application and Click-through placements have no Preview button — there is no self-contained markup to render (API responses, redirects). An Email placement does have one, because its Mail tag is preview-capable. On a demo deployment with a demo page configured the button appears on every type, but only Site, Native and Video placements open the demo page; the others open the built-in preview, which answers Not Supported for an Application or Click-through placement.
Corner case: the application API tab needs its own permission. Without it the Ad tags & API card has nothing to show for this type and looks broken — ask your network admin for the grant.
Over the API
- Email placements —
POST /rest-api/placements/update/email.docreates one (zoneId,type=EMAIL_PLACEMENT,name,adUnitId) or updates it (id), withdescription,active, labels,servingDomain(one of the domainsGET /rest-api/placements/{placementId}/serving-domains.dolists — the same as the console’s Domain picker, and like it ignored without the Set Ad-Serving Domain (Placement) permission) and azoneIdthat moves it. It must keep an ad unit; creating one needs the Email Placements permission. - Click-through tracking URLs —
GET /rest-api/placements/{placementId}/tracking-urls.doanswers the Tracking URLs tab: per linked image or video banner, the click-through URL, the one that hides the landing page, and the click and impression pixel URLs. It needs view rights on the site. - Creatives for a click-through placement — there is no click-through creative type, in the console or over the
API: a click-through placement accepts a banner of any placement type. Create an image or video banner as usual
(
POST /rest-api/banner/create.dowith e.g.placementType=SITE_PLACEMENT,bannerType=LOCAL_FILEorEXTERNAL_FILE) and link it withPUT /rest-api/banners/{bannerId}/placements.do?ids={placementId}&append=true. A create withplacementType=CLICK_THROUGH_PLACEMENTis refused with a message saying this.
Per-role notes
- Publisher — configures application and email placements; the Email tab gives the image-plus-link code. The application API tab needs its own grant — ask your network admin.
- Network manager — all three types, once your network administrator enables Click-through Placement and the application API tab for the role.
- Can View share — the forms are read-only; the email and tracking URLs stay copyable.
- Demo account — Preview appears on Application and Click-through placements but answers Not Supported (Demo accounts).
Exact grants: see User roles.
Related
- Create a placement
- Display placements (covers Mobile Site placements)
- Ad tags, invocation codes and the API
- Placement types reference