Quick start: serve your first ad as a network manager
End-to-end walkthrough from an empty account to a served ad — advertiser, campaign, banner, site, zone, placement, linking, ad tag and first analytics rows.
This tutorial takes you from an empty account to a real ad on a page. You will build both sides of the system — a banner on the demand side, a placement on the supply side — link them, copy the ad tag, watch the ad render, and see the first rows arrive in Analytics. Plan for 20–30 minutes.
Who this is for
Network managers. You need create rights on both the Advertisers and Publishers trees, and this tutorial builds one chain in each — see Roles → Network manager. What a network manager can see and change is set by the permissions your network administrator grants in Admin → Users & access → User roles & permissions; where a step needs a permission that is not always granted, it says so.
Prerequisites
- You can sign in to the account area of the new interface.
- An image file to use as the test creative — any PNG/JPEG/GIF in a standard ad size, e.g. 300×250.
- To copy and preview a Universal JS tag (Stage 4): the Ajax permission for site placements, and at least one ad-serving domain on the network. The permission is admin-only — your network administrator grants it in Admin → Users & access → Admin roles & permissions (if nobody in your network can open that page, ask Epom support or your account manager) — and without it the Ad tags & API card offers only the tabs your role holds.
Steps
Stage 1 — create the demand side (advertiser → campaign → banner)
- Go to Account → Advertisers. In tree mode, use the action rail next to the tree and click New advertiser (in grid mode the New advertiser… button sits above the grid).
- On the Create new advertiser page fill in Name (the only required field) and leave
the status toggle on Active.
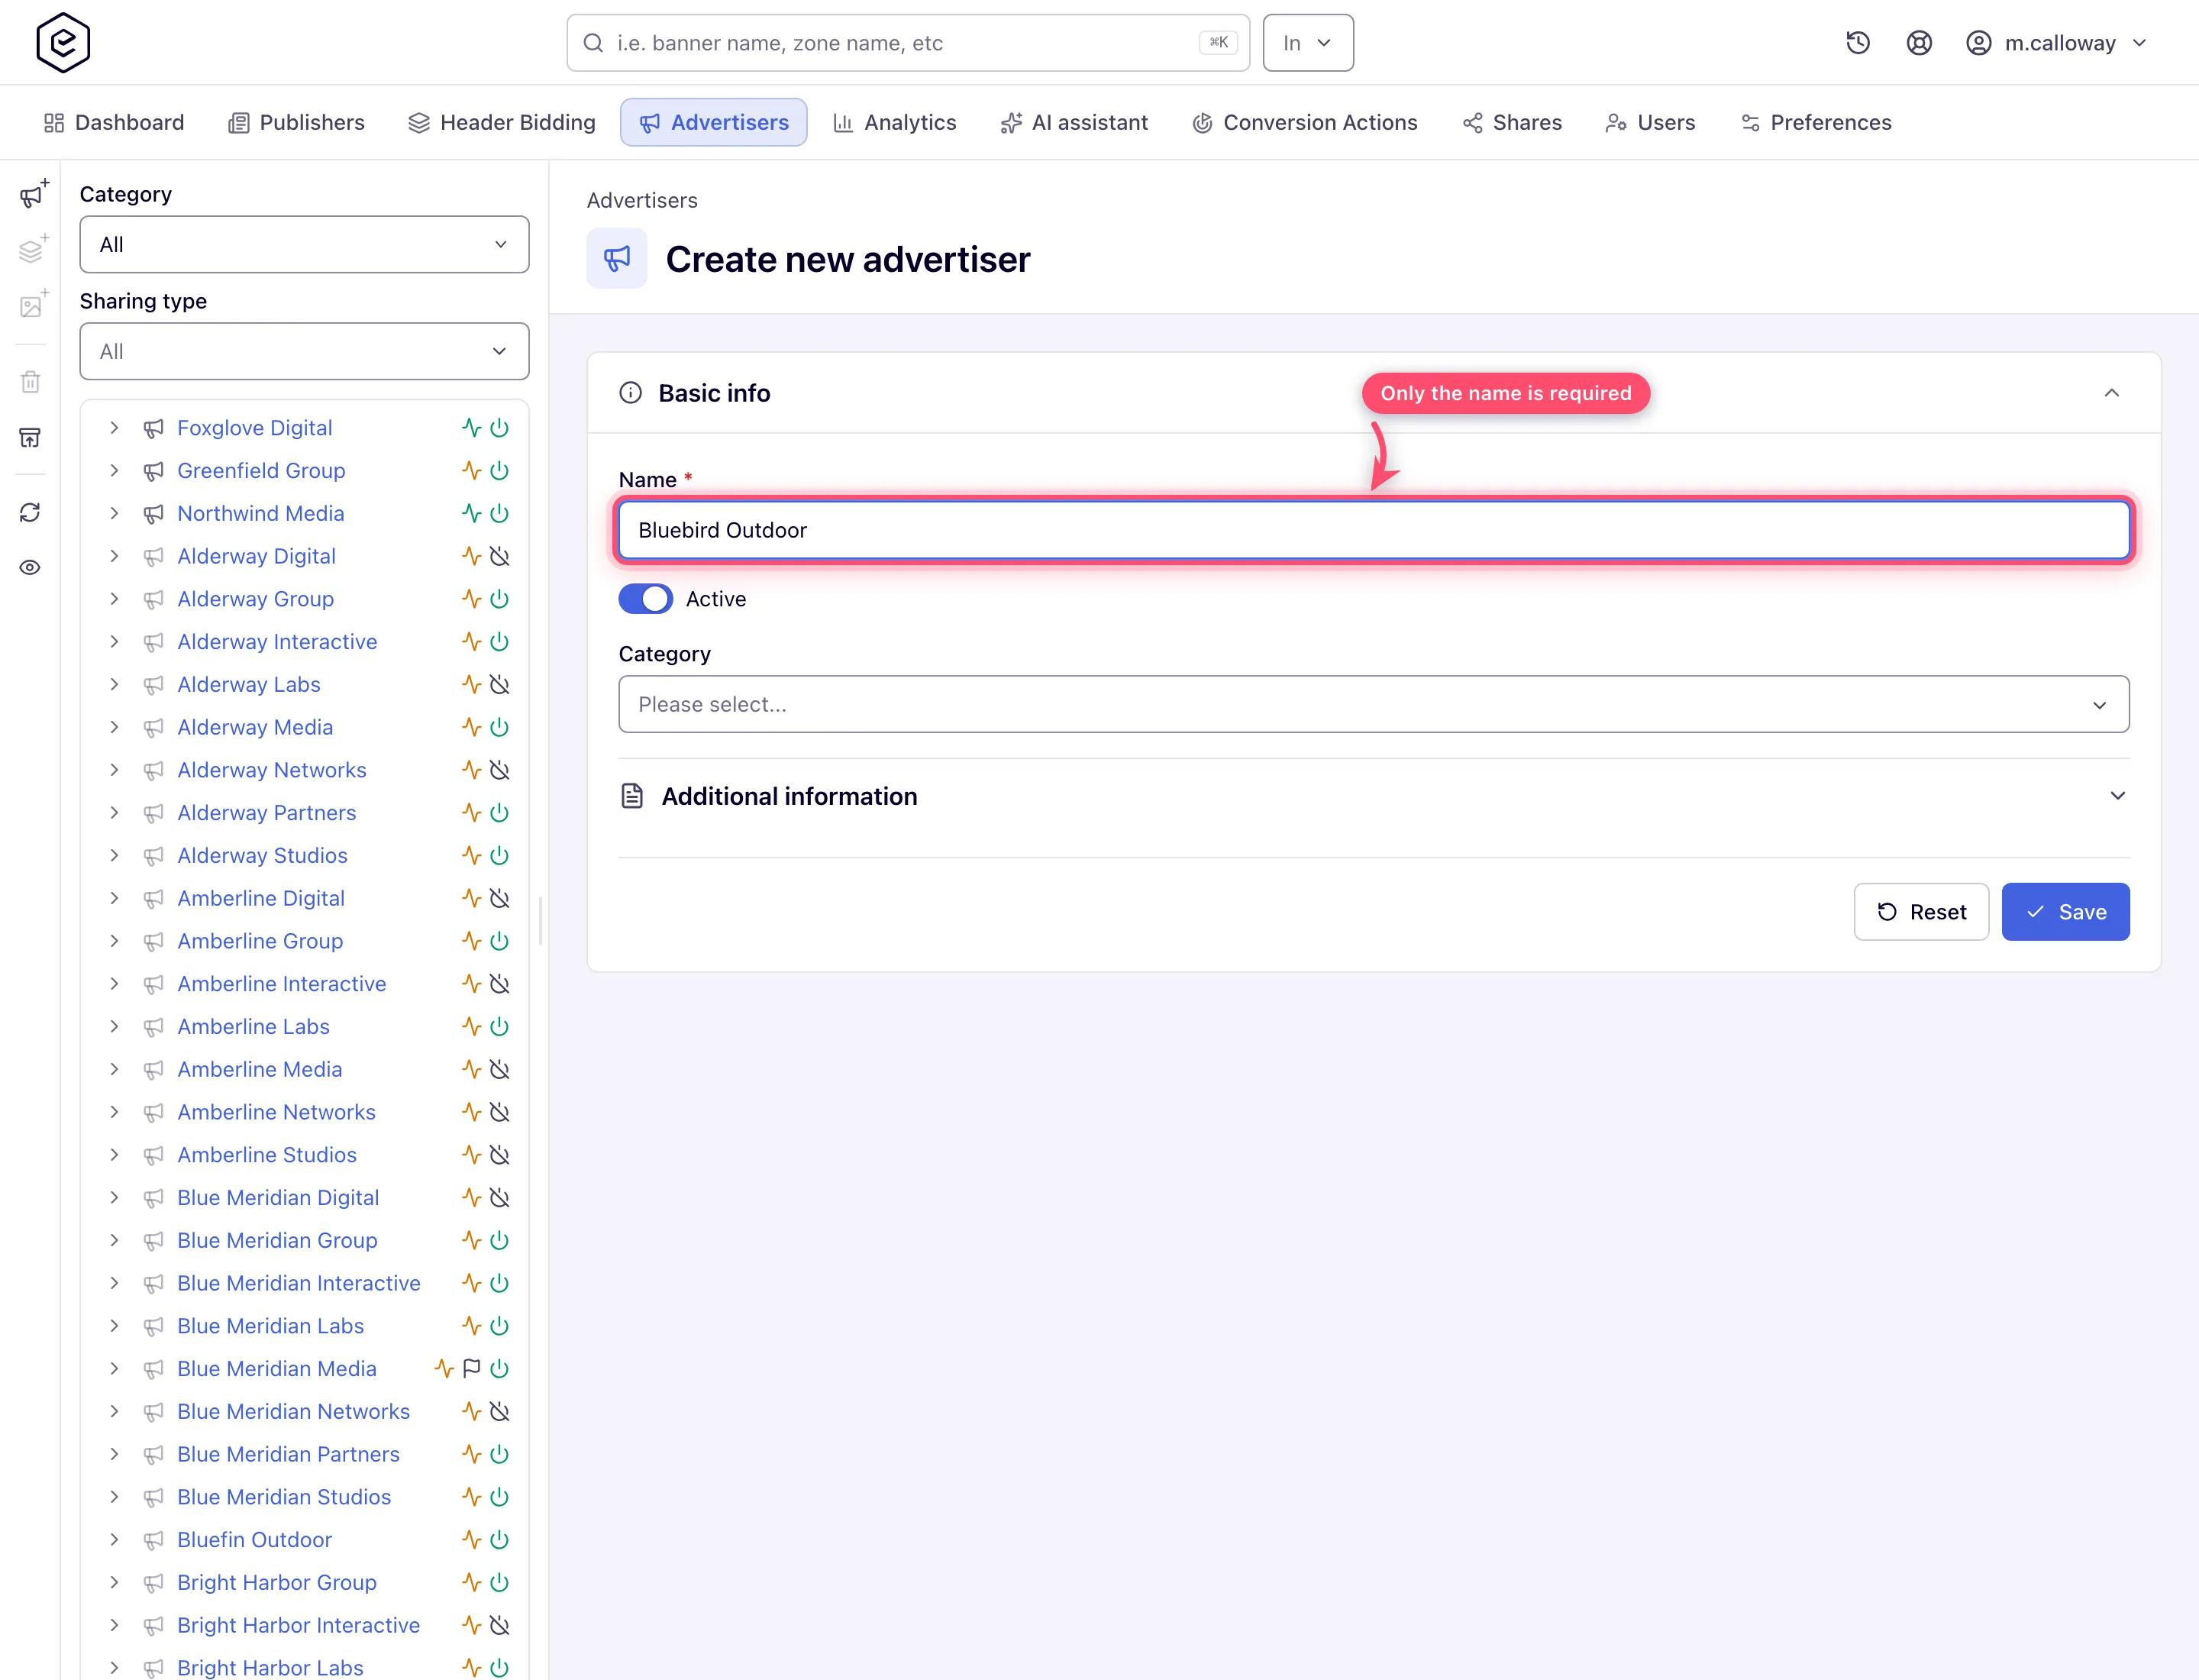
- Click Save. Success: you land on the advertiser’s full edit page — the Basic info card is now joined by Targeting, Limits, Frequency capping, Sharing settings and the advertiser’s other cards.
- Click New campaign (on the action rail, or Add new campaign in the advertiser’s header). Fill in Name, keep the status Active, and leave Weight — and Priority, which shows only with the Manage Priority permission — at its default for now. Click Save. Success: a “Campaign saved” toast, and you land on the campaign edit page.
- With the campaign selected, click Add new banner for… on the action rail (or Add new banner in the campaign’s header). The menu holds one Add banner for … entry per placement type you may create banners for. Pick Add banner for Site Placement (standard display).
- On the new-banner form fill in Name and pick the Banner type. For the simplest first
run use Local File and upload your image under Banner creative (Upload file; From
link takes a URL instead). Set Ad unit to match your creative (pick the matching ad unit,
e.g. 300×250, or choose a custom unit and enter Width and Height), and enter the
destination URL the click should open.
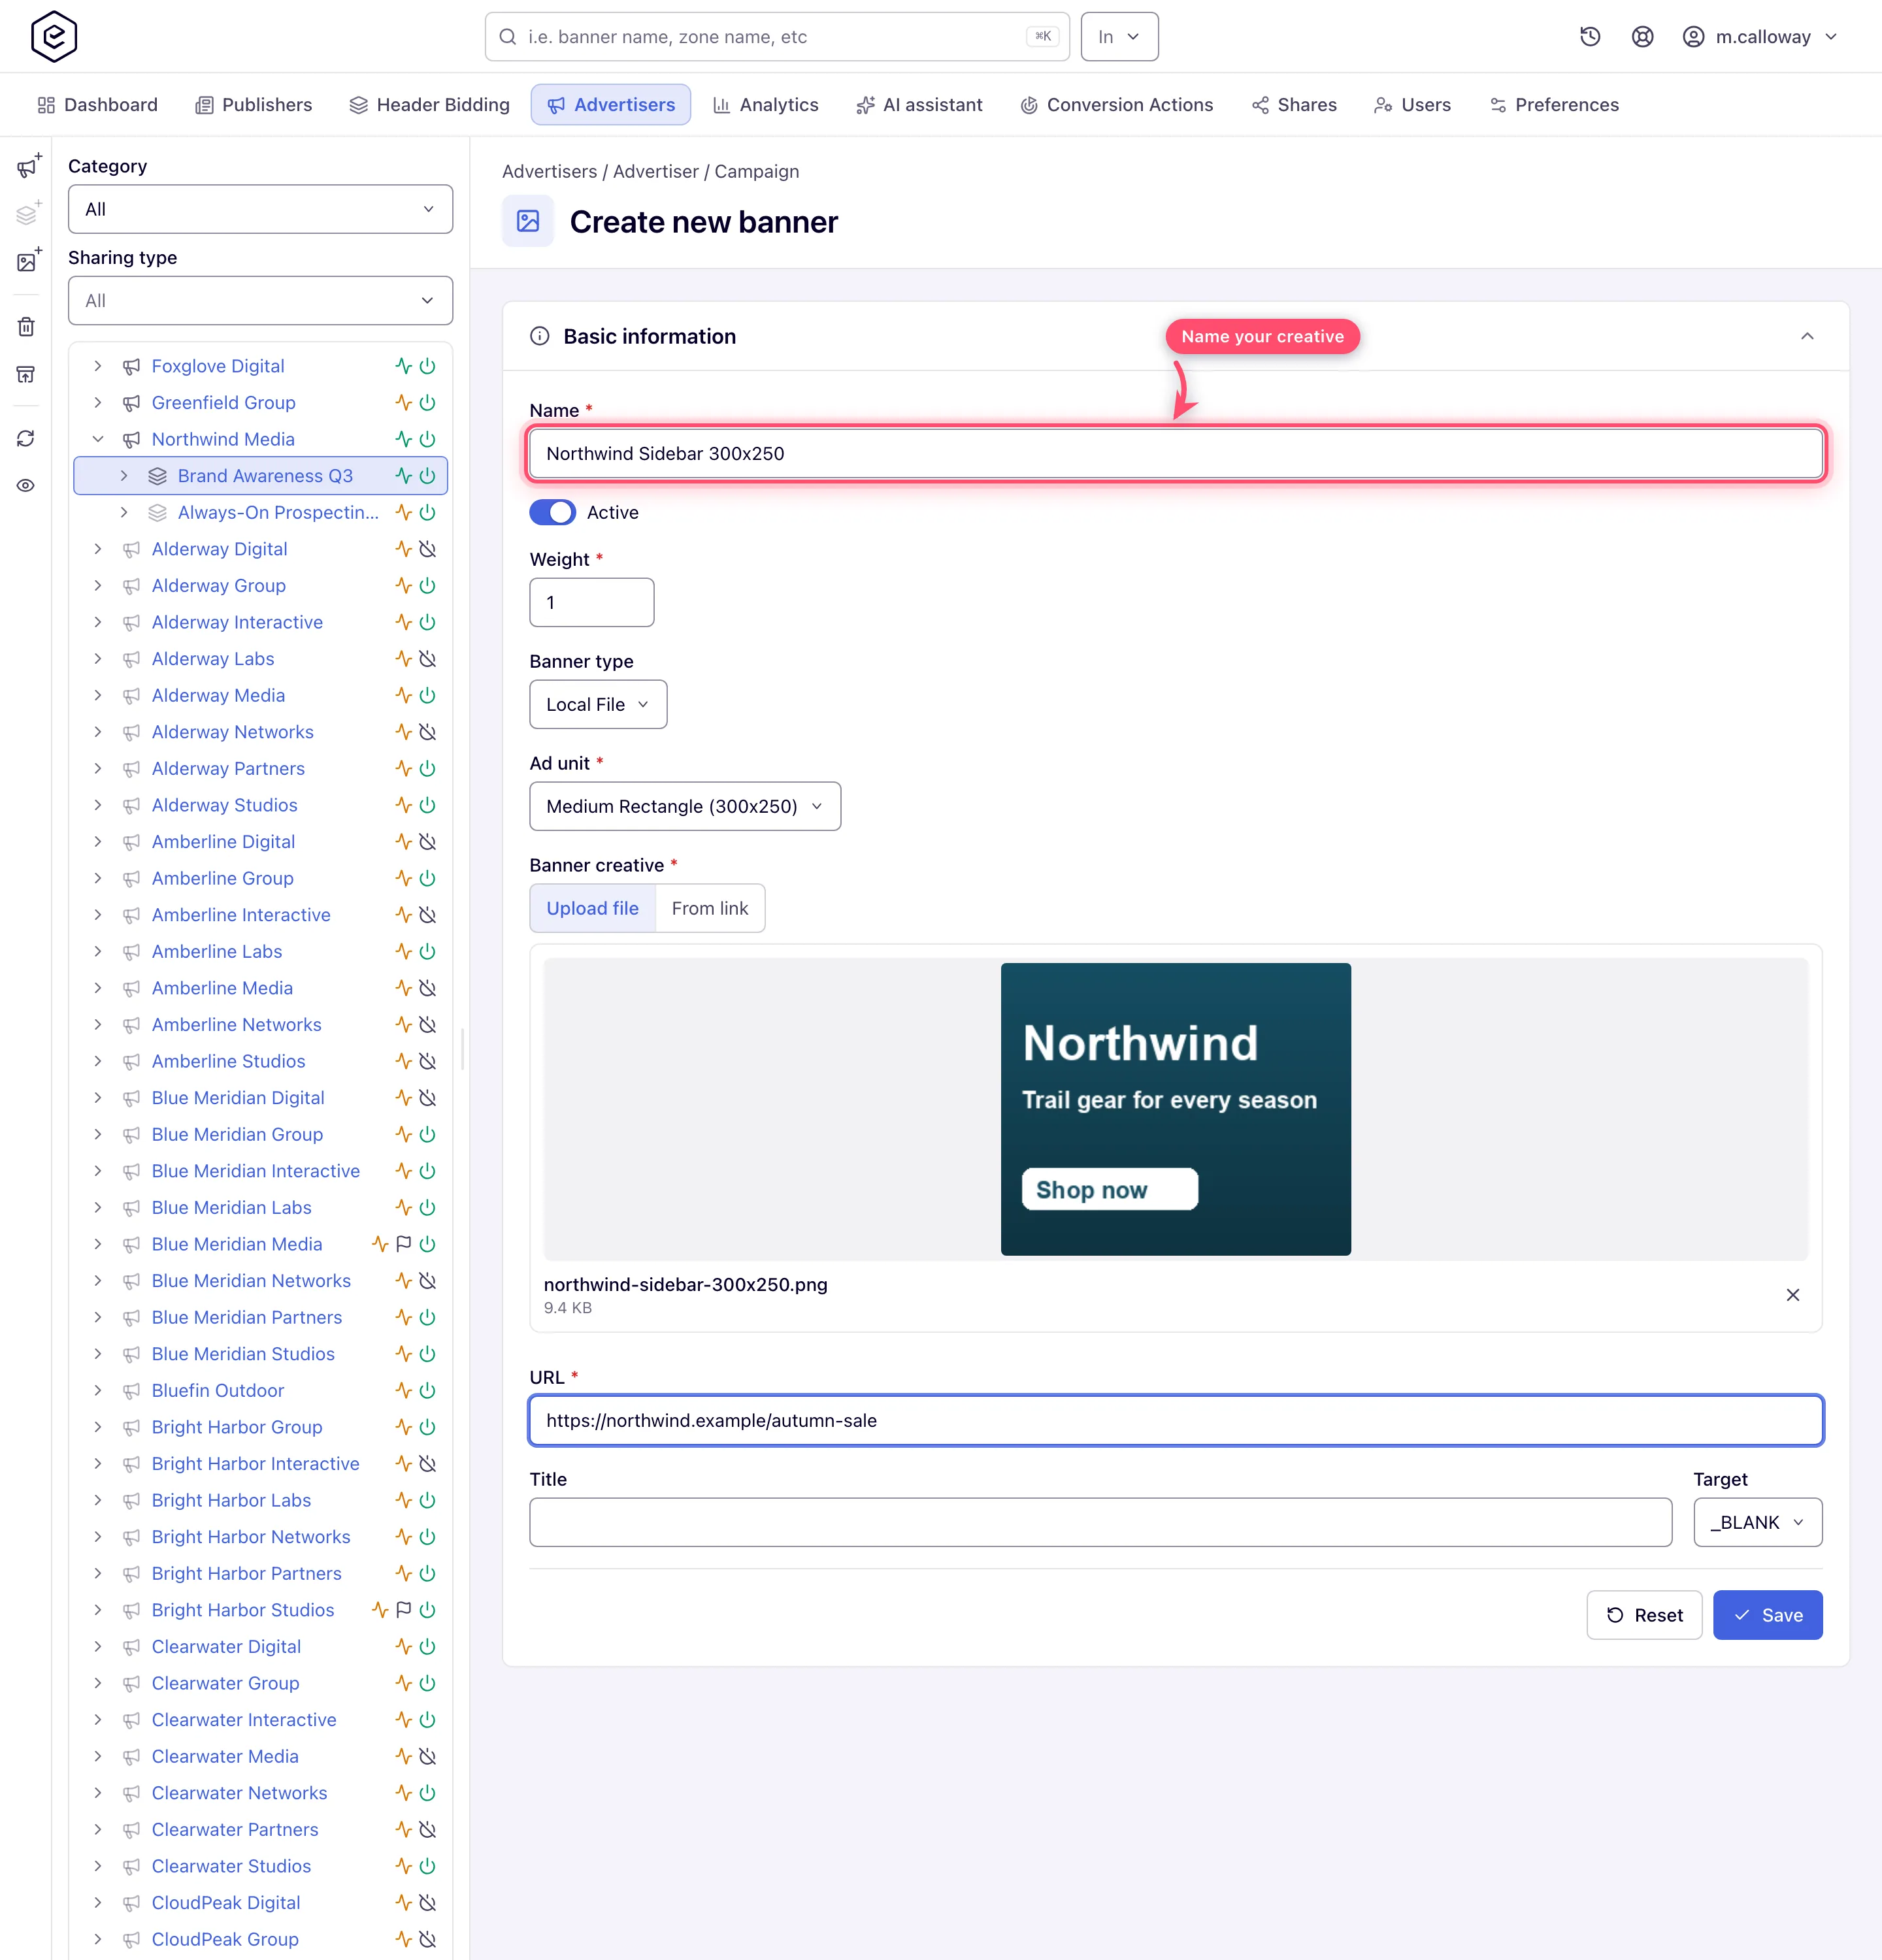
- Click Save. Success: a “Banner saved” toast, and you land on the new banner’s edit page. The creation save never asks you to link anything; you link manually in Stage 3.
Stage 2 — create the supply side (site → zone → placement)
- Go to Account → Publishers and click New site. Fill in Name, optionally pick a Category (required only where your network demands it), keep Inventory type = Website, and enter the Site URL. Click Save. Success: a “Site saved” toast and the site’s edit page.
- With the site selected, click New zone. A zone is just a named group of placements — give it a name like “Homepage” and save.
- With the zone selected, click Add new placement… — a menu of the placement types you may create opens. Pick Site Placement to match the banner.
- On the Create new placement page fill in Name and set Size to the same size as your banner’s ad unit (e.g. the 300×250 ad unit). Click Save. Success: you land on the placement edit page, which shows the placement’s cards — Ad tags & API among them for a role that holds a tag permission.
Stage 3 — link the banner to the placement
- Open your banner (Advertisers → advertiser → campaign → banner) and find the Linked placements card. In tree mode (the default) it is a tree of sites, zones and placements: expand the site and zone, tick the placement you just created and click Save — a “Banner placements saved” toast confirms it. In grid mode the card has Site, Zone and Placement pickers instead: choose them in turn and click Link; the placement row appears in the card’s grid.
- Verify the match from both ends: the banner’s Matched placements card now lists the placement, and the placement’s Matched banners card lists the banner. If either list is empty, the pair is not actually servable — see the corner cases below. (The banner-side card needs Matched inventory and the placement-side card Matched advertisers; no stock role holds either.)
Stage 4 — copy the ad tag and see the ad
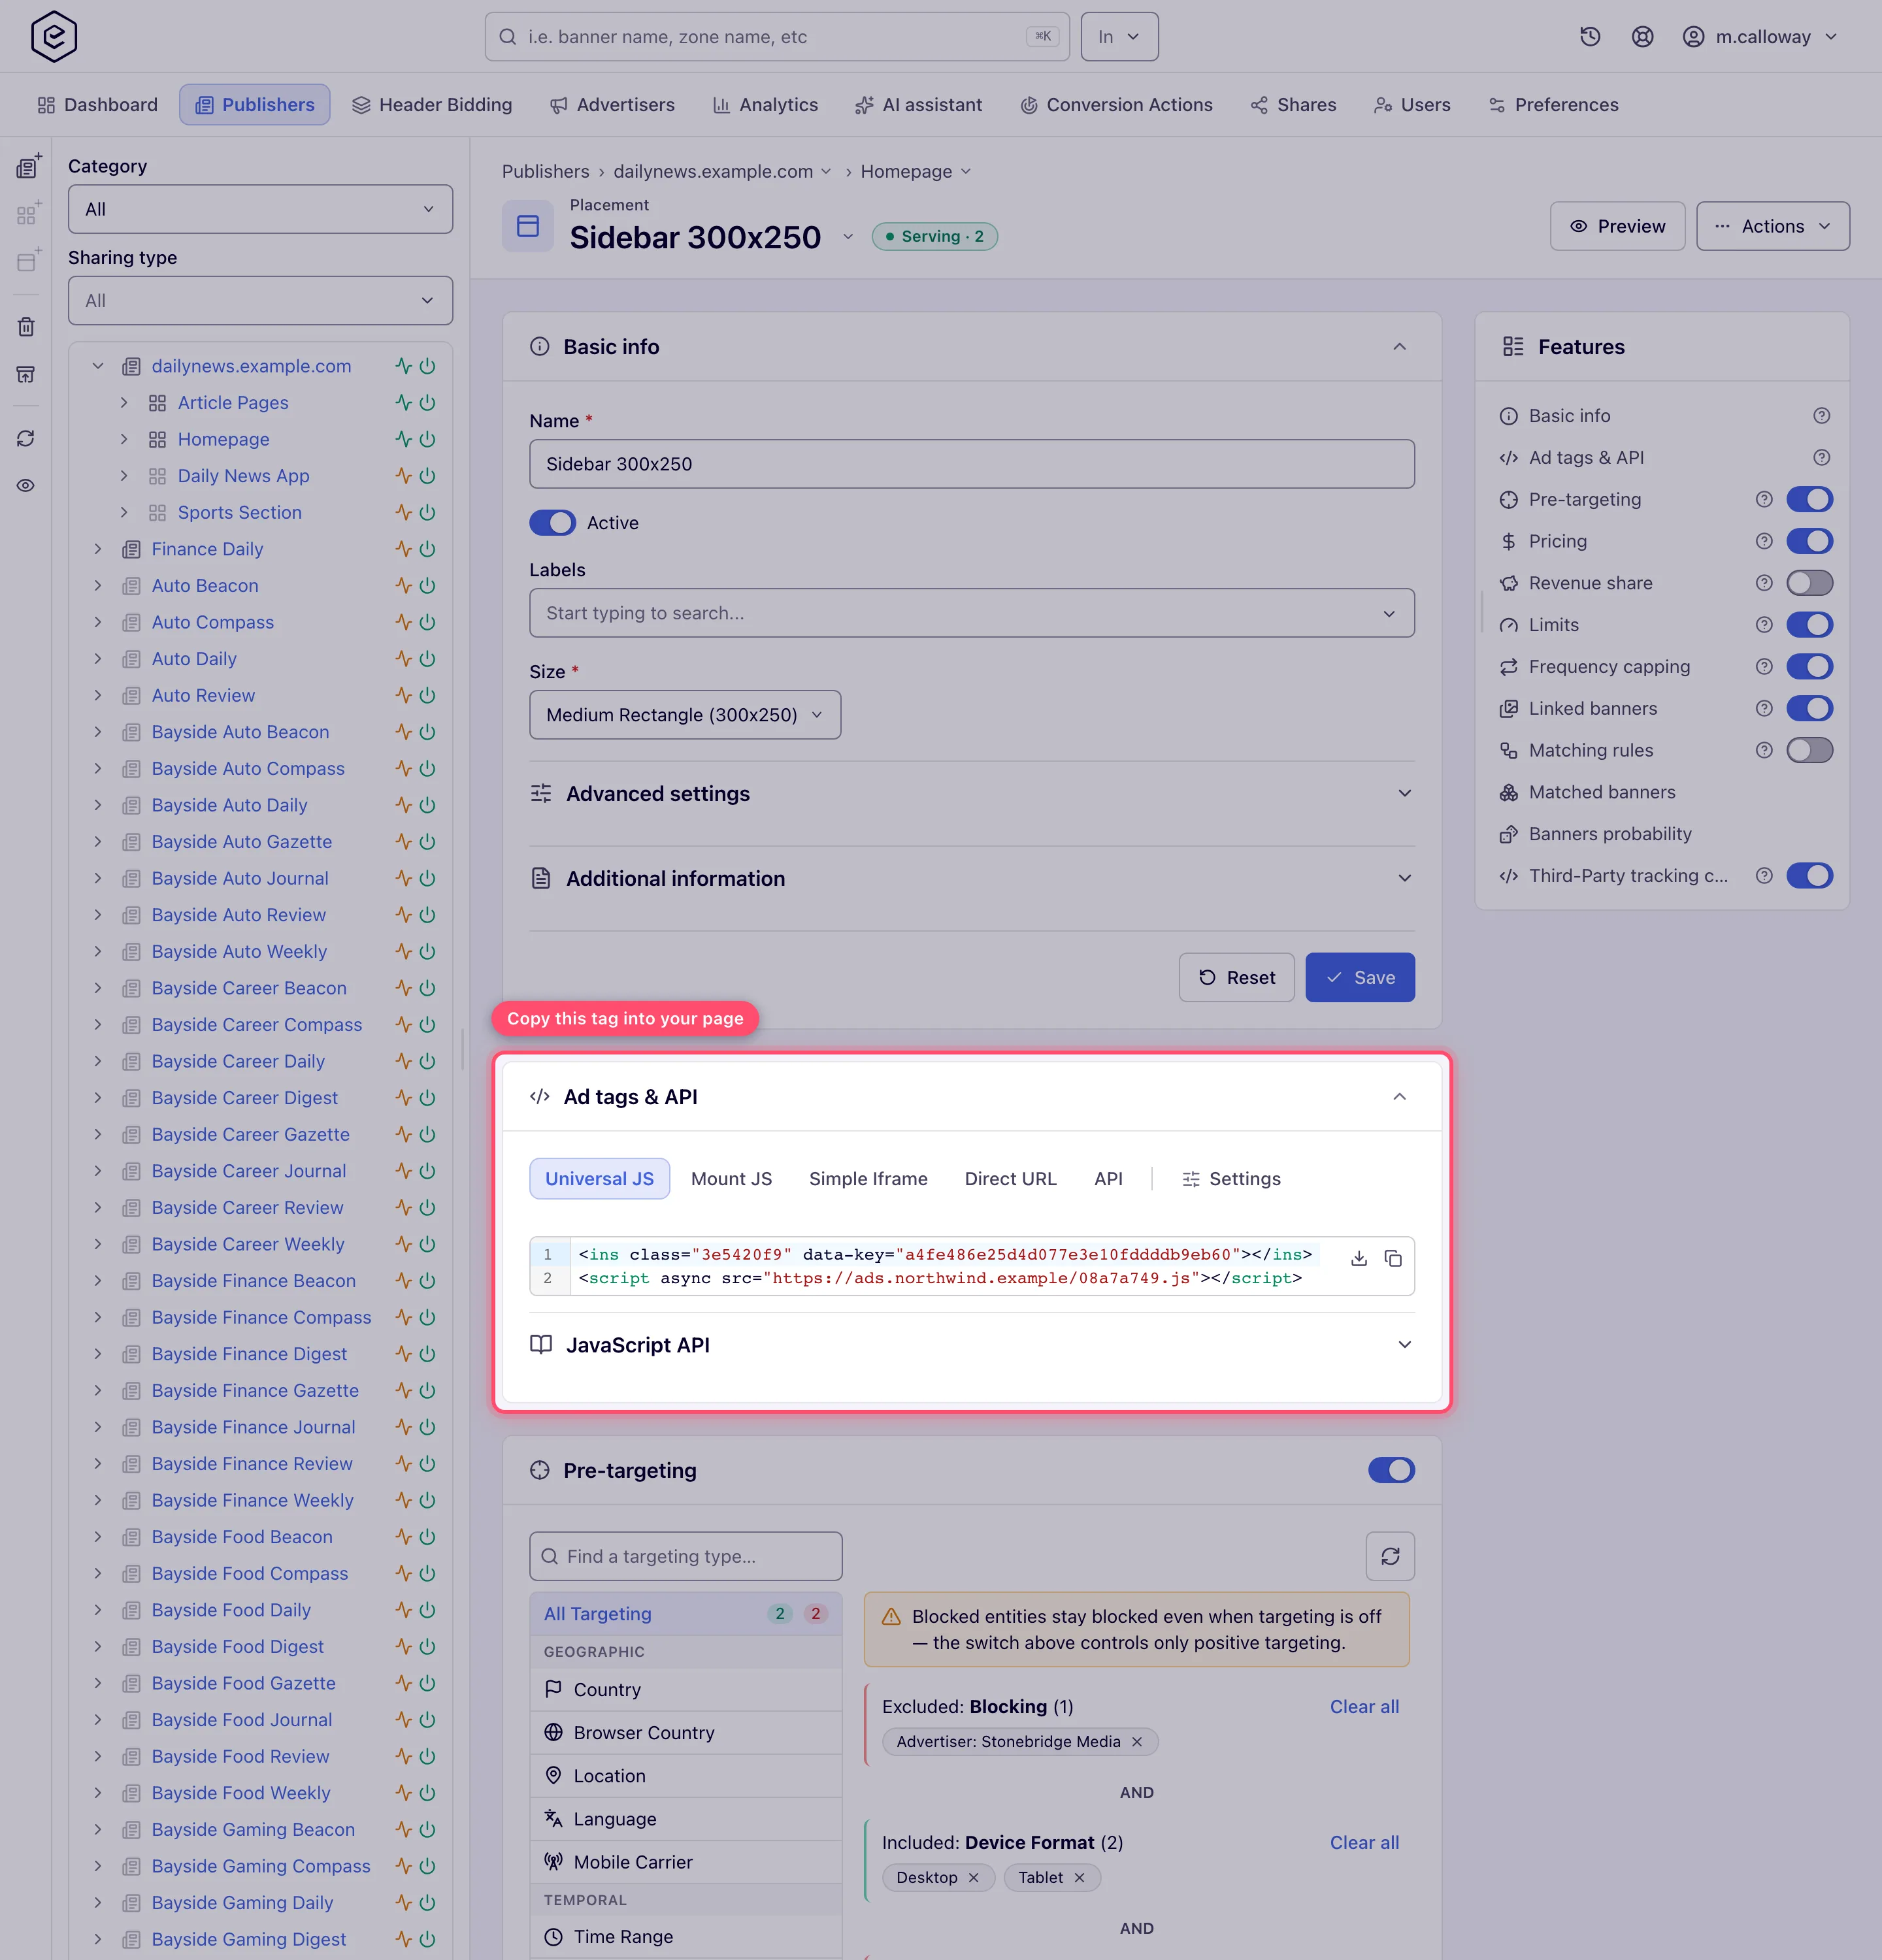
- Open the placement and expand the Ad tags & API card (it is on a saved, Active
placement and disappears while the status switch is off). It opens on the placement’s
default code type — Universal JS for a site placement, where your role holds it. The
other tabs are the remaining code types your role may use for this placement type (Mount
JS, Simple Iframe, Direct URL, API) plus Settings. Where Domain, Ad wrapper, Protocol
and Fit container controls are offered above the code, adjust them if you serve from a
custom domain or an HTTPS-only page, then copy the code block.
Note: a Copy ad tag quick action copies a placement’s tag without opening the edit page. The Grids view has it on every taggable placement row; the Publishers tree shows it only on placements with recent traffic, so a placement you have just created has none there. It copies the first tag type your role may use in a fixed order — Simple Iframe and Direct URL come before Universal JS — so copy from the card when you need a particular one.
- Check the ad before touching a real page: use the Preview action on the placement. It opens the standalone preview page, which renders the ad in an ad container on the page and lets you tweak layout (container size, top and left offsets, page mockup) live, and request parameters (invocation code type, IP, channel, custom parameters) with Apply, which refetches the ad. Success: your test image renders.
- Paste the tag into a plain HTML file, open it in a browser, and confirm the image renders there too. Reload a few times to generate a handful of impressions, and click the ad once to record a click.
Stage 5 — check analytics
- Go to Account → Analytics. In the filter form set Date range to Today, set
Group by to Placement (or Banner), and click Run report. A report tab opens.
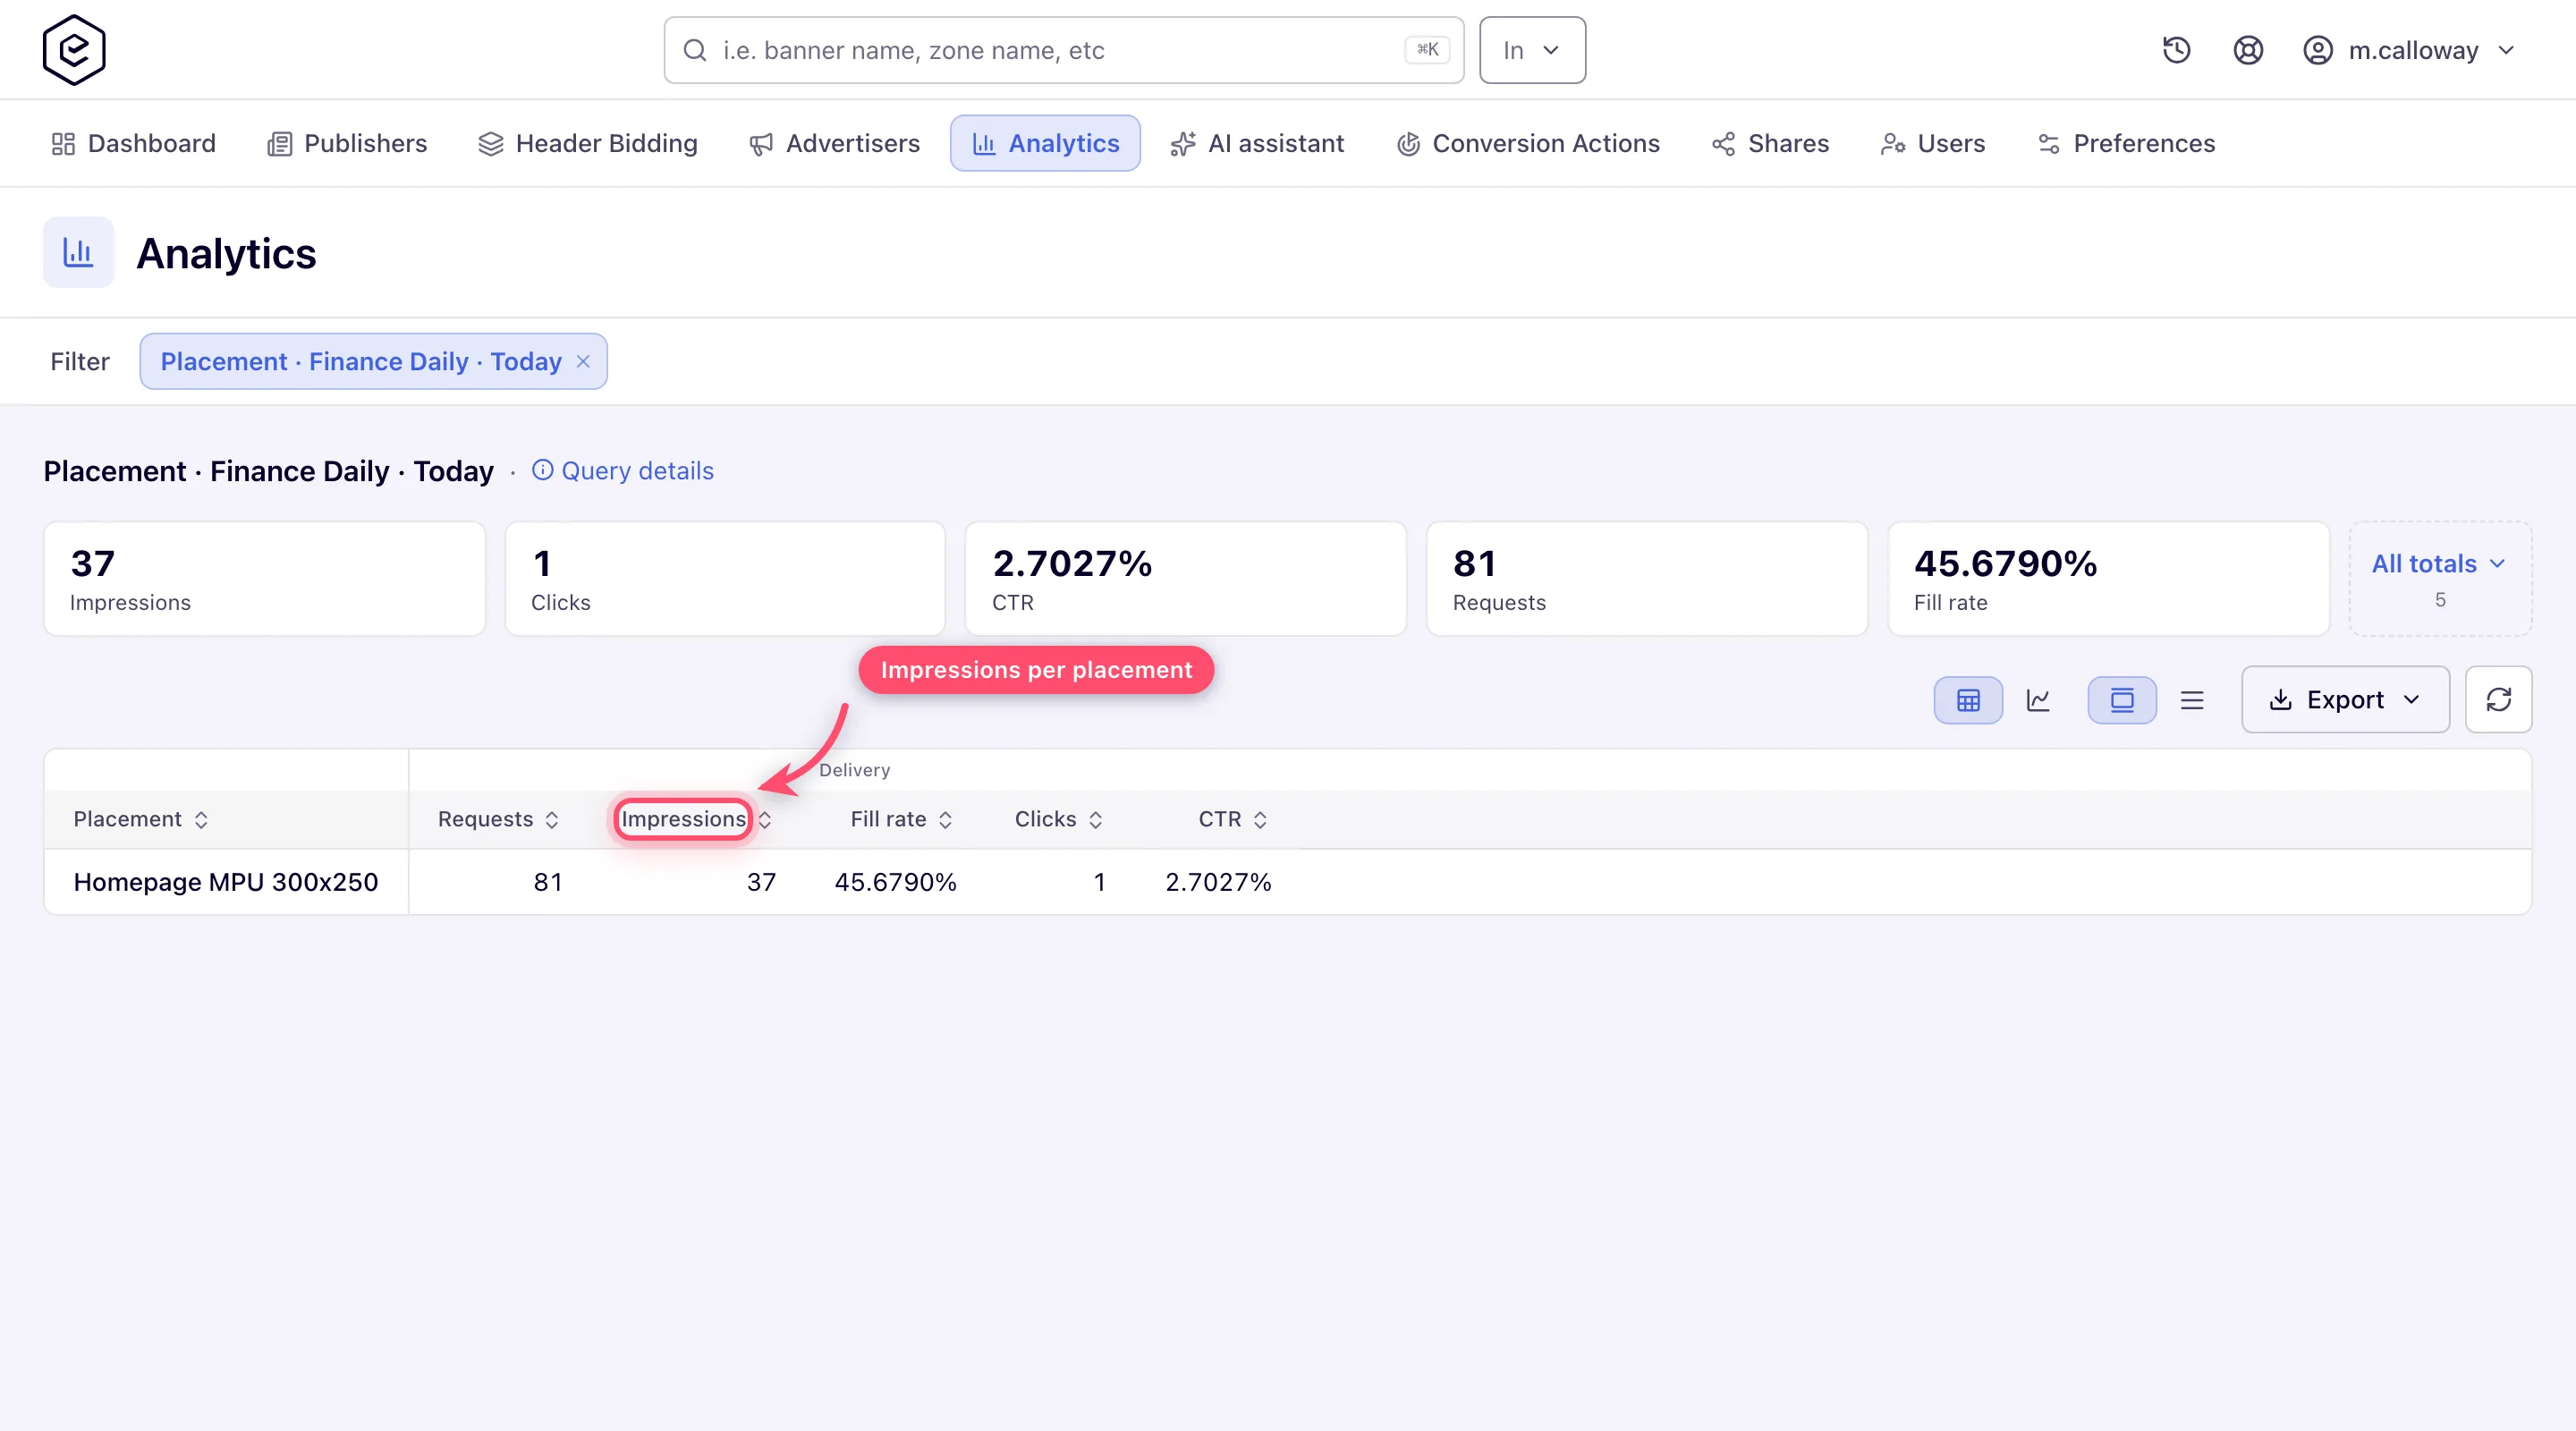
- Success: your placement appears with a non-zero Impressions count and your test click. Statistics arrive by the hour: an impression shows up shortly after its hour ends (one at 10:02 appears at about 11:01), so if the rows are still zero, re-run the report after the next full hour.
Options and fields
Only the fields the tutorial touches; full tables live in the linked references.
| Field | Where | What it does |
|---|---|---|
| Name | every entity | Display name; the only universally required field. |
| Status (Active/Inactive) | every entity | An inactive entity — at any level of the chain — stops serving for everything below it. |
| Priority / Weight | campaign (Weight also banner) | Delivery tiering and traffic split between competing ads. Priority shows only with Manage Priority. Defaults are fine for the first run. |
| Ad unit | banner | The creative’s dimensions: a standard ad unit, or a custom one with Width and Height. Required for Local File banners. |
| Size | placement | The slot’s dimensions. A banner’s ad unit and a site placement’s size must be compatible for linking and serving. |
| Category | site | Content classification; also feeds category-based rules later. |
| Domain / Ad wrapper / Protocol / Fit container | Ad tags & API card | Shape the generated JavaScript tag: custom serving domain (needs the ad-serving-domain permission), wrapper, HTTPS, responsive container (mobile and non-standard placements). |
See Banner types, Placement types and Invocation codes for the exhaustive versions.
Corner cases and gotchas
Corner case: an unlinked banner serves nothing. Creating a banner and a matching placement is not enough — the link is an explicit step (Stage 3). If the placement shows an empty Matched banners list, no ad can come out of it, and the page shows the passback code or nothing at all.
Corner case: size mismatch blocks linking. The link is refused for a “not suitable” placement — most commonly the banner size does not match the placement’s ad-unit size. Fix the size on either side and link again.
Corner case: a Confirm dialog that offers to link the banner to all matching placements appears only when you save an existing banner and the server finds matching placements, never when the banner is first created. If you answer Do not link, the banner stays unlinked and there is no reminder later — you have to link it from the Linked placements card.
Corner case: saving an existing placement unlinks banners that no longer fit it — after a size change, for example — and says only “Done”. Re-check the link list after editing a placement that is already in service.
Corner case: country targeting with no resolvable country. If you add country targeting to any level and the visitor’s country cannot be determined (common on localhost or private test networks), country-targeted ads are skipped and the placement looks broken. Keep targeting empty for the first run — empty targeting means “serve to everyone”.
Corner case: moderation does not gate delivery by itself. Ad serving reads no approval state: a banner or site that sits in Pending banners / Pending sites still serves unless the Active switch is off. The exception is a role carrying Banners Moderation With Deactivation — its new or edited creatives are switched off until a reviewer approves them, and that silence looks exactly like a configuration fault. See Moderation and quality.
Note: no report shows the hour in progress. A tag that just fired appears shortly after its hour ends — up to about an hour later — so don’t debug a “missing” impression younger than that. See Freshness.
Per-role notes
- Network manager: the Matched placements, Matched banners and Universal JS steps each need a permission of their own; ask your network administrator if one is missing.
- Publisher and advertiser colleagues: they run their own half and cannot create links, so Stage 3 stays with you. See the publisher and advertiser playbooks.
- Can view share: enough to follow Stage 5, not to build Stages 1–4.
- Demo account: build the chain on entities you create; the examples are read-only.